Absolutely zero progress on since the last update.
I worked on various minor maintenance tasks and little unimportant personal projects after work much of the week while waiting for the concrete from the first spigot project to cure so I can assess results before doing the remaining two. It was windy many afternoons so I didn’t really want to be shoveling dirt to fill the trench and getting it blown in my face.
Bear started showing signs of not feeling well, vomiting once, then diarrhea for a couple of days. I realized late Thursday to early Friday that he had gone from having diarrhea to being constipated and that if we didn’t get his bowels working again, he would be in distress so I gave him a couple of enemas much to his displeasure. He did clear a number of sizable objects that appeared to be undigested beans. Not entirely sure where he got those from. Maybe they were edamame beans that escaped me one evening a few nights before when I was eating them but I don’t remember dropping that many… I walked him around quite a bit outside as well to try to help things move along.
Hoping that would do the trick for Bear, I moved onto relocating my hobby/project work space in the 5th wheel to the travel trailer. The space in the 5th wheel had become a convenient dumping ground for things to take care of later (which never comes of course) and I far more inclined to sit and watch the mind numbing box with Cheryl and Rachel then sit at the table with my earbuds in and work on various computer and electronics projects as I had planned. After I got things setup in the travel trailer, I worked through around 4 tutorials in the Sparkfun arduino inventor’s kit that I bought well before ever leaving Michigan.
Saturday morning it was clear that Bear’s condition was continuing to deteriorate. He was no longer eating, drinking, peeing, or pooping. 3-4 more enemas with minimal clearing of fecal matter. Clearly dehydration was now in progress. There was a traveling vet scheduled to be in town for a vet clinic so I took Bear in for review. The vet sat down and talked with me taking a quick cursory look (no exam) and advise I take him to someone to get him on an IV to re-hydrate him thinking that while I may have cleared the intestinal blockages, it was too late and he needed re-hydration to come around.
As I had to work Saturday evening I knew I would not be able to take him so I rousted Cheryl and Rachel and told them to get ready for a road trip while I called around to see where we could take him. Given the it was going on 2 PM on a Saturday afternoon, our options were really limited. We ended up settling to take him to an Animal hospital in Tuscon, three hours away. Knowing it was going to be an overnight trip, Cheryl and Rachel through together an overnight back and took off with Bear.
At that point, it was only a couple hours before I had to work so I just puttered around looking for some electronics project components I had failed to locate in the clutter and cleaned a bit.
Work went fine. Finished around 7 PM local. To late to work outside, so I started a little research project that I had been wanting to do. I ended up working on that until 2 AM local (4 AM eastern).
In the mean time, Cheryl and Rachel had arrived at the animal hospital in Tuscon and Bear was being assessed. I’ve always said: I would not spend that much on a pet when I hear about people paying huge vet bills. Put it down and get another. Guess I’m a liar. After spending $$ on a test for parvo and then imaging of his belly, it was determined that he was mildly dehydrated and that he still had obstructions that needed to be cleared. Recommendation: Overnight stay with IV’s and enema’s and other measures necessary to clear the obstruction. While the price for the treatment was high, it wasn’t going to break the bank. Yes, we could put him down and get 2-3 more dogs of the same breed for what we paid for him compared to what we were going to now pay to keep him alive. He’s part of our family now with many years of life still to live. It sucks parting with that money. It would suck more parting with Bear. Decision made. Treat him as suggested.
Sunday having stayed up so late, Bear’s well being on my mind, the research project I started the night before still on my mind, all combined with the cool temperatures and wind outside sapped any motivation I had to work on projects outside. While I could have worked on electronics projects inside, I opted to pound on the keyboard all day writing for the blog and working on my personal laptop.
Speaking of my personal laptop, I think it may have been compromised. I’m scanning it now for malware as I type this.
As far as updates from the hospital on Bear, the update as of this morning was that he is starting to eat, drink and poop. They wanted to monitor his recovery a while longer. I’m translating that to mean that he has passed or is in the process of passing what ever had him backed up and is on the road to recovery. At this moment, it is visiting hours are Cheryl and Rachel will be going to check in on him soon as they have not been able to get another update since this morning.
That pretty much brings you up to date.
As far as all the writing I’ve said I’ve been doing all evening and day clearly that hasn’t been reflected here, I’ve decided to start two new sections/threads in this blog site. One for food and health (I see those eyes rolling out there 🙂 ) and one for technology projects. I’ll prefix the technology projects blog entries with “Tech:”. I’ll prefix the food and health blog entries with “Food and Health:”. The blog entries for the construction projects and general babbling will continue on as they have been with the general project phases being the prefix in the title. This way, if you are subscribed and getting emails, you will know which subject matter the blog entry is pertaining to and you can decide to read it or not accordingly. I’ll also add the new sections to the table of contents so you can browse to them if you wish to for those readers who aren’t subscribed and instead periodically check the site for updates.
Now that I have internet, land based phone services, fully functional solar power, and pressurized water from a 5k gallon storage tank, I think it is safe to retire the “Setting up Infrastructure” chapter of the blog and move on. The only component of my long term infrastructure still missing as I see it is the rain collection and water filtration systems. Given I can have water delivered for a nominal price and can fill drinking water jugs at friends, the rain collection and water filtration systems are simply going to have to wait a while.
I’ve recently contemplated all projects I have envisioned and how to prioritize them. Sadly none of them have anything to do with starting the construction on the house yet. As we are entering winter and it does get below freezing at night here a few times a week, priority one is to protect all the water lines I just put in from freezing. That project category in and of itself has multiple projects.
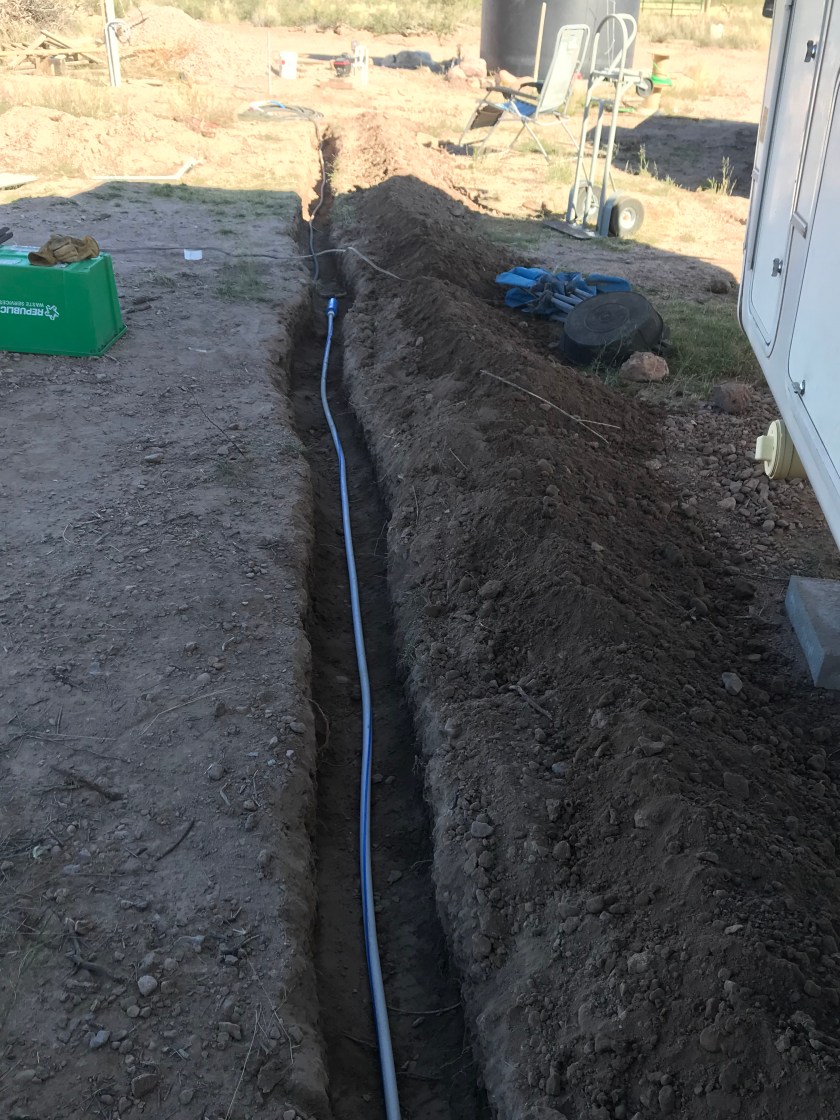
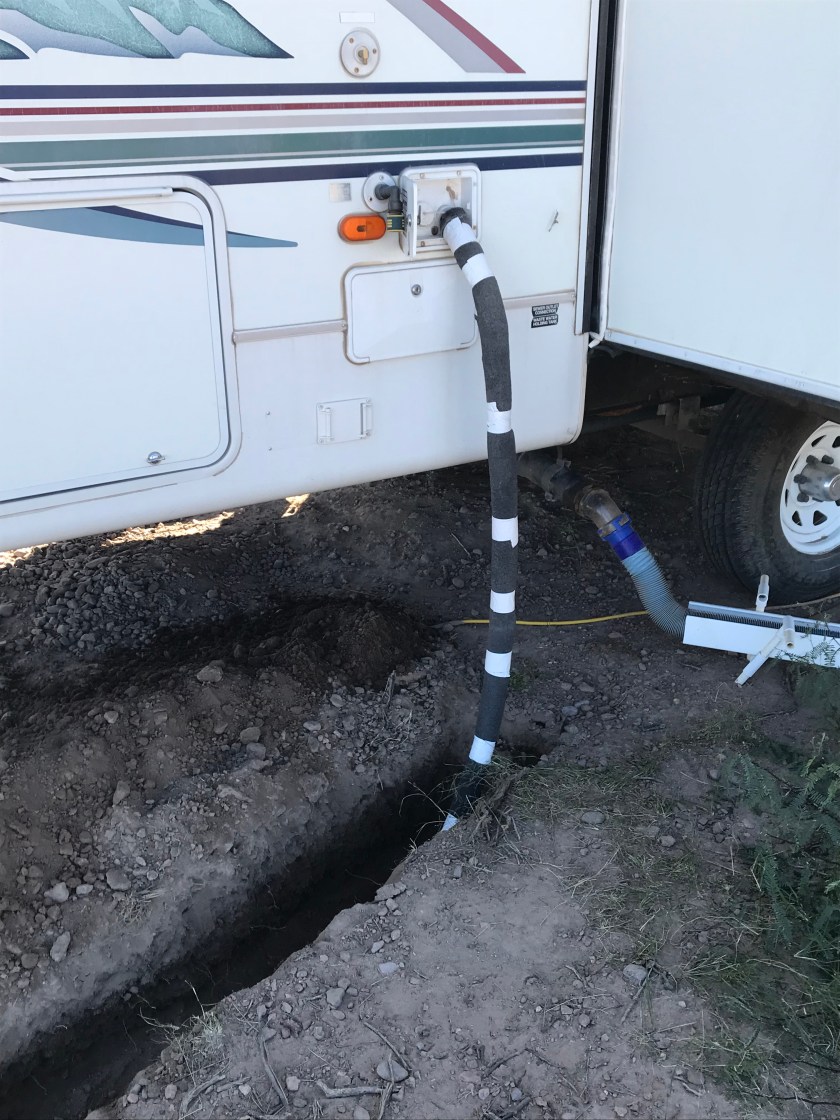
Protecting from the cold project 1: Protect the water hose to the 5th wheel.
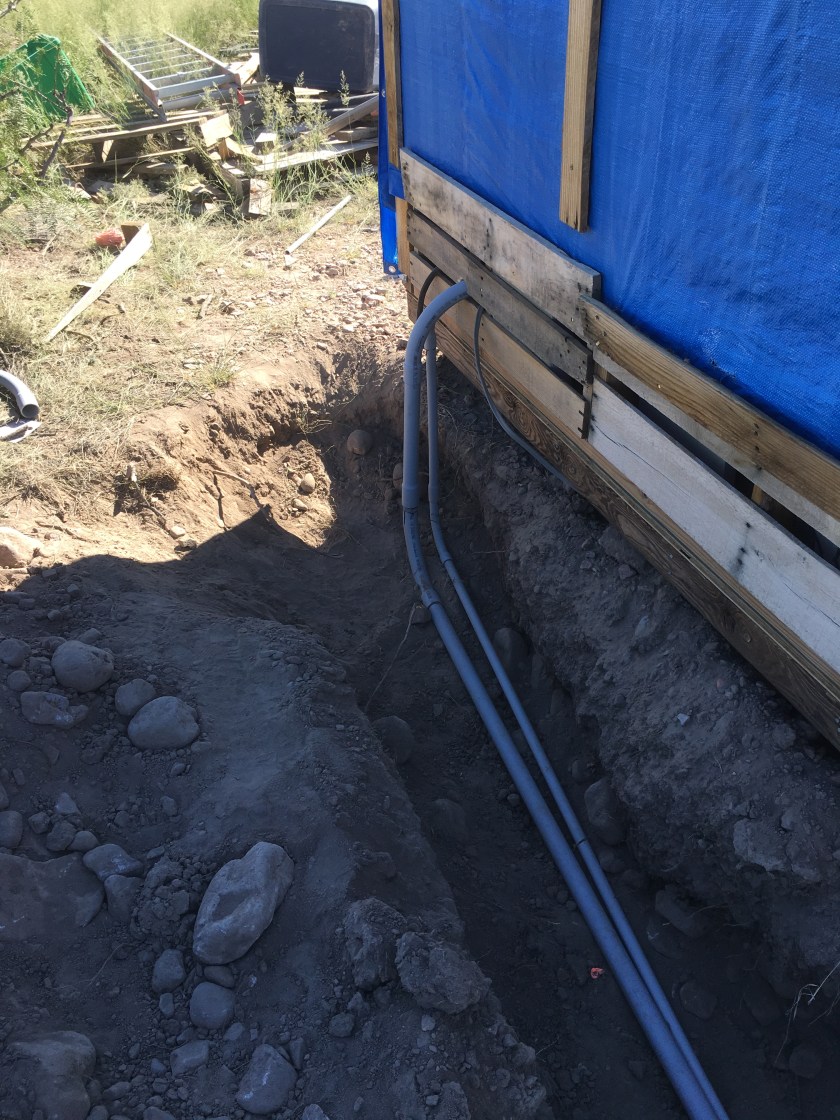
Bury the hose from the spigot to the 5th wheel and insulate the hose that runs from the ground to the 5th wheels water inlet.
Protecting from the cold project 2: Protect the water pump and associated plumbing
Although the water pump and associated plumbing sits at a location that will be within the future utility building, there is the immediate need to put some temporary protections around it to prevent it from freezing and yet still provide access to the pump, shutoff valves, and electrical outlet.
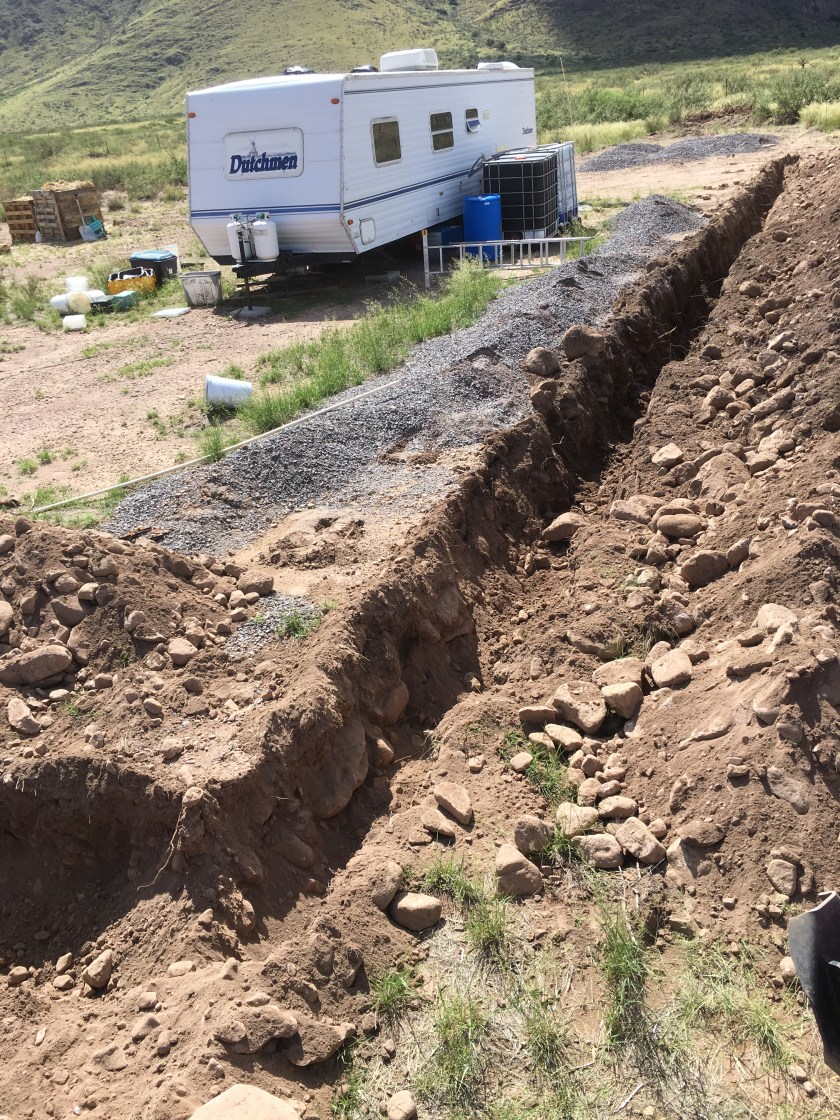
Protecting from the cold project 3: Filling the trench that was dug for the water lines back to grade level.
I could easily use the tractor to push the dirt back into the trench and be done. Since when have I done anything the easy way? My thoughts are if I need to dig in this area, I will need to do so by hand. I really have no desire to be digging out big rocks by hand. My solution then is to fill the trench in by hand separating out the large rocks. On the plus side, I get to work on two projects simultaneously as I both get to fill in the trench with dirt and small rocks while I fill the fence line with larger rocks so Sasha doesn’t crawl under the fence.
Protecting from the cold project 4: Protect the water spigots from the cold.
There are currently 2 water spigots exposed to the air over by the RV carport and 1 by the future utility building that will be for the garden area and is currently being used to supply the 5th wheel in its current (temporary) location with water. The desire is to put a few inches of heat absorbing material around the plumbing for these spigots to delay the freezing temperatures from reaching them and then subsequently freezing the water in them for a reasonable period of time. I chose to specifically use heat absorbing material rather than insulating material as the material will act as insulation and in the future I can circle back around and build something to further encase them allowing me to pump in heat during the day for the material to absorb further reducing the risk of them freezing during extended cold snaps. Given the changing climate it is anybody’s guess what the future holds.
Protecting from the cold project 5: Protect the water tank’s plumbing
As the exposed plumbing for the water tank is 2″, the risk of it freezing is less than that of the rest of the plumbing so it is last on the list. There are stories of illegals puncturing plastic tanks such as mine with a knife so they can get water from it. My plan to protect from this happening is two fold. 1. Have a readily accessible water source available so they are not inclined to damage the tank for access to water. 2. Wrap the tank in something between stucco and ferro cement. Ferro cement is essentially multiple layers of wire embedded in an inch or two of concrete. As the tank is close to 13′ tall, I don’t think I will cover the full tank initially. I think that the lower 7-8′ would be enough. I can always circle back around and finish it later after I complete more pressing priority projects.
Protecting from the cold project 6: Relocate the RV’s to their long term locations and install foamboard insulation around their base.
At this point, I see this more as a nice to have than a required project for this year. We will see what month it is when I complete the other projects to determine if this one will be tackled this year or next fall.
Once I’ve completed the cold protection projects the fire protection projects are next. I’ll dive into the fire protection projects in detail when the time comes. I’m really hoping to have most of the cold protection projects wrapped up or nearly wrapped up by the end of December.
So, where am I at on my cold protection projects? Let’s review.
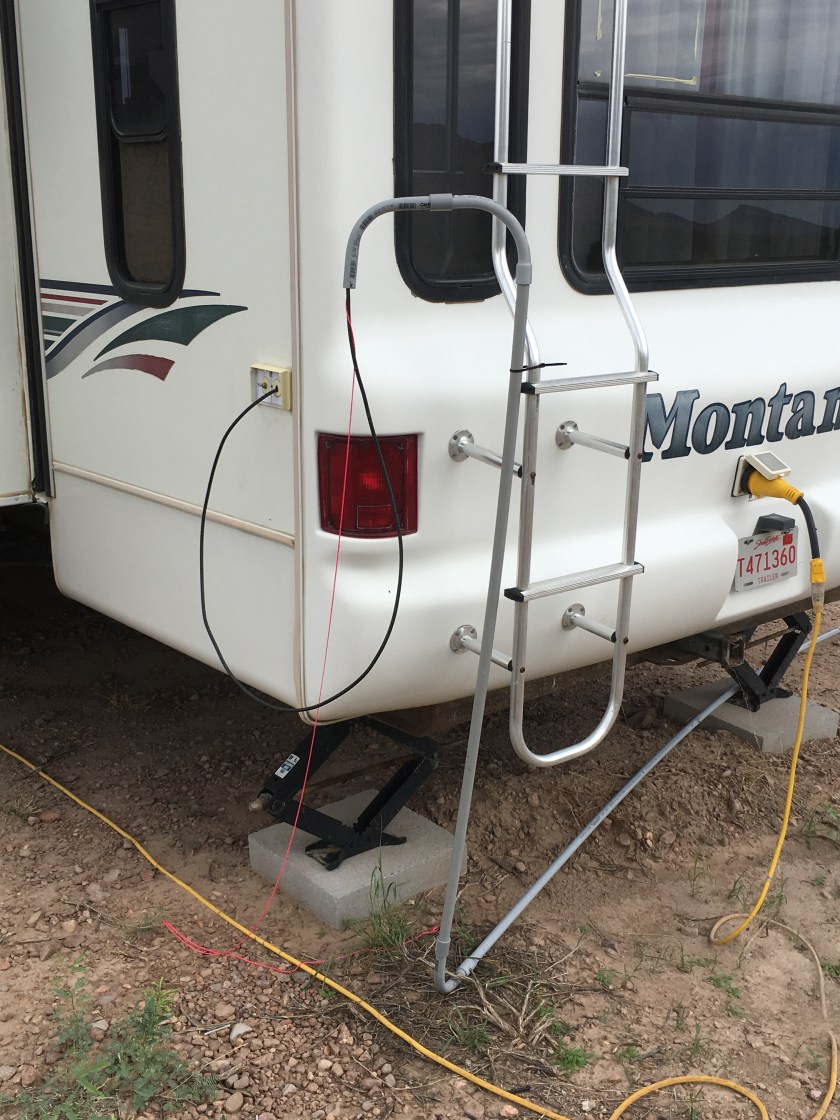
I hand dug a 1′ deep trench from the spigot to the 5th wheel to bury the hose. As I don’t know how long it will be before I move the 5th wheel, I only threw a few inches of dirt back over the hose so it will be easier to remove. If the weather forecast calls for colder weather, I can quickly fill in the rest of the trench some afternoon.Insulated water hose between trench and 5th wheel water inlet. I have additional wrap insulation I can add if the weather forecast calls for colder weather.
Cold protection project 1 complete.
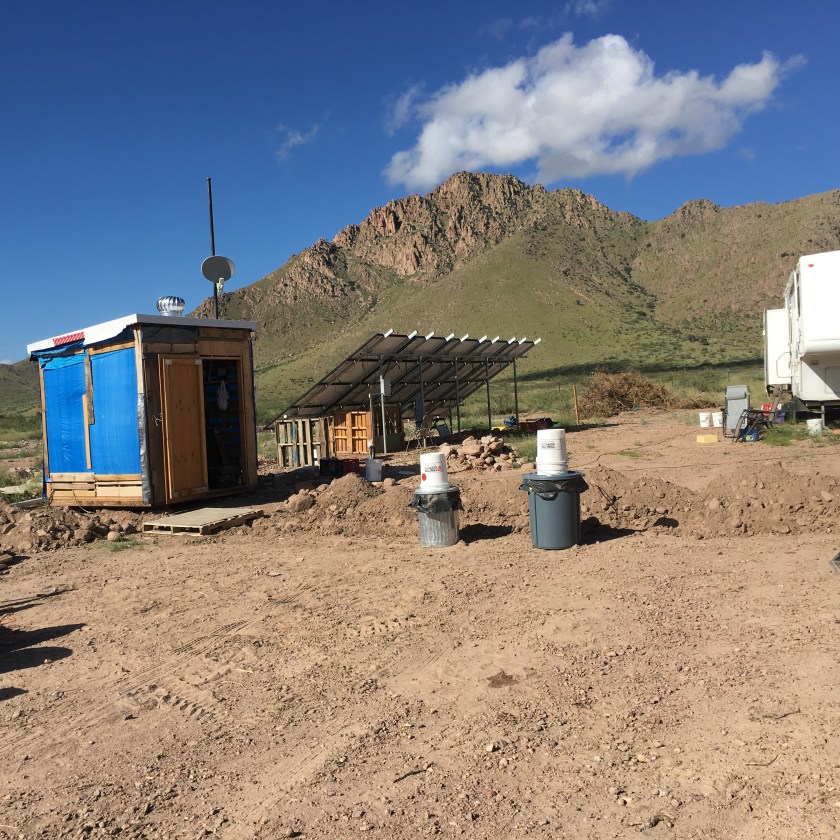
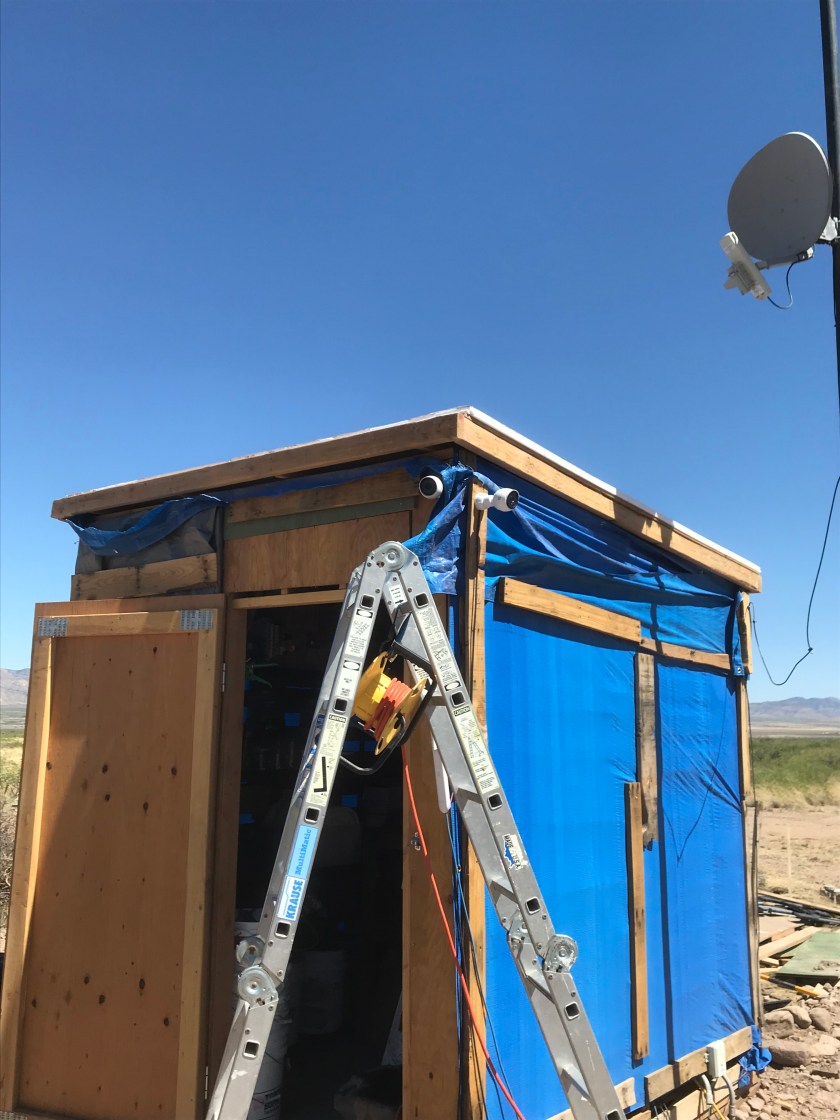
I built a wood framed box and used the 1″ foam insulation that I had previously bought to put around the shed but never got to. The top just sits on top and is held in place with the string. I can just slide the top a few inches to reach in and turn off the pump when I need to. I have plans to add temperature trending and monitoring in the next few weeks.
Cold protection project 2 complete.
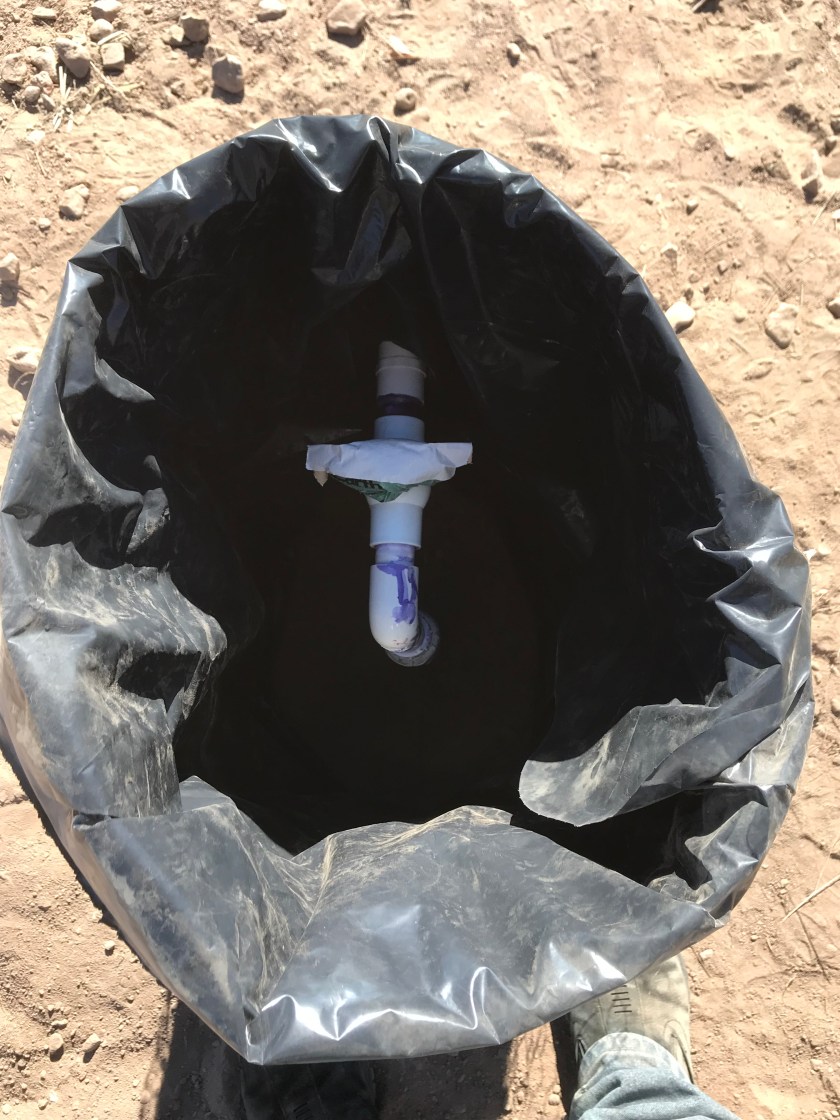
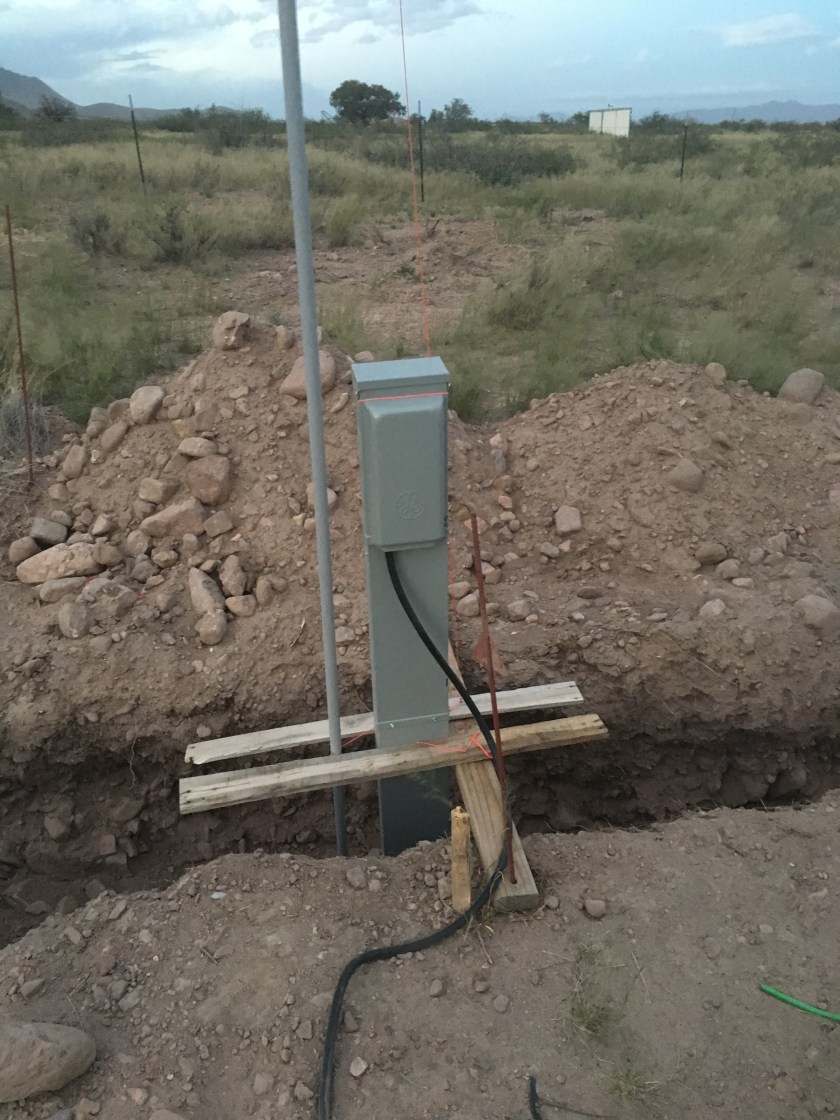
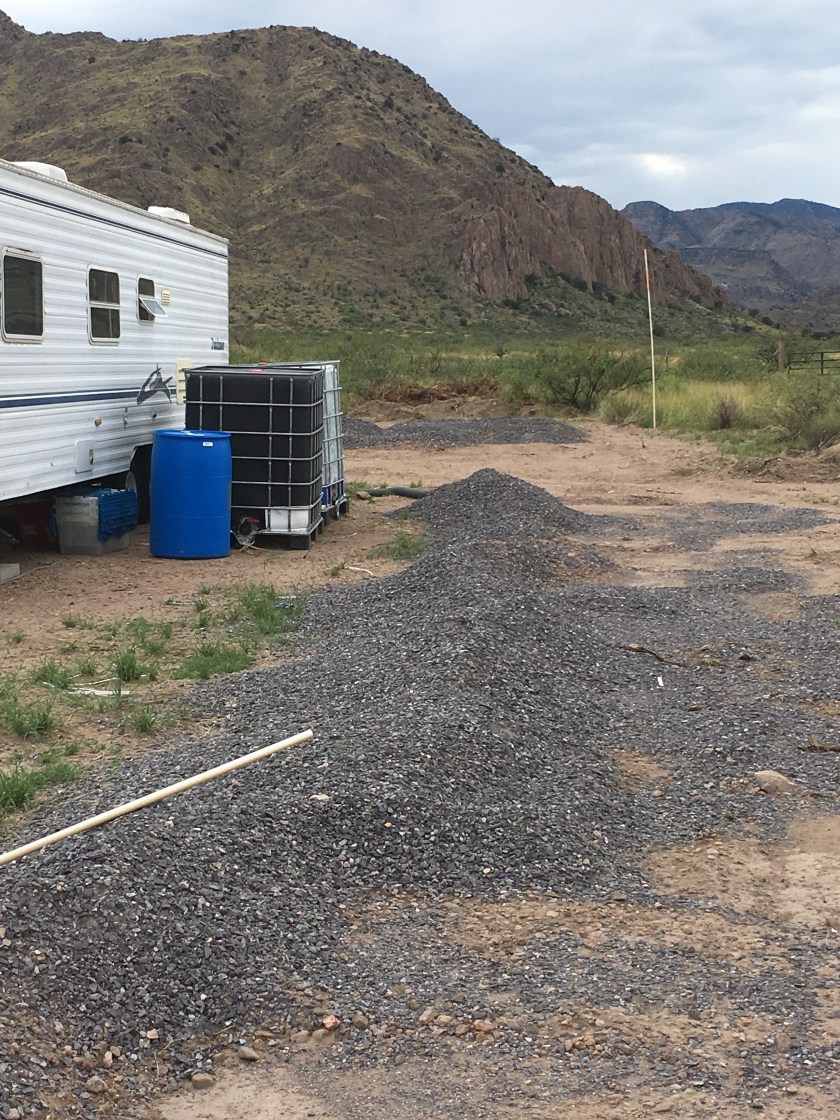
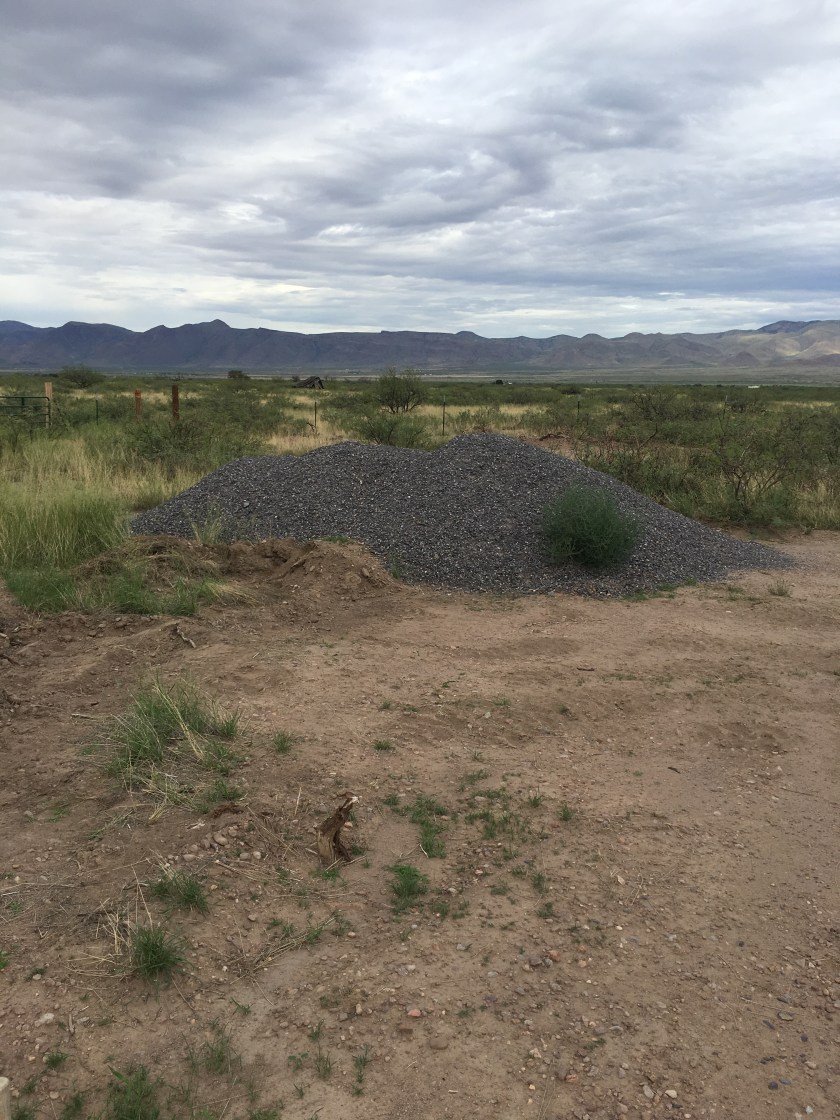
Trench around RV car port electrical pedestal filled to grade.Trench around all water spigots filled to grade. This is a pic of the western most RV carport spigot if you happen to care. The handle has been covered and taped in preparation of adding earth/concrete mix around it. I’ve also taped the check valve as that thing unscrews and leaks afterward. I disassembled it, added teflon tape to the threads, reassembled it, then taped it with (white) duct tape so it wouldn’t accidentally get unscrewed and leak again.
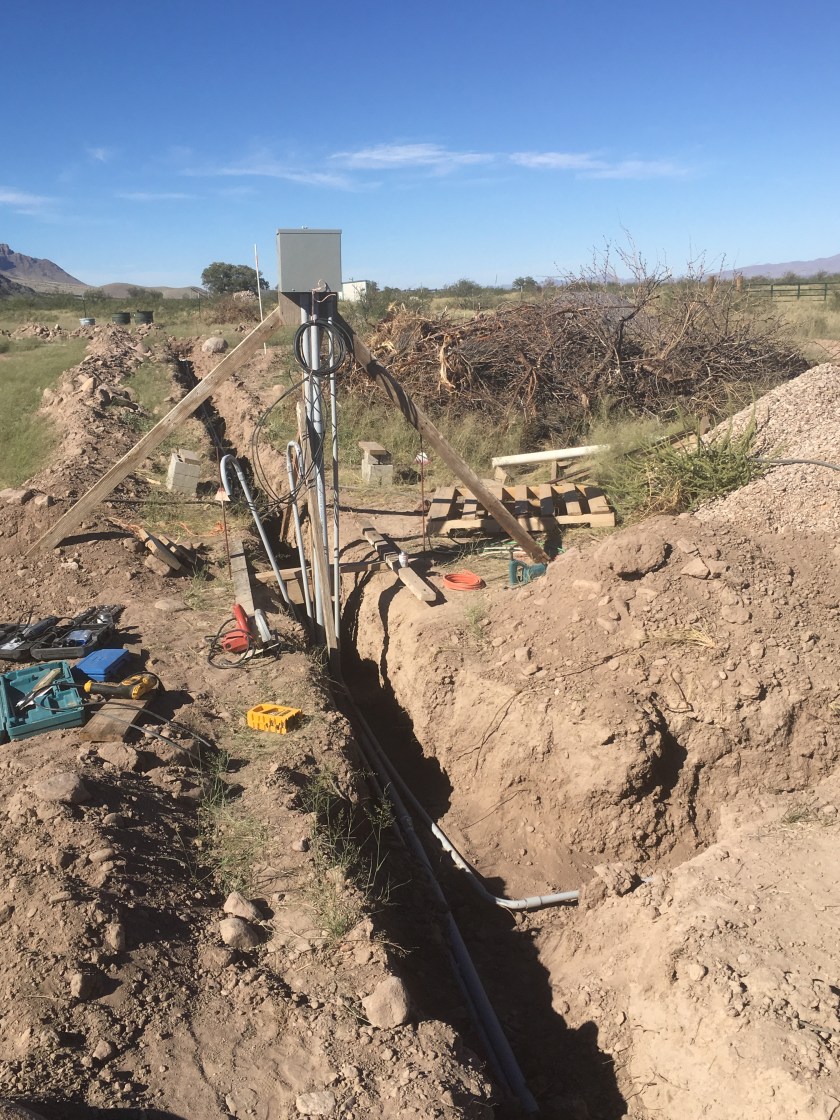
Cold protection project 3 of back filling the trench is well under way. I would estimate a minimum of 6″ of dirt covering the water pipe the entire length of the trench. Multiple key areas have been filled to grade. Many other areas have been filled to the level of where I plan to install the buried utility marker tape. Rachel seems to enjoy working in the dirt – separating the rock from the dirt, filling the trench with the dirt and the fence line with the rock. We have gotten to a stage in the trench filling that I am minimally worried about the pipes freezing so I will be moving onto the remaining cold protection projects and let Rachel work on filling the trench over the course of the winter. All that said I would estimate this project to be about 60% complete.
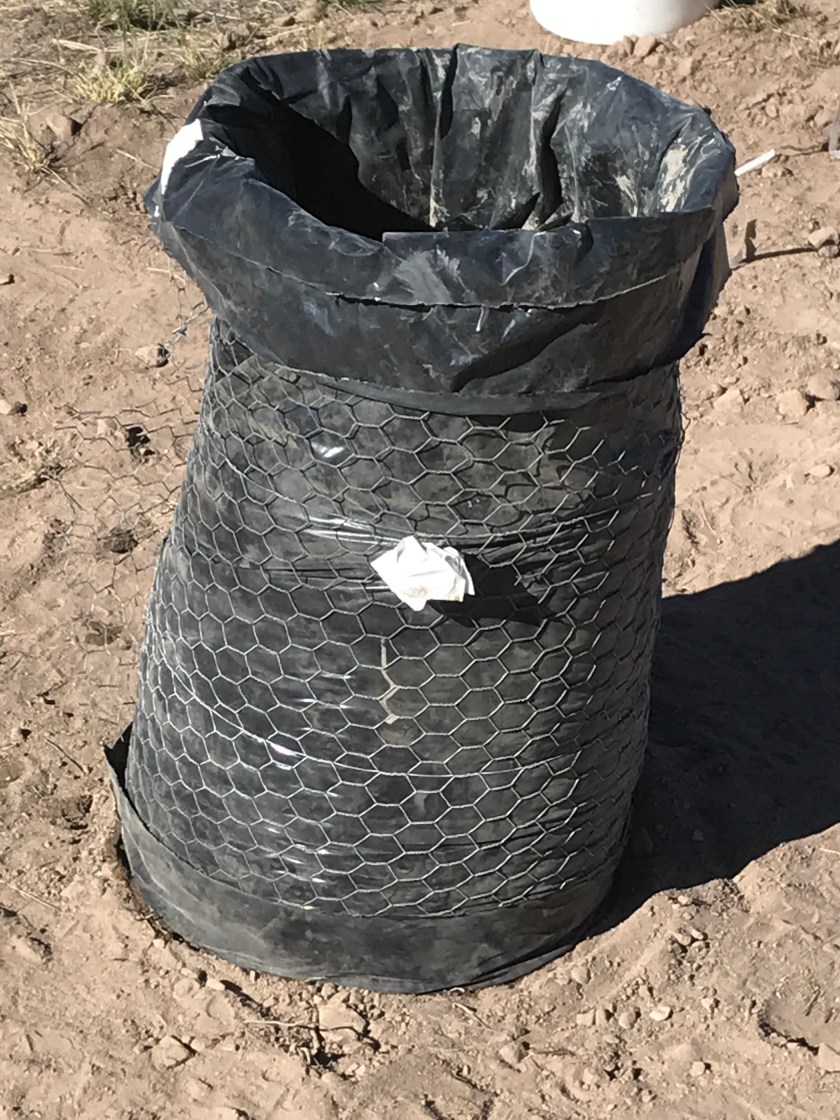
Inside view of the form I created using free chicken wire and a garbage bag around the spigot.Outside view of the form. A bit anxious to see how this is going to work.Form filled with concrete. Should have used screened dirt for the last batch of mix that was added to the top. There wasn’t much room to work to smooth it with a trowel and the rocks in the mix didn’t help.Form held together. It certainly isn’t going to win any beauty contests. Will be interesting to see if some long lost artistic side in me miraculously appears to figure out how to dress it up to somehow make the finished product look cool. Highly unlikely. This was just done Nov 25. I plan to remove the form Dec 1, contemplate any lessons learned based on the results, then try to do the remaining two spigots Dec 2.
Cold protection project 4 of protecting the spigots is 33% complete. In the mean time, temporary measures protect the other 2 spigots from freezing). If things go according to plan, the remaining two spigots will be complete next weekend (not counting time for the concrete to cure).
That leaves protecting the tank pluming (along with protecting the tank itself) and relocating the trailers. I’m really hopeful that I will be able to do the tank project in a weekend. That will leave me a couple of weeks in December to circle back and finish filling in the trench presuming Rachel hasn’t finished it before then.
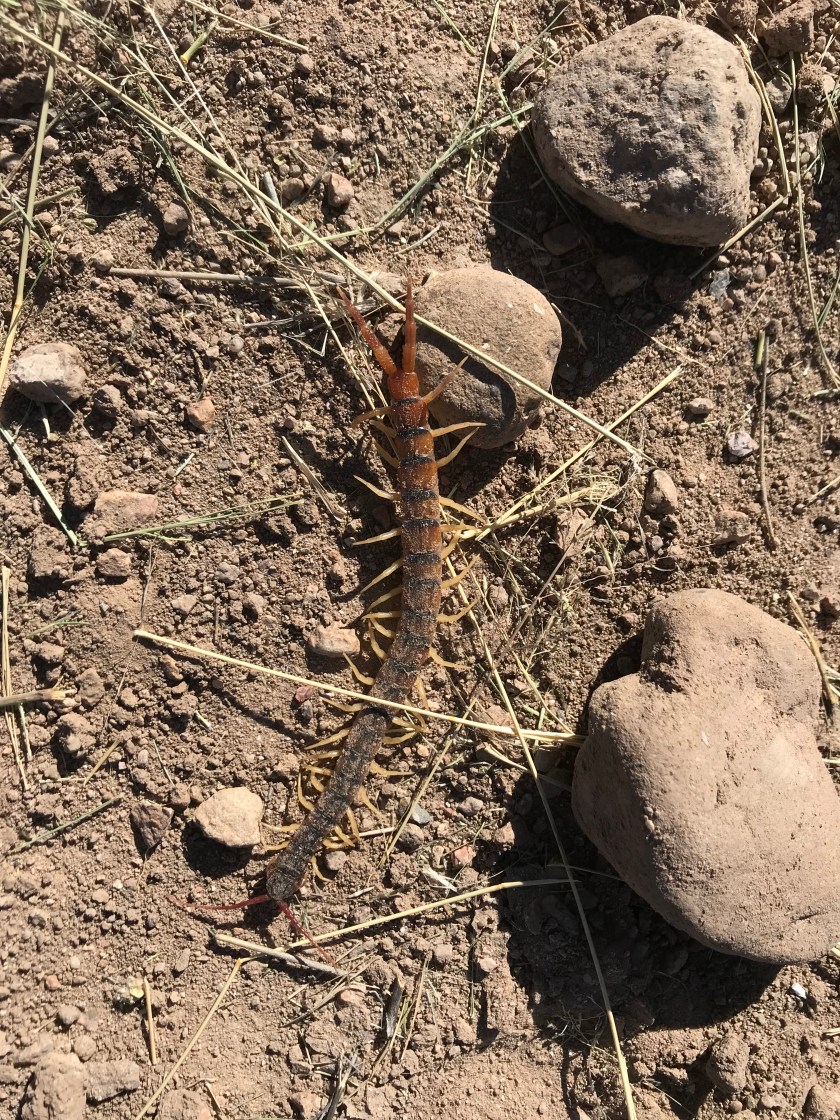
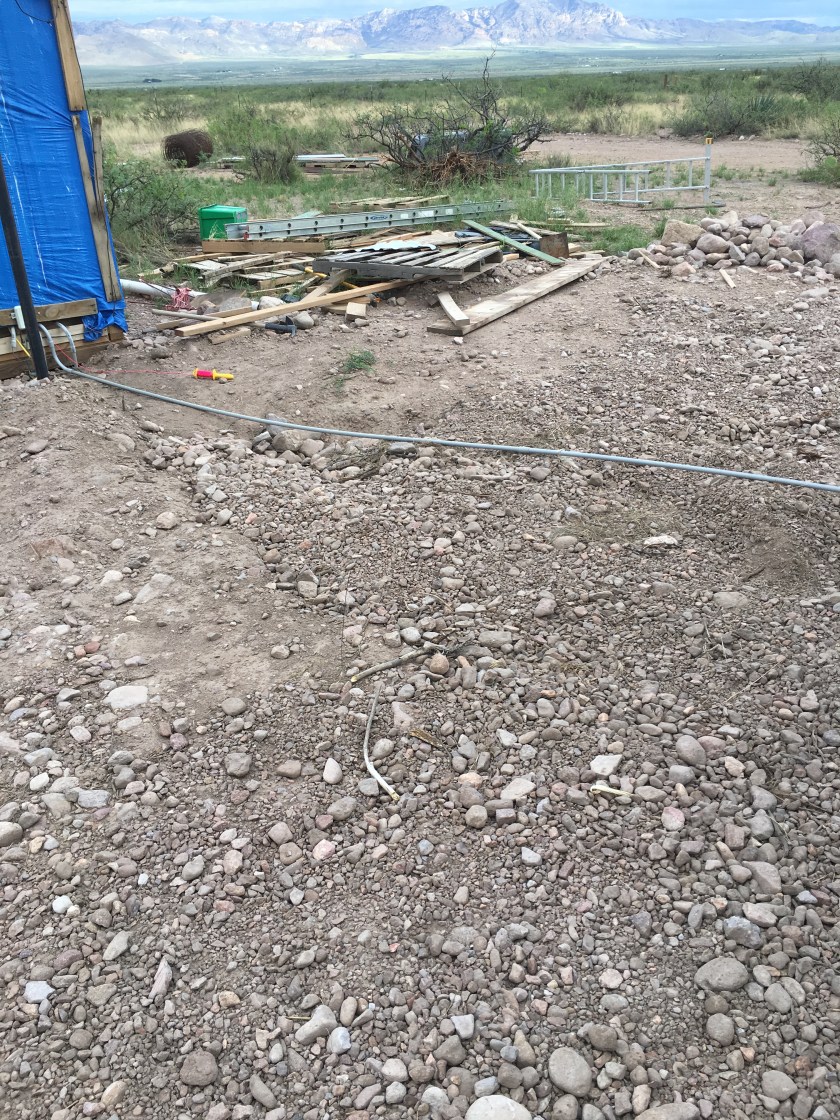
Loaded up the generator, ladder, along with tools and parts in the bucket to go add a support wire on the front gate. The tractor sure comes in handy for moving big stuff around. Charlie, Tom’s new ranch hand had come over and helped me replace the post that was holding the front gate and provided me guidance on adding a wire to better support the gate over the long term. I’ve started finding centipedes (I assume that is what this is) recently. They took up residence in the piles of dirt created from trenching for the electrical and water lines. They are none to happy as we disturb their home while we are refilling the trenches.
So much for not waiting so long between blog posts. On the bright side, I have actually been making progress. Slow, but progress none-the-less.
After a number of delays due to on demand surprise projects and changes in plans for the plumbing so need to order and wait for more pluming parts, I am happy to announce that we have pressurized water to the 5th wheel from the 5k gallon water tank so we don’t need to spend time refilling the fresh water tank via a low flow rate due to gravity feed hose. Yay!!! The spigot currently being used for the 5th wheel is for the future garden area. I also put in 2 spigots over by the RV parking area for both the travel trailer and the 5th wheel. I also added plans to run water to the site I plan to build a combined compost, storage, workshop, and tractor parking building. Unfortunately that was a recent add so I’ll need to dig trench for that line later.
Here are a few pictures from the plumbing project.
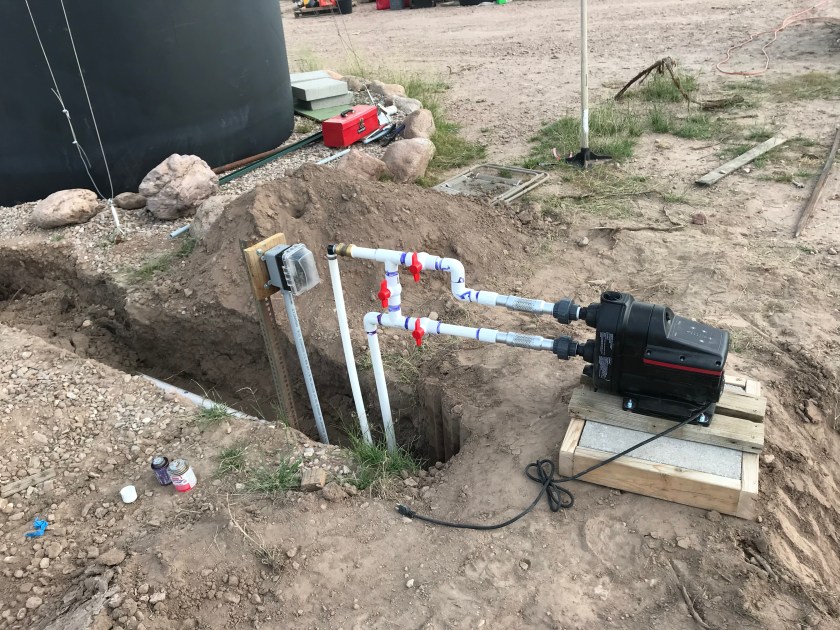
Plumbing around the pressure pump. I opted for a pressure assist pump rather than a pressure tank plus pump combo. Time will tell if it was a wise choice or not. The pump is a Scala 2 made by Grundfos. It is made for inside or outside use. The outlet is GFI protected. All the shutoff valves enable me to bypass the pump and use gravity feed if there is a problem with the pump.
My goal was to have pressurized water to the trailer before November. I made it… Sort of. I finished making all the connections on Oct 29 and pressure tested the system Oct 30. Three leaks. All three were expected. I realized as I did it, I over tightened a threaded 2″ PVC to galvanized pipe connection. I kept moving on with the plumbing of the system hoping it wouldn’t leak. I’ve never had an issue with glue joints in my plumbing projects until now. As soon as I glued these two particular pieces together I knew it would leak. I was unable to get them together properly after applying the glue. They were the last two pieces that needed to go together, they were large (10′ 2″ PVC that was connected via plumbing to the tank and a 3′ 2″ PVC section), and I was unable to maneuver them into a better position while working in the 2′ deep trench to force them together. The third leak was with a garden host that I had to use crescent wrenches to remove the hose shutoff valve that I put on in the spring. Seems that I damaged the connector/hose in the process. I used a different hose to resolve that leak. Both of the other two leaks were really slow, on the tank side of the pump so there was minimal water pressure. Because of that, I left them connected and the system pressurized so that we could have water in the 5th wheel as we had run out of water in the fresh water tank the night before. That night I ordered the necessary parts to repair the two leaks. I received the parts the next day (love that the nearest Granger’s plumbing part’s depot is in Phoenix so I get the parts the next day with standard shipping). Unfortunately, I had insomnia the night before and was in no temperament to tackle a plumbing project after work so it waited until Nov 1.
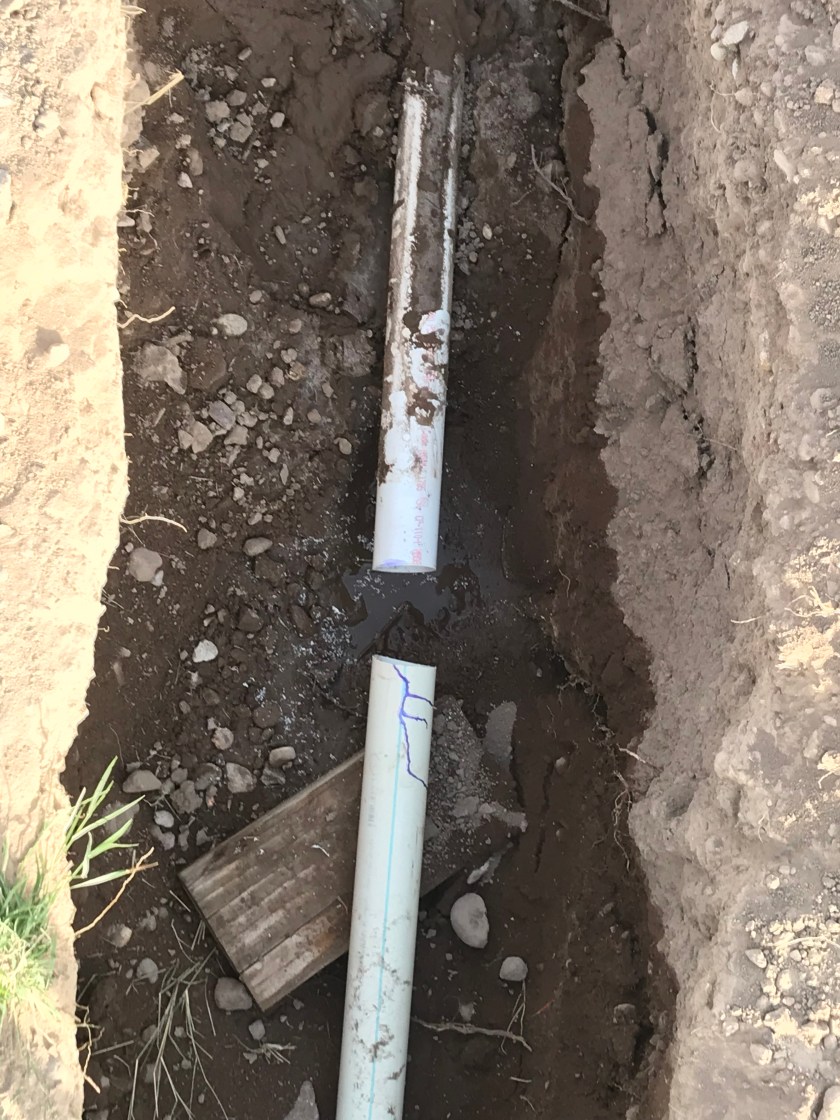
So, it has been a while since I’ve visited the kingdom of “dumb-ass-dom” so brace yourself for some chuckles. After working for paycheck I was ready to fix those leaks. I was happy that the leak around the threads of the PVC to galvanized pipe was no longer leaking. I was hopeful that would be the case although it is something I will have to keep an eye on given the difference in material and thus difference in expansion/contraction rates. That left fixing the bad glue joint. No problem. I had ordered another coupler to replace the one at that location as well as a union thinking that was my best bet to be able to successfully glue and reassemble the parts given that there wasn’t enough play in either direction of the pipe to be able to reattach them with only couplers. Step one. unplug the water pump and shut off the water lines around the pump so that water doesn’t run back from the pump direction when I cut into the PVC to replace the section of pipe around the coupler with the bad glue joint. Step two. Grab my hand hack saw to cut the pipe as I don’t want to use my electric saw as I expect water to come squirting out when I cut through the pipe wall albeit it just the water in that 2″ pipe between the tank and the pump so it should be a manageable amount of water. Step three: Start cutting. As I’m sawing away I shift around and accidentally step on the pipe at the joint. Not surprisingly, the joint gave way and water started gushing out. No big deal. I step back and wait for the pipes to empty their contents into the trench. As I’m standing there watching the water run, I start to think, gee, that is a lot more water than I expected to be in that pipe. Hmm… It it still coming out with a LOT more pressure than I would expect at this point in time. OH F*CK! I forgot to turn off the valve at the water tank. I’m draining the water tank into the trench. I make the short 10′ dash to the shutoff valve at the water tank and quickly shut off the water. Not before I have at least 10 gallons of standing water in the trench (above the level of the bottom of the pipe so I’m getting dirt and mud in my pipe. UGH… I take a deep breath, go get a 5 gallon bucket and a scoop and start bailing out the trench. I get as much of the water out of the trench as I can manage. Go ahead and get my electric saw now that the pipe has dumped it’s contents (as well as some of the contents of the tank) and cut out the desired section of pipe. See the photo below for the results.
Section of PVC pipe between the tank and pump cutout to replace a bad glue joint at a coupler.
Did you know that if you combine copious amounts of water and dirt you get mud and that if you step it in within the hour you sink into it a fair bit? I was reminded of that fact.
After bailing out the water, cutting out the section, cleaning as much of the dirt from the pipe as I reasonably could, drying the pipe, I measured, calculated, pondered, and finally said screw it. Confidence shaken, I didn’t have a choice. I had to move forward with the repair. I made the cuts, glued everything together, and finally reattached everything. Success. Waited a couple hours to let the glue cure. Reopened all appropriate water valves and plugged in pump to power. No leaks. Confidence restored.
Bad coupler glue joint replaced with another coupler and a union.
I’ve spent much of my energy the last three days separating rocks larger than a half dollar from the dirt and filling in the trench. I’ve filled in about 40′ foot of trench. probably about 10′ to grade, and 20′ or so to around 6″ below grade where I place the metal detectable buried utilities warning tape. I also placed rock along about 60′ of fence line to deter Sasha from crawling/digging under the fence. Only ~1700′ of fence line left to fill with rocks. Good thing there is no shortage of rocks around here. Although she generally stays around the trailer, she does roam outside the fence line daily.
What else to share? Have had some interesting challenges with vehicles. My truck was out of commission for 2-3 weeks. It didn’t want to start and when it did it often wouldn’t run. Often symptoms I’d seen when jumping the truck in the past where the computer was screwed up. After a few iterations of disconnecting the batteries for a period of time and then reconnecting them, to have it run that day but not the next, I decided to pull the batteries and send them to Douglas with Rachel and Cheryl on one of their grocery runs. They stopped and had them tested. Dead. Time for 2 new batteries for the truck. No problems with the truck since. Nothing a little money can’t fix, right? Next was the tractor. I’ve spent a fair bit of time digging mesquite to take advantage of the moist soil the unexpected October rains provided and to be productive while waiting for plumbing parts. One evening after work when I was digging mesquite, I felt the platform moving strangely as I was digging. So I adjusted the outrigger on the side that was weird. Something was definitely wrong. The backhoe platform was moving independently from the tractor. Hmm… Look at one side, then the other. Oh look. I’m missing two huge (1″) bolts from one side that holds the backhoe subframe together. Glance around but don’t see the bolts or nuts. Done with the back hoe work for the day. Go in, look up the specs on the parts, and start shopping. Now I’m waiting for both plumbing parts and back hoe parts. No shortage of projects that can be worked on. So next day I weed whacked with the string mower. The patchy grass is about knee high and will be more and more of a fire hazard as it dries out now that the rainy season is over. Would love to get all of it inside the fence line cut down. Not sure if that is going to happen. I started by making rounds around the fence line so I could see any snakes or other creepy crawlies while I work on filling the fence line with rocks. I cleared over an 8′ wide path before I shifted focus to the space between and around the trailers. From here out, will focus on area around trailers and solar system first and expand out from there when I weed wack. Tractor parts arrived the following week. The repair was fairly easy. The hardest part was finding the right size tools for that size nut and bolt. Thankfully I had a crescent wrench that would fit the bolt and I happened to have a very large wrench that fit the nut which was slightly smaller than the bolt head. I’ve since purchased sockets of the appropriate sizes to use to periodically tighten those bolts and nuts.
Something else that I spent a weekend on deferring some of the plumbing work was the furnace. That was an interesting exercise of marginal utility. It started getting cold at night in October. I was told unseasonably cold. So we started using the furnace. One of the things I failed to check before buying the 5th wheel. Mechanically, everything seemed to work. There was simply not much air flowing from the vents to warm up the 5th wheel. One repair was obvious and I knew about it as I had seen a large hole in the thin foil duct that runs to the bed room. I had purchase some heavier duty ducts to replace it with but as I began looking over things, I didn’t feel like I had the access needed to one end of that duct work to replace it. So I opted to patch it with some duct work foil tape. Still no go. So at this point, for what ever reason, my brain seemed to think it knew what the problem was and as such I bypassed all forms of useful and time saving troubleshooting options. The problem I envisioned: rats/mice got in and built a nest in the duct work near the furnace restricting airflow. Very reasonable theory given the hole in the vent I had to patch and horror stories I’ve heard about rats. So, it seems reasonable that I need to clean out the duct work. But how? I take apart the furnace to see where it connect into the duct. That is clear and it seems that I’ll have to access the rest from under the trailer. So, one morning I embark on the project of removing a section of 1/8″ thick plastic sheet under the trailer to access the duct work around the furnace. In all, not an overly challenging task. A bit uncomfortable working environment laying on my back on uneven piles of gravel that Sasha has formed under the trailer to suit her liking. After getting the plastic sheet unscrewed and I work on dropping it down to see what it is hiding, I find of nice pack rat’s nest complete with dead pack rat. Nice. I get that mess cleaned up and realize that there is really no access to the duct work from under there either. Unlike the tubes feeding air to the bedroom of the 5th wheel, this heat duct was much like that of a home and it ran the length of the trailer. Well crap. It is at this point, my brain decides to come back from vacation. Maybe there are some things that I could do to test/troubleshoot this in a methodical fashion. First check: Is the duct actually blocked between the vents and the trailer? I go to one end of the trailer, remove the vent, and extend a tape measure through the duct to the other end. No obstructions. Well crap. An airflow leak would explain lack of airflow into the trailer. I shoved towels at the far side of the both vents on the main floor in relation to the furnace to prevent air from blowing past the two vents. No perceivable change in the amount of air moving out of the vents. So it had to be closer to the furnace. No obvious obstructions from the fan and the fan appears to be operating properly. The furnace body itself is fairly dented and under close observation, I note many air leaks. So, out comes the foil tape and I tape over all air gaps in the heat exchange area to force more air through the ducts. I then go out and reassemble my folly under the trailer. I think the tape helped but I’m not sure if it was enough. The only thing I can think of is maybe replacing the fan. Although it appears to be operating properly, it may simply not be powerful enough to move the amount of air needed.
Now that we have pressurized water, I also decided it was time to turn on the water heater in the 5th wheel. One evening, I went out to try to get it turned on. I turned on the on switch outside but the burner wouldn’t light. After a 5 minutes or so of trying I gave up for the evening. The next day, a visit to youtube showed me the light. It never occurred to me that 1: it might also be an electric water heater, and 2: there might be another switch somewhere else (like inside the trailer in plain view next to the water pump switch). The switch on the water heater only accessible outside was to turn on the electric heating element. I wonder why the gas did’t even try to spark when I turned it on? Dumb ass. After watching the youtube video, I get up, walk over to the kitchen, flip on the hot water switch, and wha-la, I hear the hot water heater burner come on. Yay! 5k gallons of water (ok, maybe 4k gallons of water now) + water pressure + hot water = shower in the trailer. No more running to Rusty’s to shower.
Another half day project I tackled was the repair of my iPhone 7. On the way back from Michigan this summer, I dropped it a couple times and shattered the screen – even with one of those glass screen protectors on it. Work sent me an iPhone 6 and instructed me that I could take the iPhone 7 in for repair. As I’m due for a new phone in the spring anyway, I’ve wanted to learn to repair these myself but have been too afraid to do so given their cost, I decided there was no time like the present to roll the dice and try to repair it myself. I ordered the replacement parts and a tool kit. One Saturday morning I sat down for the one hour task. Three hours later I was done. It was mostly a success. The one thing that didn’t go well for me was applying the replacement gasket to seal the phone from moisture and dust. I got 80% of it in the proper place. The rest… Let’s just not expose it to must dust or moisture. Anyway, everything still works and I can once again use the iPhone7 and have the 6 as a backup. Nothing like success like that to build your confidence to try to venture in to the unknown and try more do it yourself projects. Like build a home from dirt. 🙂
I think that catches you up on most of the goings on around here.
My plans for November were to aggressively (HA) work toward getting the RV’s moved to their long term parking locations. I rethought that this weekend. As winter is quickly approaching, I want to do what is necessary to protect the water lines I just put in place as we do get freezes here. That means fill in the trench, build insulated structure around the pump and plumbing as well as all the spigots. Those are my goals for November. Will shoot to move the RV’s around in December. Freezes are expected to start in mid to late December.
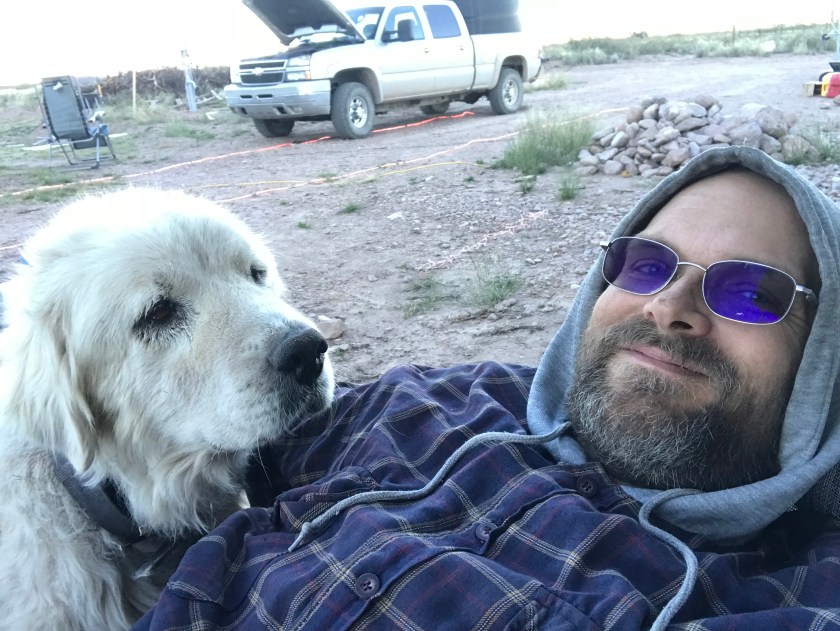
And now for some cute animal photos with a couple of my ugly mug thrown in.
Friends at last.
It was funny one evening. We heard bear antagonizing Sasha so we looked up to see Sasha playing with him in a fashion. She was trying to step on him with her front paws. It was like a slow motion version of “whack-a-mole”. We all got a good laugh at it. Sadly we didn’t get any video of it.
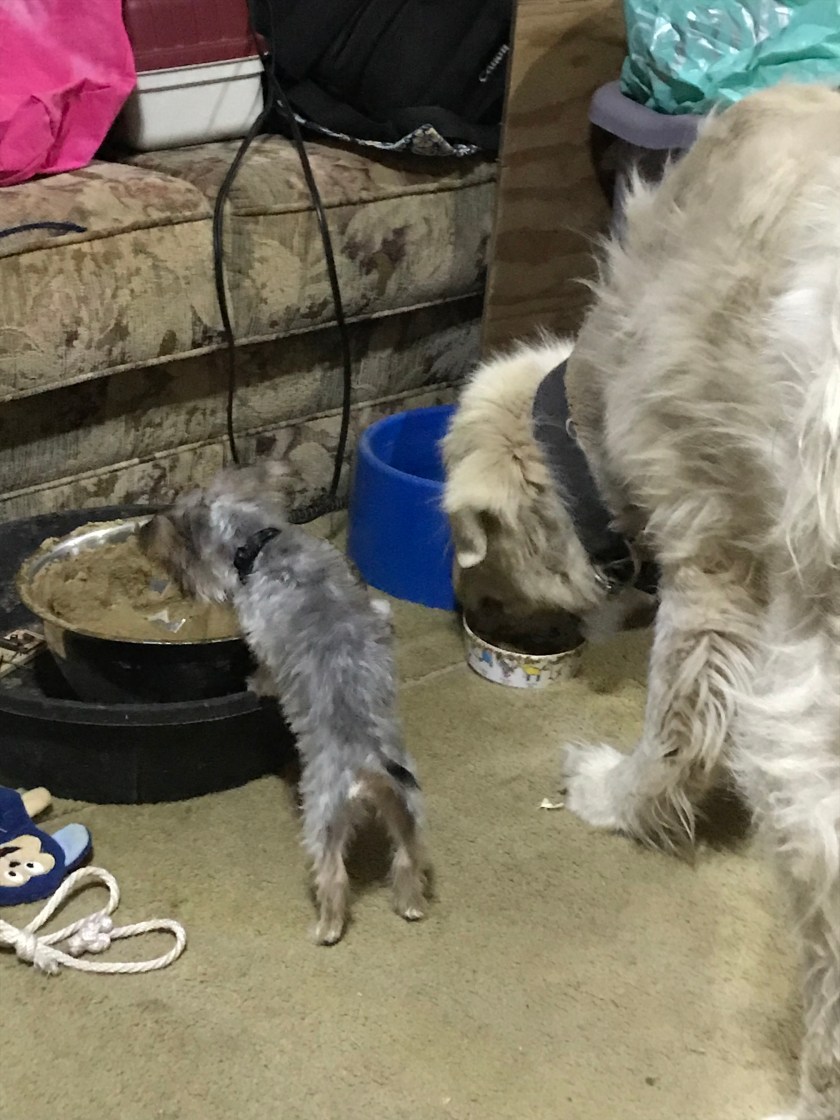
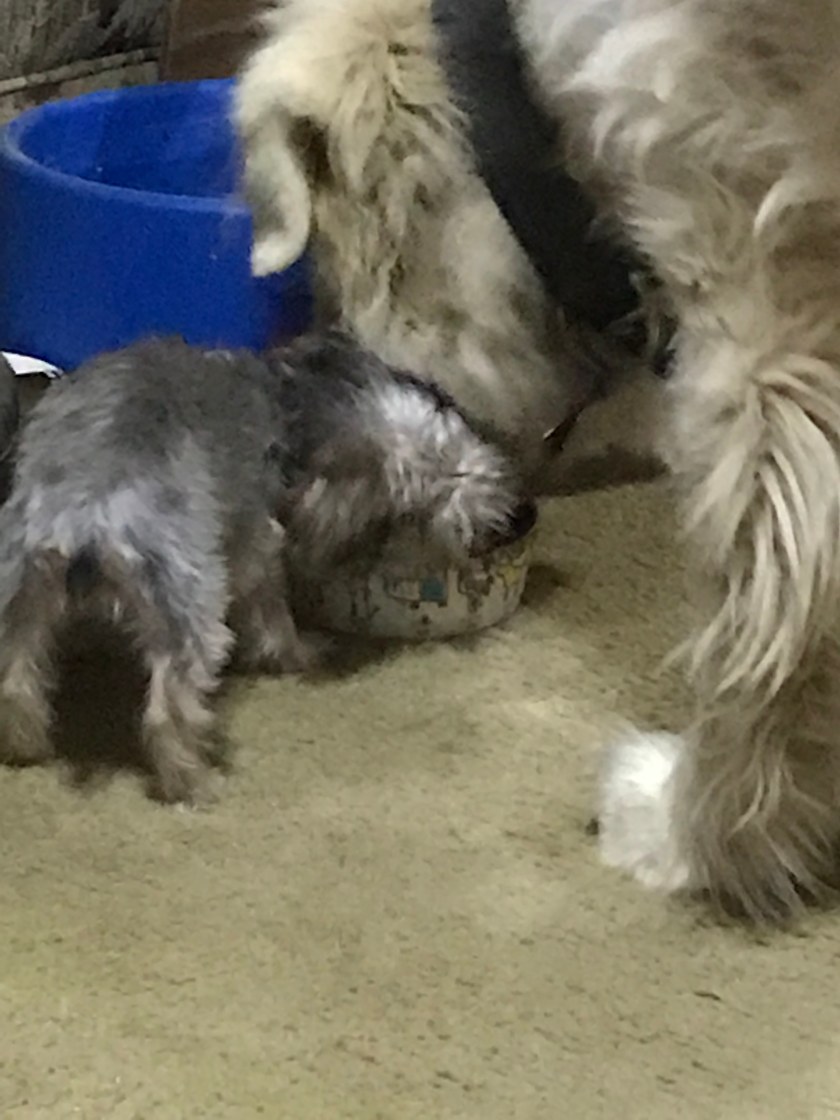
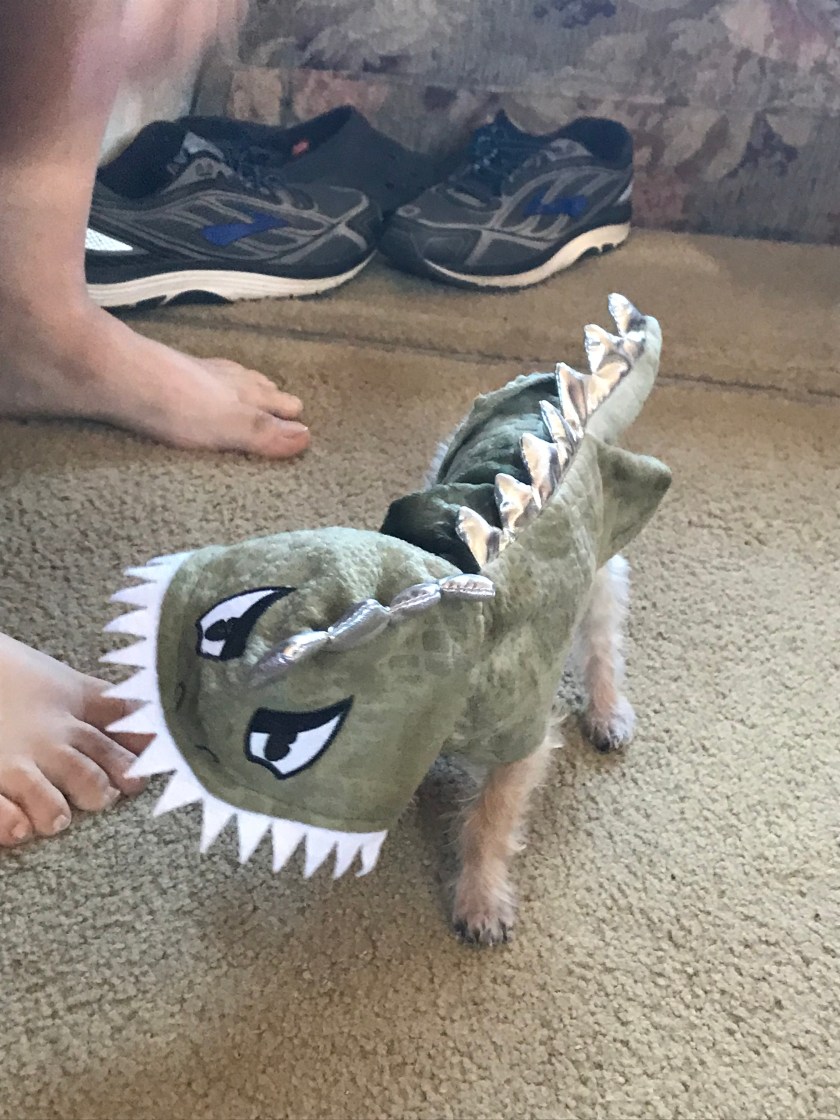
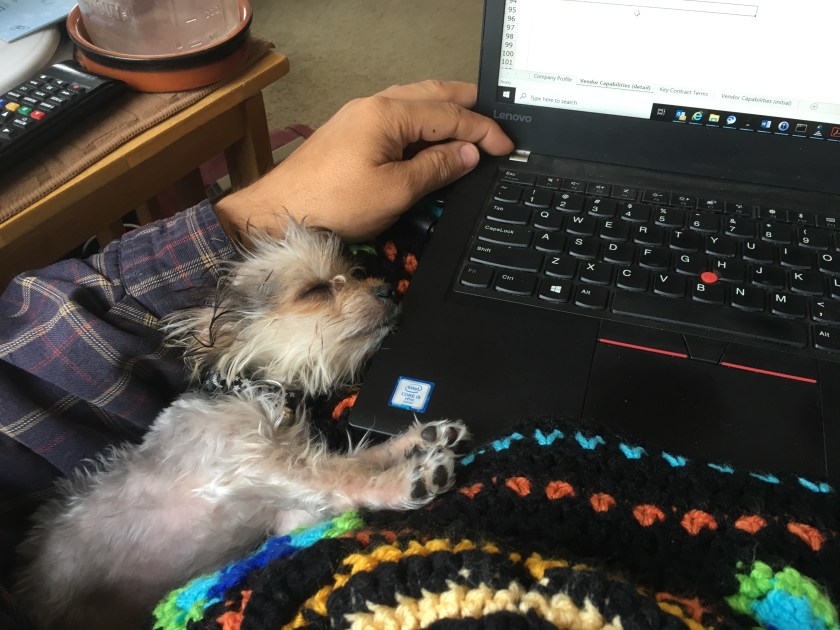
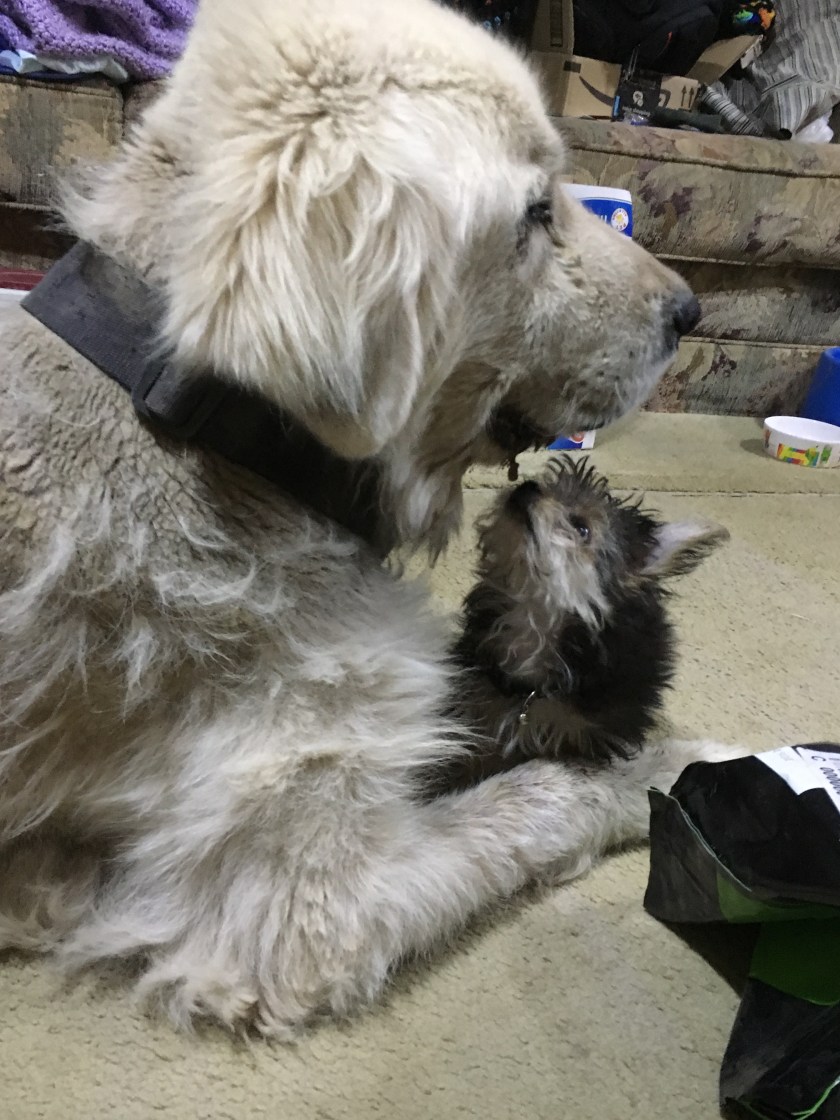
This is the usual scene at feeding time. Sasha successfully eats out of bear’s food dish and bear makes a vain attempt to eat out of Sasha’s food dish. I think Sasha is the smarter of the two as she get’s all his food and as much as she wants of hers. Don’t worry. She never eat’s all her’s initially so after she has filled her belly we transfer food from her dish over to Bear’s. We also use it to our advantage as we transfer older food from her dish to his before we feed them so that all the older food get’s eaten first.Bear finally got smart and decided he wanted some of his food before Sasha ate it all one evening. Looks like it is time to clean up the food dishes. Cheryl and Rachel picked up a Halloween costume for Bear.Dad… Put your phone down and get this thing off me please!Bear napping while I work.Resting with Sasha after a day of shoveling dirt. Temperature was dropping as the sun dropped below the mountains peaks to the west. Still warmer than Michigan. 🙂
Geez. Seems that I’m getting worse at posting regularly instead of better.
Ok. So it has been over a month since I last posted. While I haven’t made as much progress as I’d like to have, I have made progress. I’ve been tired in the evenings after work so on evenings when I haven’t worked late for work, I haven’t been very productive on projects. Weekends have generally been productive though. Doing what you ask?
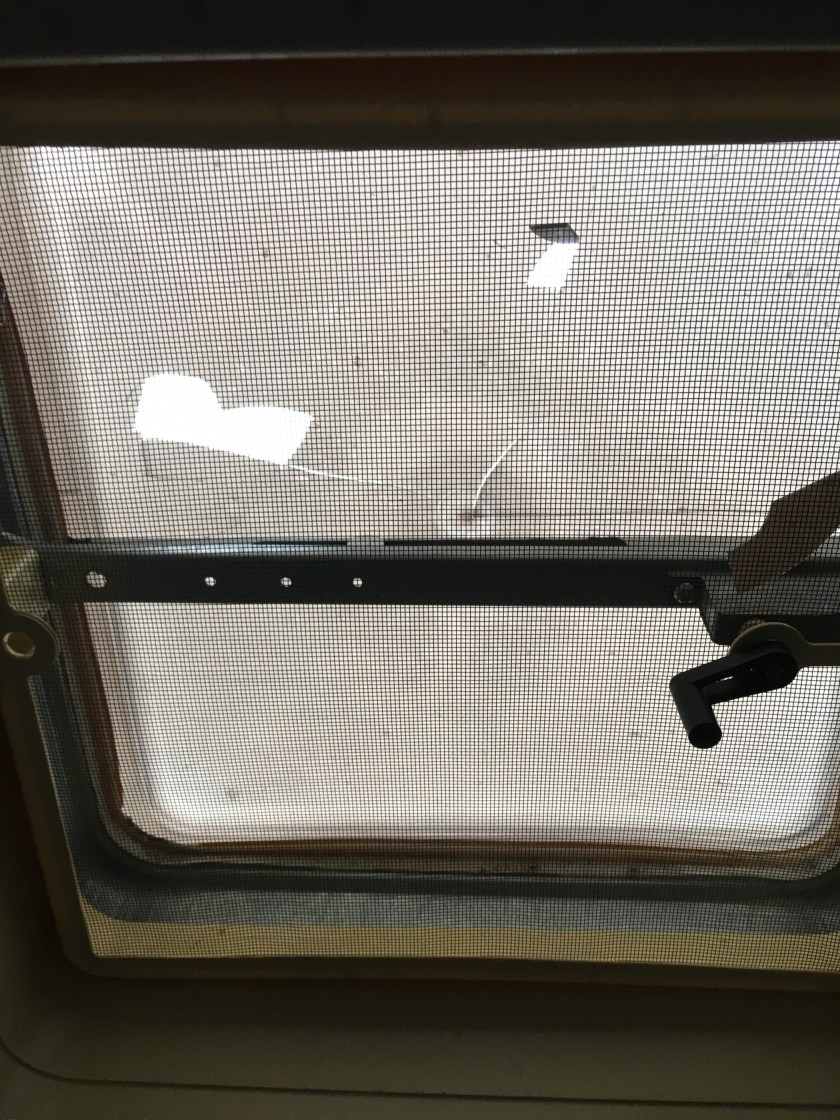
I replaced the vents in Rachel’s trailer that were broken by the previously mentioned hail storm the Saturday following the storm. I had wrapped the vents in garbage bags then closed the vents to keep the weather out. Rachel was ready for the vents to be replaced after listening to the garbage bags blowing with the breeze at night for a week.
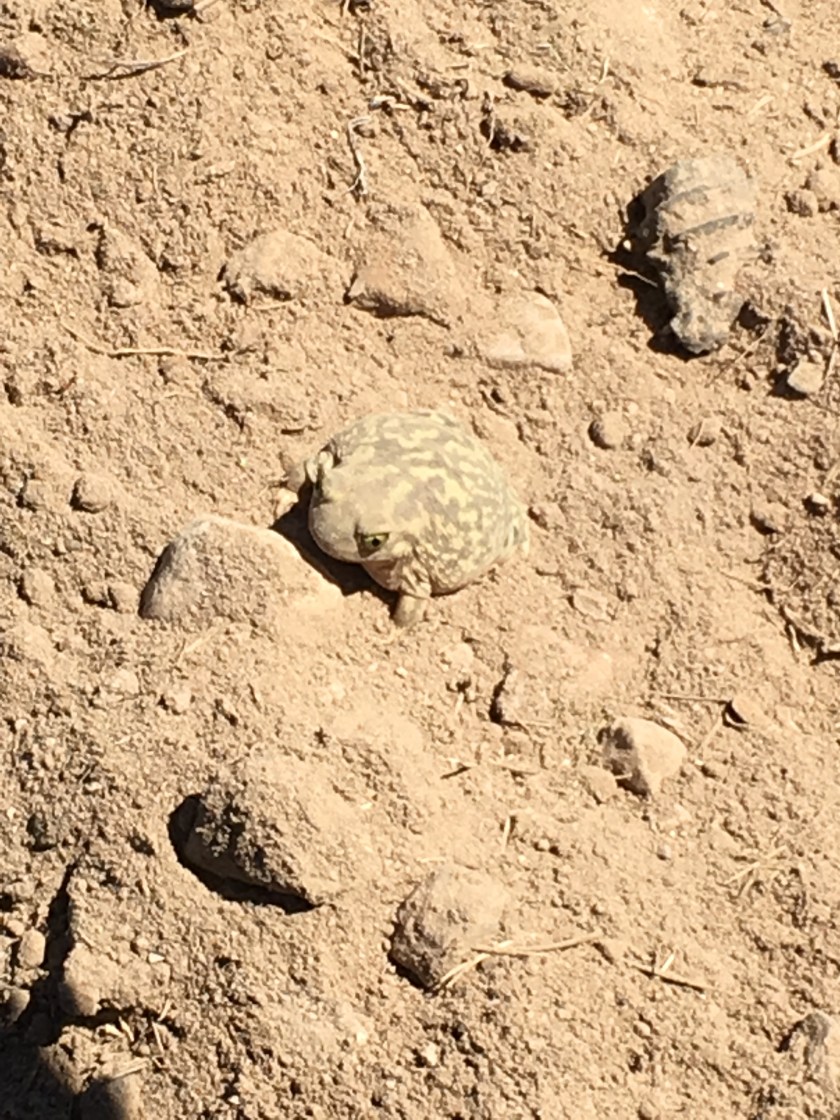
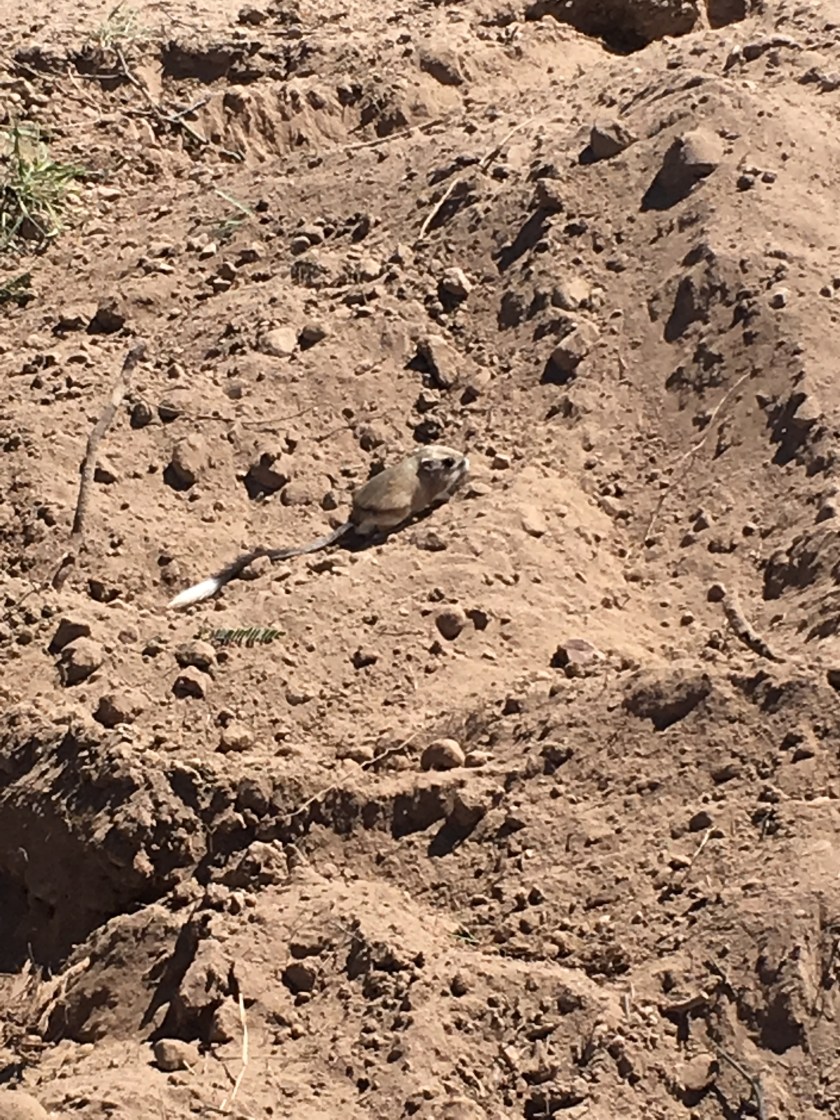
September 15 and 16 I cleared mesquite brush while waiting for supplies to be delivered. In the course of digging out the mesquite I saw a few new to me breeds of critters that I hadn’t seen yet.
Google indicates this is a couch spadefoot which is not a toad as I thought when I saw it.This is a kangaroo rat (in the heteromyidae family – not a rat or mouse). These critters like to chew automotive electrical cables. May be also responsible for the missing insulation between the engine and passenger compartments in my truck (I discovered last October). These and mice are the reason I leave my hood up on the vehicles at night and have a LED rope light under the vehicles in an effort to deter them from doing damage to the vehicles.
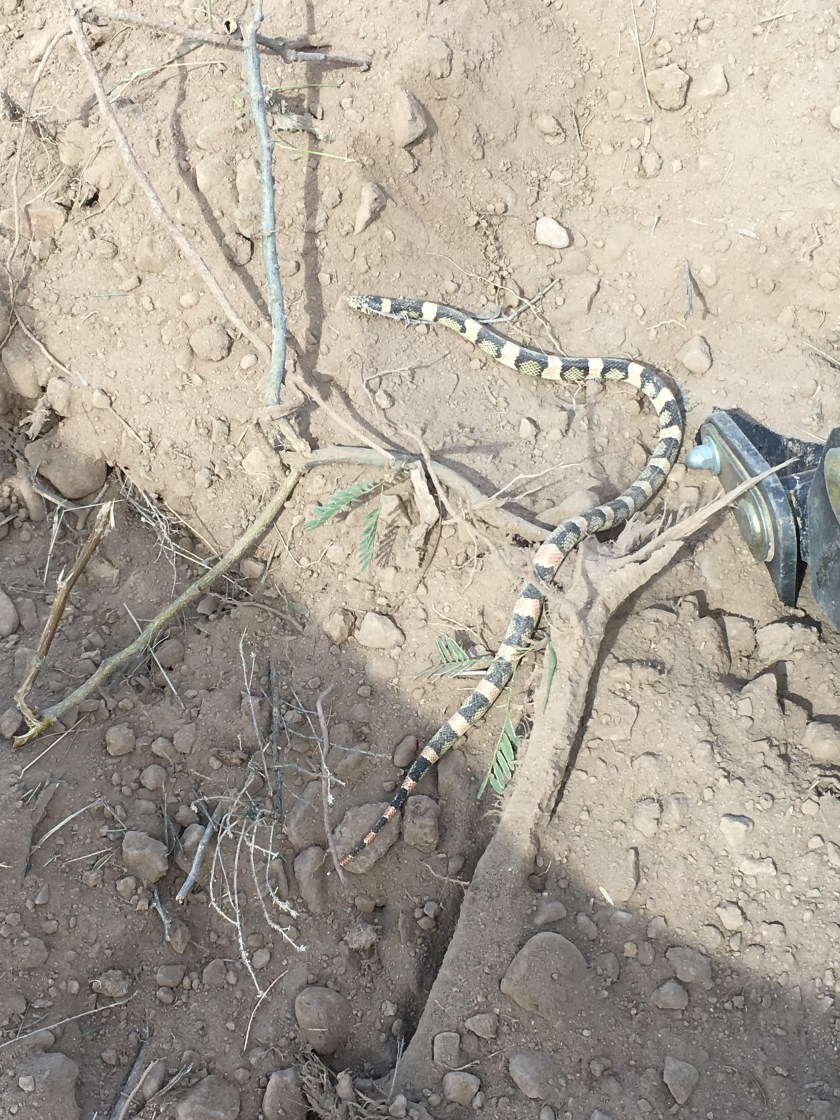
This is a long nose snake. Google search indicates it is non-venemous.
I spent a number of days working on installing the electric.
Trenched to the near side of the drive. Waited to trench across the drive until I have everything on hand to minimize the amount of time the drive is torn up. This phase of trenching was completed September 2-3.Trench along the length of what will be the RV carport to install water, electric, and data. Completed September 3.When I finally trenched across the drive, I setup a bridge to walk across and go no further barrier for parking. Trench across the drive dug September 21.Conduit with cables pulled between shed and location of future utility building. Electric on the right and data on the left. Second vertical conduit on the right is data which goes to the RV carport. This was taken before conduit and wire for electric service was run from here to the RV carport. Data cable was run September 22 and this part of the electric was pulled September 23.Data and electric into the shed completed to this point September 23.
Ordered metal detectable electric line warning tape to be buried in trench approximately a foot below the surface. September 24 – 25 filled in trench from shed to far side of drive way so that the drive way could be fully used again.
The weekend of September 29 was spent planning and researching specific needs for electrical distribution (what I had previously bought was not appropriate for my needs). Also spent a day in Sierra Vista celebrating Rachel’s birthday and shopping.
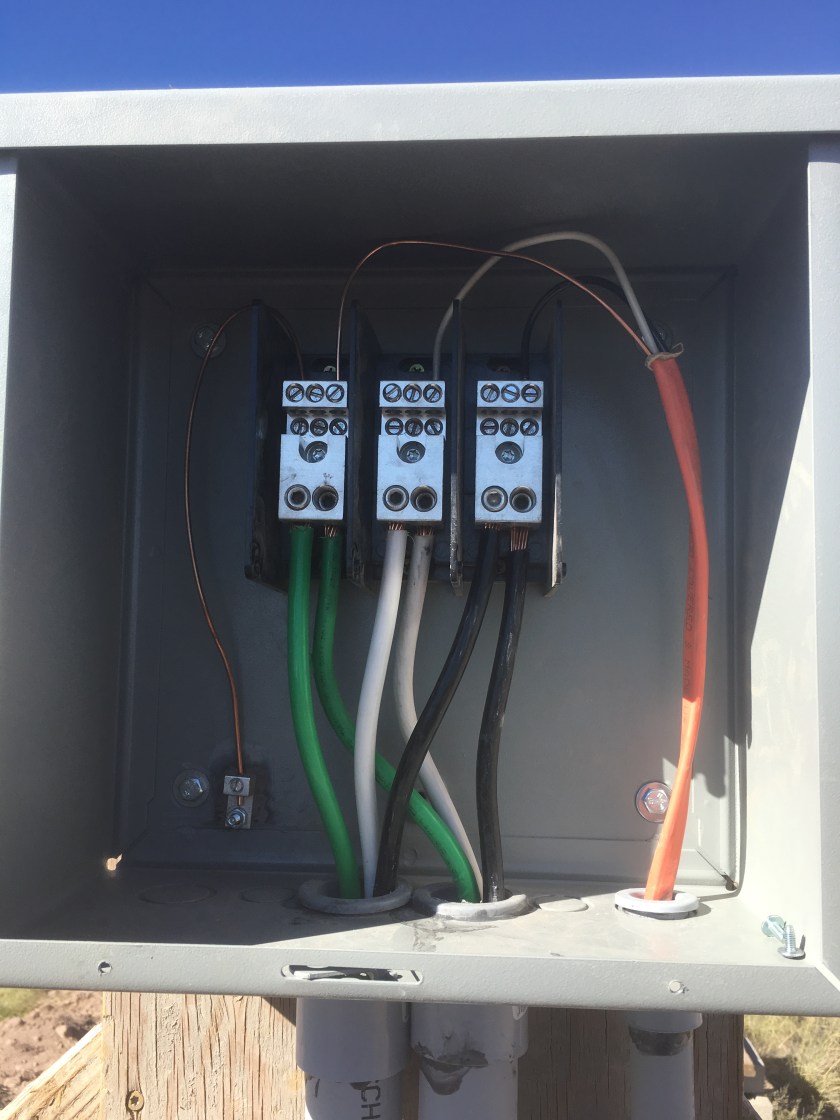
Electrical Pedestal for RV Carport. To the left is conduit for data cable. I plan to cut it down to proper length and terminate the data cables into data jacks in the coming week. Wiring of the pedestal connections completed October 5.Electrical distribution box that will be inside future utility building. Temporary bracing in place until I fill in the trench. Installed October 6-7. Bracing withstood 25 MPH winds Oct 7 & 8. Data cables tied up to electrical box to keep it up off the ground so it doesn’t get chewed by critters.Inside the electrical distribution box. Wiring completed October 6.GFI outlet wired to future utility building’s electrical distribution box. Installed October 6. Outlet will be used for water pump that will supply pressurized water to RV’s and eventually the house.
I completed the electrical wiring in the shed today (October 7). I held my breath and turned on one breaker at a time. Nothing blew up. I took the drill motor around to test the various outlets. It just occurred to me as I write this, I’m sure I have an outlet wiring tester somewhere. Anyway, it all worked as expected. I moved Rachel’s trailer from the temporary power cable that is laid across the top of the ground from the shed to her trailer to the pedestal. Progress!!
And now for misc pictures for your enjoyment.
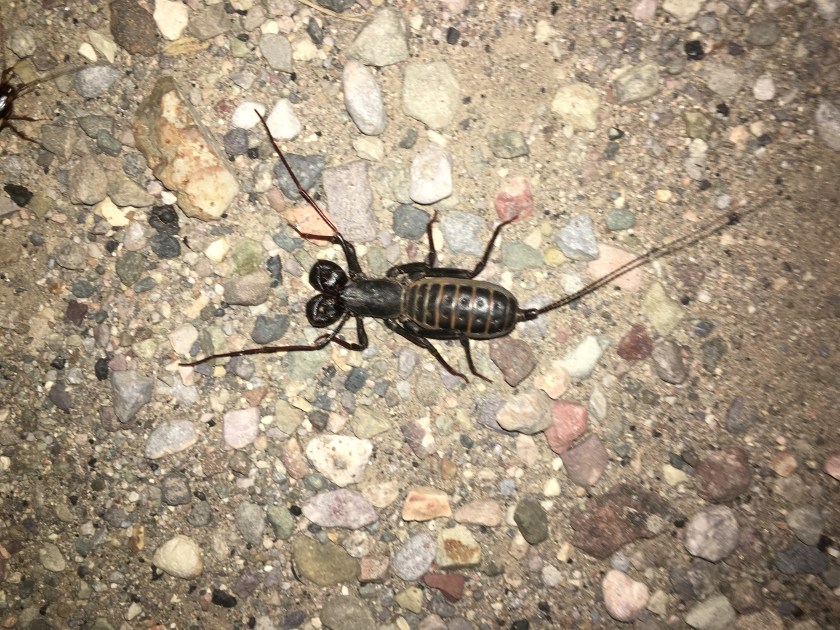
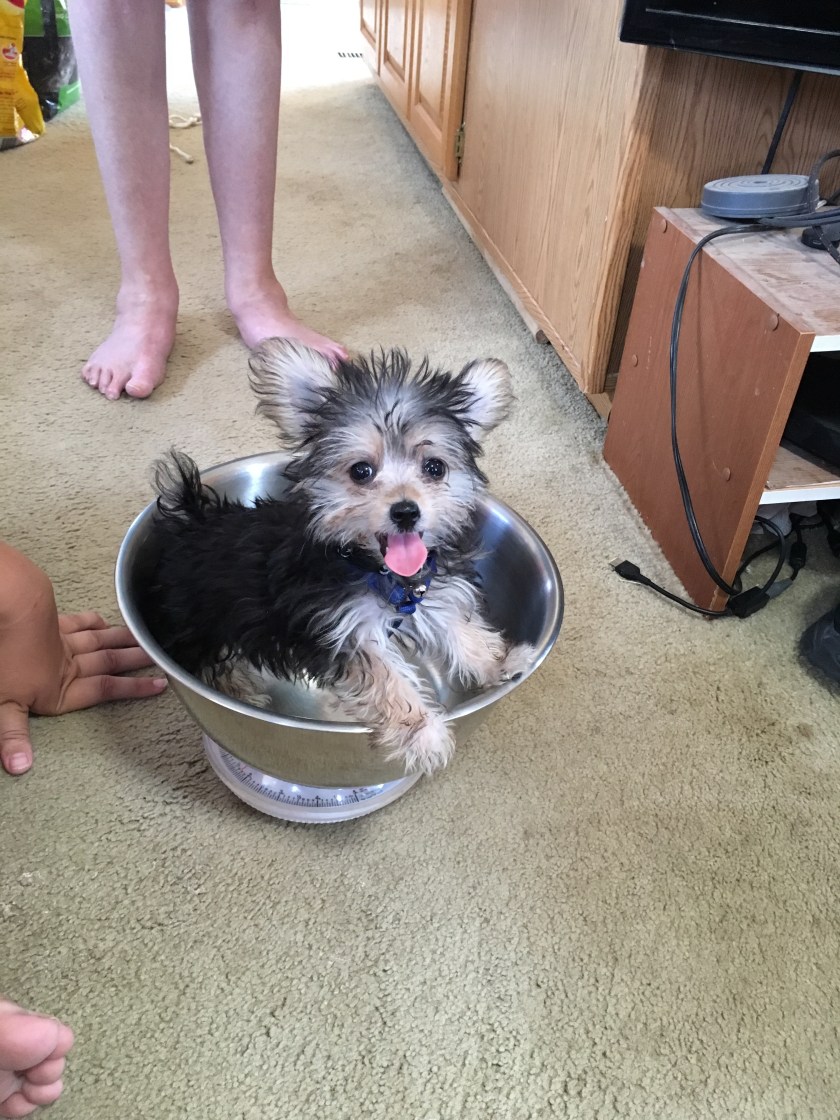
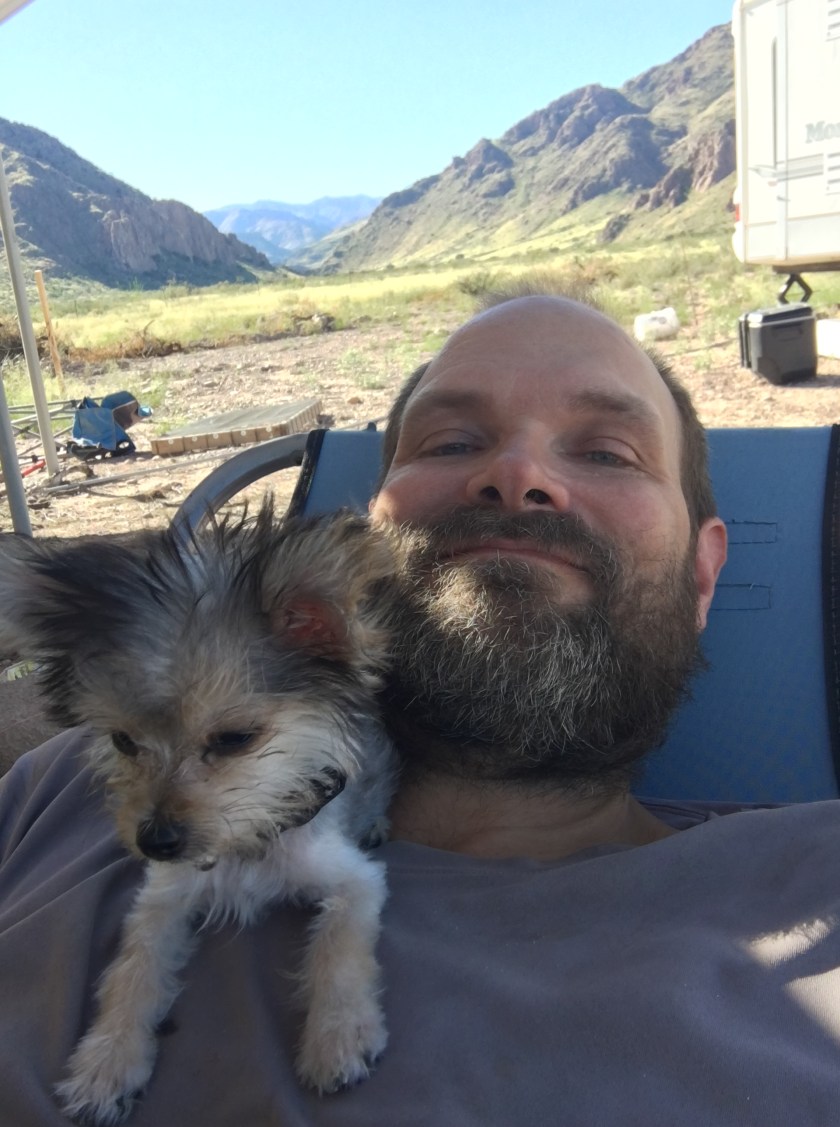
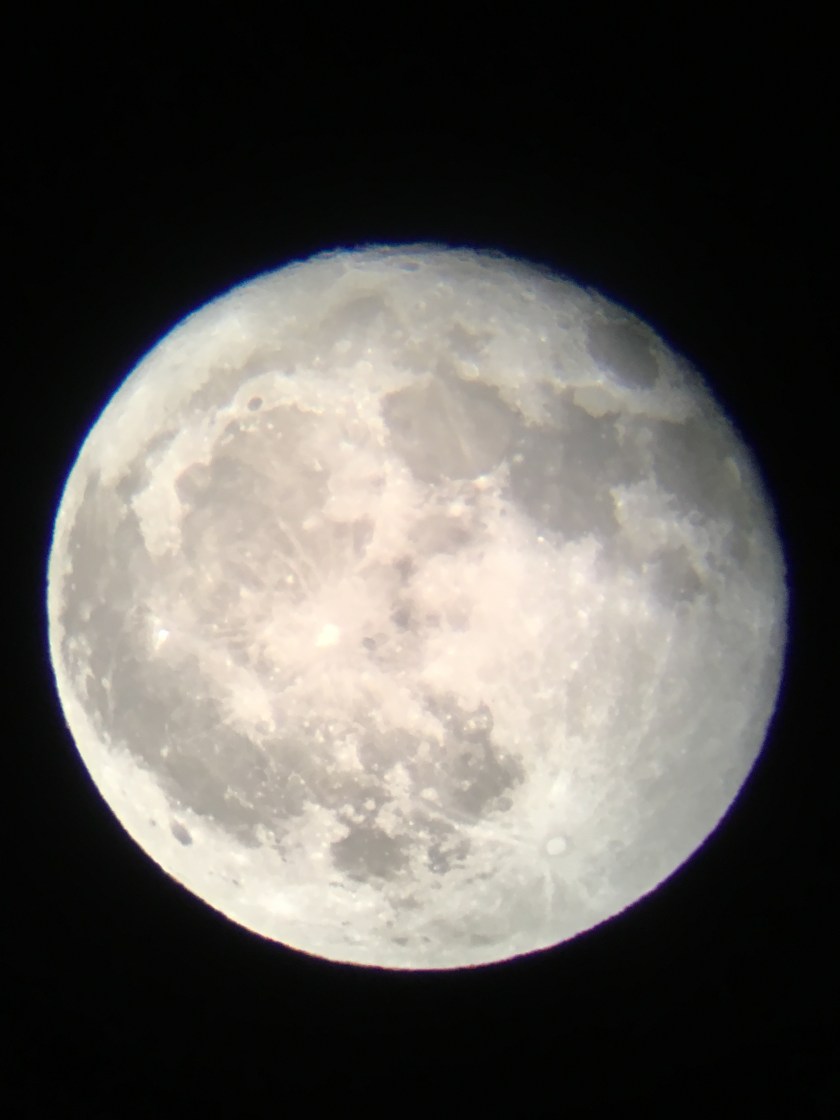
Whiptail scorpion we saw one night when leaving the Portal Cafe after enjoying an evening of music. This is a non-venomous scorpion.Bear’s first ascent of mount Sasha.Bear getting weighed.Bear performing a public service – waiting to eat Sasha’s drool.Bear cleaning my beard for me. Keep your mouth closed else get Bear’s tongue in your mouth. I speak from multiple experiences.Bear and I chilling outside after a hard day of work.Picture of the moon through the spotting scope our friend Pete gave us.
There is more that I would like to share but it is late. I’ll try to provide more frequent updates in the future.
Seems like I’ve been busy doing a whole lot of nothing, at least it seems that I’ve been getting nothing accomplished since the last update.
Let’s review starting where I left off – concerned about having enough charge in the batteries to last the night after a day of heavy cloud cover. Yes indeed. Made it through the night with power to spare in the morning before the sun came up and started charging the batteries. Had the same concern yesterday but will get to that later.
I’ve spent a few great days out and about with Cheryl and Rachel. First was a day where we took a tour of Shakespeare ghost town (http://www.shakespeareghostown.com/) followed by a trip to Deming New Mexico to see what it had to offer with a stop at Walmart there for groceries. There is the vet in Deming that I took Hersey to, but IMO, not much else making it worth the trip. We ended the day with a trip to the Portal Cafe for dinner and live music.
After spending a week of evenings thinking and planning the water supply and electric supply to the RV carport area and ordering a number of items online, came a day trip to Sierra Vista to pickup conduit and misc other things as well as a general shopping day for Cheryl and Rachel. It was a long day, but a productive and enjoyable day. First stop that day was at the mall for Rachel to look for pants to work around the property in – she is very particular about her clothing and she doesn’t have anything appropriate to work outside around the mesquite and cactus in either pants or footwear. My back was sore from the drive. Felt like it may even have been a bit out of place. The mall happens to have a massage place. For the first time in my life, I broke down and paid for a massage. My back felt much better afterwards.
I took some time out to upgrade Rusty’s WiFi network. It was the first time in a year that an upgrade to that network went without a hitch. The previous 2 – 3 upgrades always seemed to be a nightmare that had me walking around the park with my laptop and directly connecting to one or two WAPs to try to recover them and get them back online.
I spent a couple days clearing mesquite shrubs from the long term compost and general storage building location, then build a new compost bin in that location.
It occurred to me that I should double check to see if the 10 AWG wire I am currently using to power Rachel’s trailer (15 AMPs at 110V) in the current car port area is large enough to carry the 30 AMPs at 110V that I plan on for the RV carport area before I proceed with burying the wire and conduit. Ugh… One reference I found says the wire is large enough to carry that load but mentions nothing about distance which I know is a concern. Further searching revealed I need at least 3 AWG but is really on the edge, so I ordered 2 AWG wire. Boy is that expensive! So, with bigger wire, will it fit in the conduit I just bought for it? Nope! Soooo…. Yep, another trip to Sierra Vista to return the conduit I bought for the electrical wires and get larger conduit. Another full weekend day gone without clear progress. At least I wasn’t alone. Cheryl came along to keep me company.
The water pump in the 5th wheel died. So had to order a replacement online and replaced it the day it arrived. Natually, the plumbing fittings that connected directly to it were aged and disconnecting from the old pump and connecting them to the new pump, leaks. Sooo… picked up new fittings on my previously mentioned 2nd trip to Sierra Vista. Problem solved.
So, I now have the conduit for electrical, the RV electrical pedestal that I ordered from Home Depot, and all the odds and ends that I think I need to be ready to run water, electric, and communications cables (phone, network, remote control panel for the solar system) once I got the trench dug. This is a big project that I don’t want to drag out, so I plan to perform the trenching the Thursday and Friday before labor day weekend so I can spend the three day holiday running water line, electrical, communications cables, and filling in the trench. Sounds like a good plan right? I thought so, except…. After spending evenings earlier in the week clearing clutter out of the 5th wheel so I had a place to sit and work on micro controller projects in the evenings and giving the tractor an overdue lube job, Thursday and Friday were spent working for work instead of the planned trenching. Also, the week came and went without delivery of the electrical wire. Saturday was rainy pretty much all day long with hail, thunder and lightning thrown in. So even if I wanted to work in the rain, no way am I working in hail, thunder and lightning.
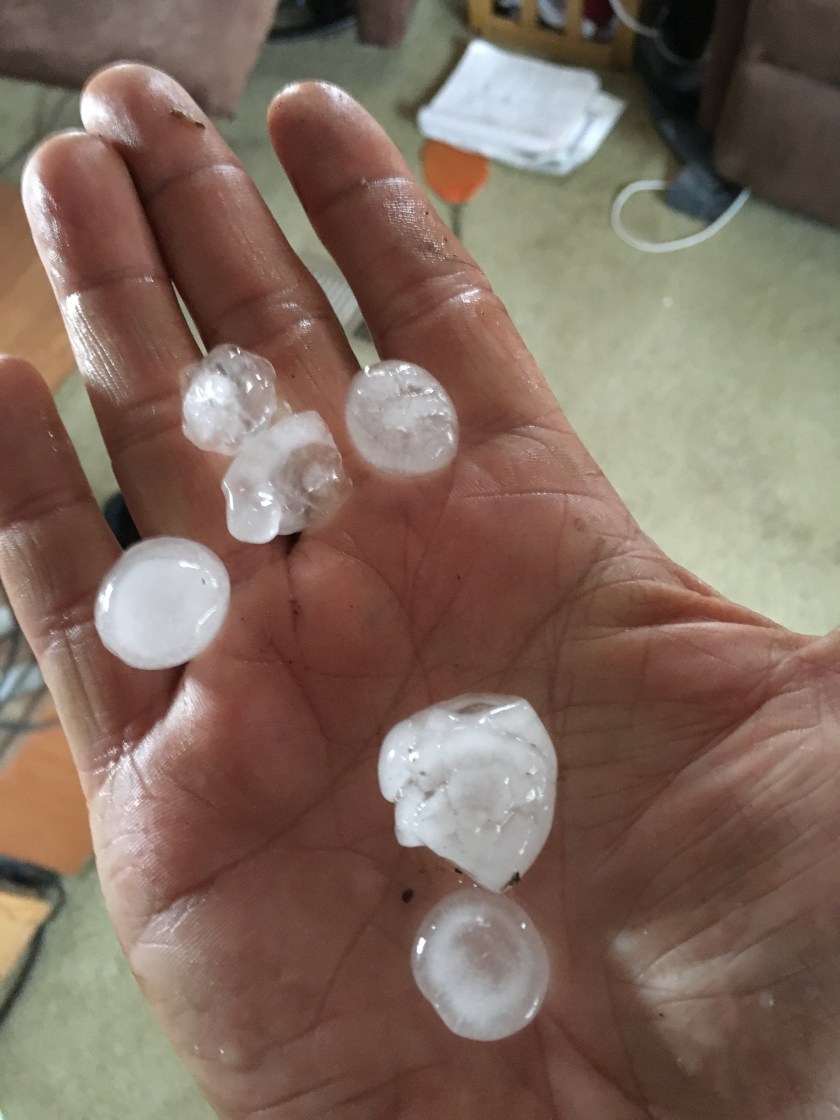
The white objects all over the ground are hail stones.The hail stones weren’t huge but they weren’t exactly little either.The hail storm put holes in two of the three vents in Rachel’s trailer and cracked the third so all three need to be replaced.
Cloud cover was so heavy all day that the batteries did not get sufficient charge. First time since the solar panels came online. The generator hasn’t been run in months… Not good. It would not run with the choke at anything less than 1/2 and as such, it wouldn’t supply the power it normally would if it were running properly. That said, after I reconfigured the system to not try to pull so much power from the generator, it got the job done of charging the batteries another couple volts over a couple of hours of running. That was yesterday. Today started out rainy (thus this early day blog post), but it is clearing up now. I expect/hope it to be clear enough to charge the batteries today. Some day I plan to learn to service the generator myself, but now is not the time for that, especially considering I don’t have a shop to work in yet. In the mean time, I will have to find someone to take it to for service.
I’ll have to jump online tonight to shop for replacement vents for Rachel’s trailer.
What else have I been doing with my time?
Doing battle with a mouse comes to mind. Damage that I am aware of was minimal before it met it’s demise. Rachel has some extra cleaning to do due to his multiple visits to our kitchen gadget drawers.
Cheryl has had furry cuddle buddies in the form of cats for most of her life, but she has been without for the past year at the apartment. Over the past year, we’ve discussed it at length and at this point in time, I don’t want another indoor cat so we agreed we would get a small lap dog when she got moved down here and settled into the trailer. She became focused on getting a new furry cuddle buddy over the last couple of weeks. After days and nights of searching shelters and rescue organizations, she gave up and turned to searching breeders in the area for a pup meeting her/our wants and yet affordable. She finally settled on one this week, made the arrangements, and so it is that we have added a new member to our family.
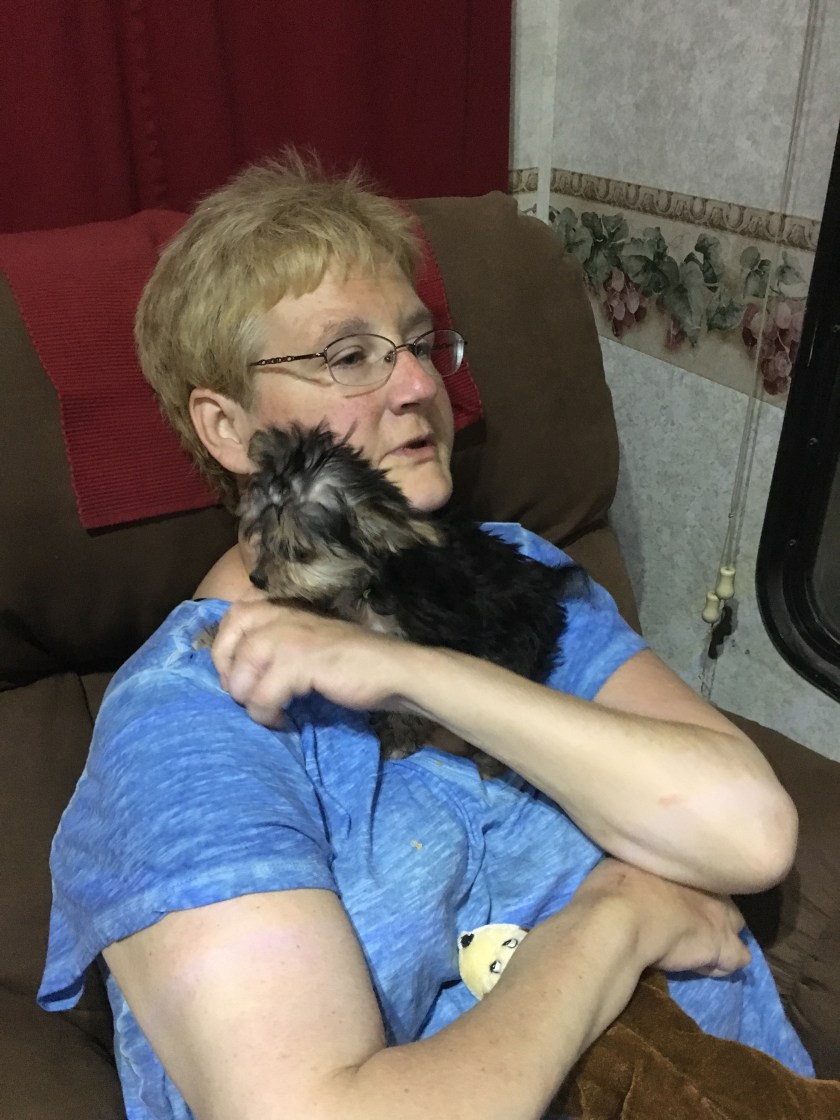
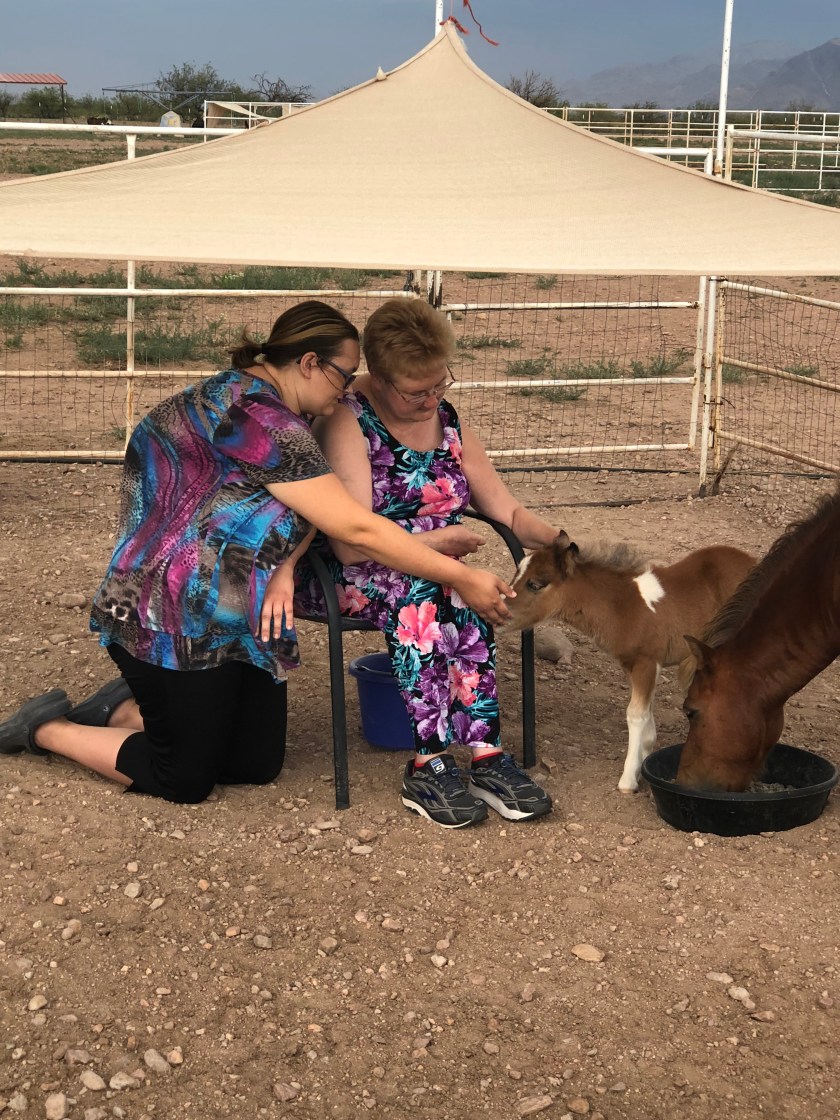
Meet Bear. Our newest family member. He is a Yorkie/Maltese mix showing mostly Yorkie traits. He is 11 weeks old. This was taken his first night with us.
Cheryl holding Bear his first night with us. Bear likes to be up around your shoulders and neck.
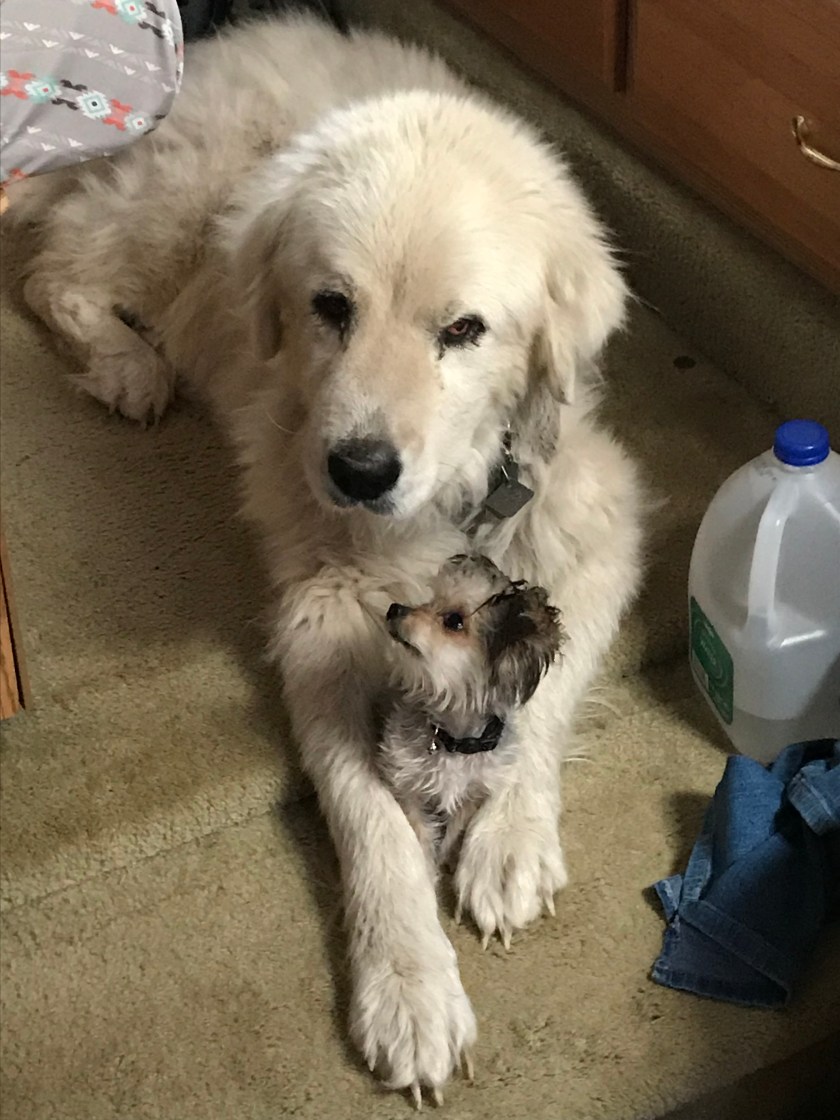
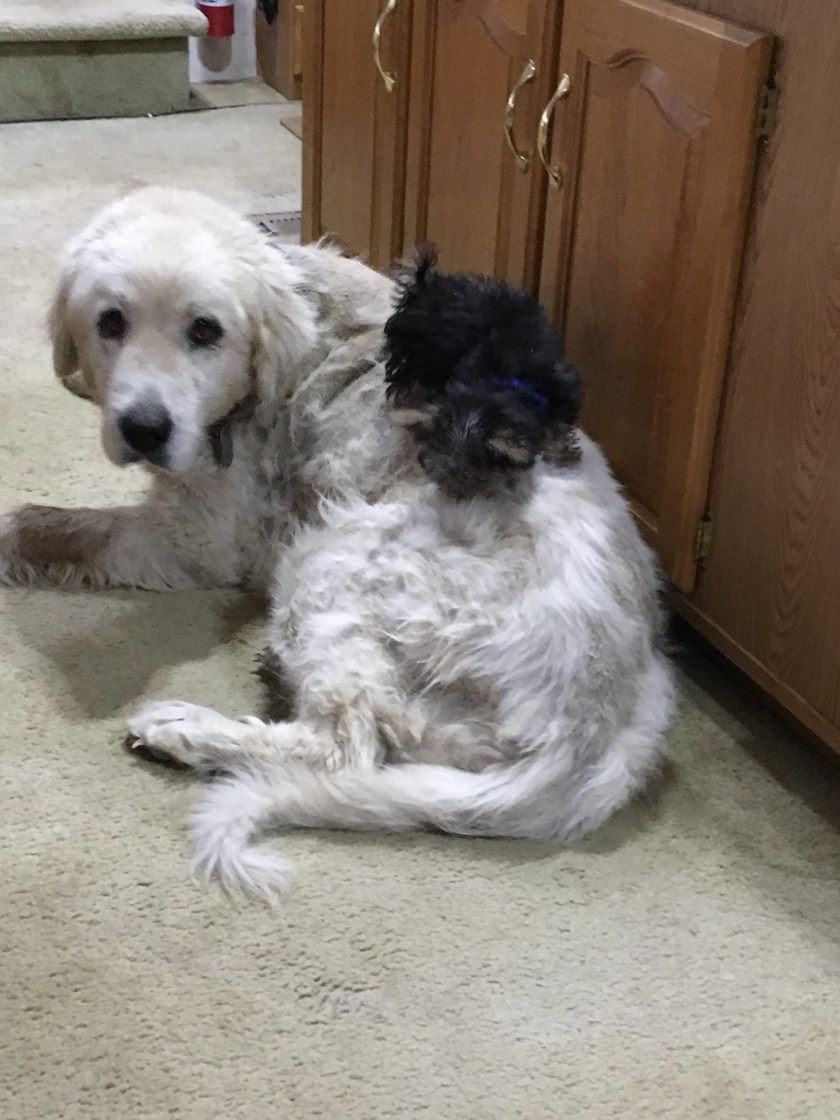
Sasha pretty much ignores him. Bear wants to play with her but she has no interest in playing with him. He barks his little bark and charges a few inches then backs up trying to get her to play. She silently walks away annoyed. In fact, she has taken to now going into the upper bedroom area of the 5th wheel, an area she was previously not allowed and didn’t venture into, just to get away from him. Feeling bad for her, I let her go up there now. He is still to small to make it up those stairs but I’m sure it it is only a matter of time where she will just have to go outside to get away from him. It is kinda funny. For you Star Wars fans, seeing him run under and around her makes me think of Ewoks running around the imperial walkers.
Speaking of Sasha, we have been leaving her out at night to keep the unwelcome critters away as is in her breed’s nature. She does this by barking at anything she hears go bump in the night. She barks a lot. We sleep through it. Thought we were far enough away from all our neighbors that it would be fine. Apparently not. The one neighbor I failed to attempt to introduce myself to left me a nasty gram posted on our gatepost informing us that he had called animal control, had audio and video evidence of her barking, and if it continued, I would get a visit from animal control. The note was left anonymously but I am confident I know who it was. He stopped outside the fence line that night and parked for a few minutes. I presume to see if she would come out and bark at him. Thinking it is time to go introduce myself. Sasha now sleeps inside at night with us.
Subject change…
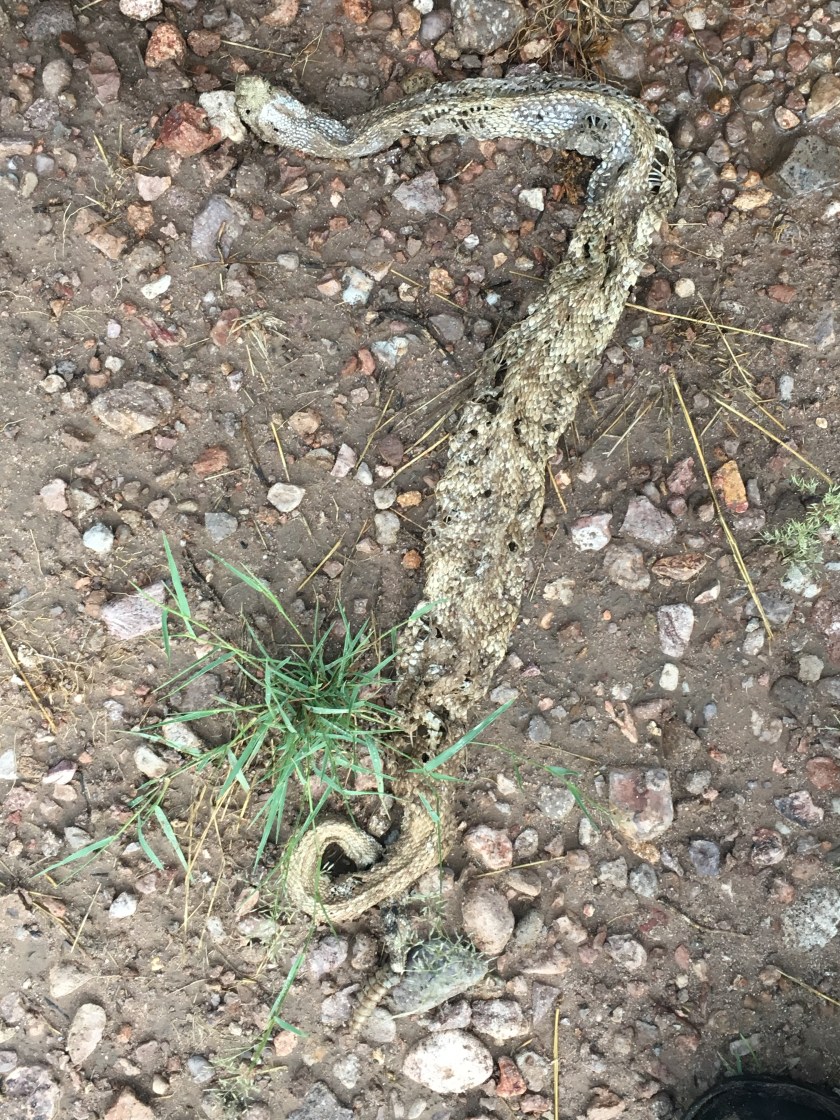
Rachel found what I presume is the rattle snake I shot with the shotgun back in May, or at least what is left of him… I’m guessing the rattle snake I saw in the drive a few days after that event was a different snake…
One Saturday night after enjoying an evening of dinner and music at the Portal cafe, Cheryl and I heard a brief sound as I was helping her into the trailer. It could have been a bug, but I had my suspicions that it wasn’t, so I went back out to investigate. The sound had come from the direction of the solar panels. After a few steps in that direction from the trailer, it occurred to me that I needed to not step lightly. I needed to make my presence know with each step. Sure enough, the next thud of my step were enough to elicit the very loud rattles of a disturbed rattle snake that Cheryl was able to hear from the inside of the trailer loud and clear. Good enough for me. I froze in my tracks for a few couple seconds, then retreated taking the same path I came as it was dark and I knew that path was rattle snake free. I was thankful he was under the solar panels and not under the trailer. I’ve been assured that as we establish our presence in the area, rattle snakes will become less of a problem in the immediate vicinity of our living space over time. Note I said “less”. Another thing to reduce their presence in the area is to reduce or remove their food source – mice and rats. That sounds like a win/win to me. So, making various forms of bucket mouse and rat traps are also on my to-do list. I’ve also considered introducing non-venomous snakes to the property to further reduce the food supply in the area. Cheryl is less excited about that option. 🙂
Okay. I think that brings you up to date with everything. The sky has cleared and it is still early in the day. Time to get lunch then go play on the tractor digging a trench. Maybe I will still be able to salvage some of this holiday weekend and make substantial progress after all.
Wishing everyone a safe and enjoyable holiday weekend.
Ya, I’m a slacker and this blog entry is once again long overdue.
That said, I’m not sure that I have all that much in the line of updates but I’m sure once I get my brain working I’ll find plenty to ramble on about.
Health wise, Rachel and I are back to 100% and my ear and hearing are back to normal and Cheryl is still healthy.
The weather is slowly cooling off. The humidity is up quite a bit for this area (currently 37%) as it is monsoon season and we are finally getting rain nearly every evening.
My weight is continuing to slowly creep downward which is a good thing. I’d be much further along if I didn’t like to eat out and eat corn chips and guacamole so much. With Rachel and Cheryl’s recent change in diet, the rate of their weight loss far exceeds mine at this time. Hoping it continues for them as encouragement to stay the course. I expect the rate of their weight loss will decrease yet continue in the coming months as the temperatures cool and their tastes adjust and appetites increase.
There has been a substantial increase in creepy crawlies around. We haven’t noticed as many tarantula’s out and about in the last couple of weeks as compared to the last half of July. Although they are very large (typically around the size of a Clementine orange), tarantula’s are less worrisome than the black widows which from what I’ve seen are closer to the size of a quarter or smaller. Rachel did some research on black widows and found that their venom is worse than that of rattle snakes and as such can be life threatening if medical treatment is not sought after a bite. We have a number of spider webs under the 5th wheel. Rachel noted 3+ black widows in the web by the door one night. Not okay. So, we got some spider spray and killed them one evening. Next step is to knock down the webs and see if they come back. If/when they do we will need to go night time spider hunting again. We’ve killed a couple of other black widows here and there outside as well. Thus far, we haven’t noted any spider webs in the trailer. Definitely thankful for that.
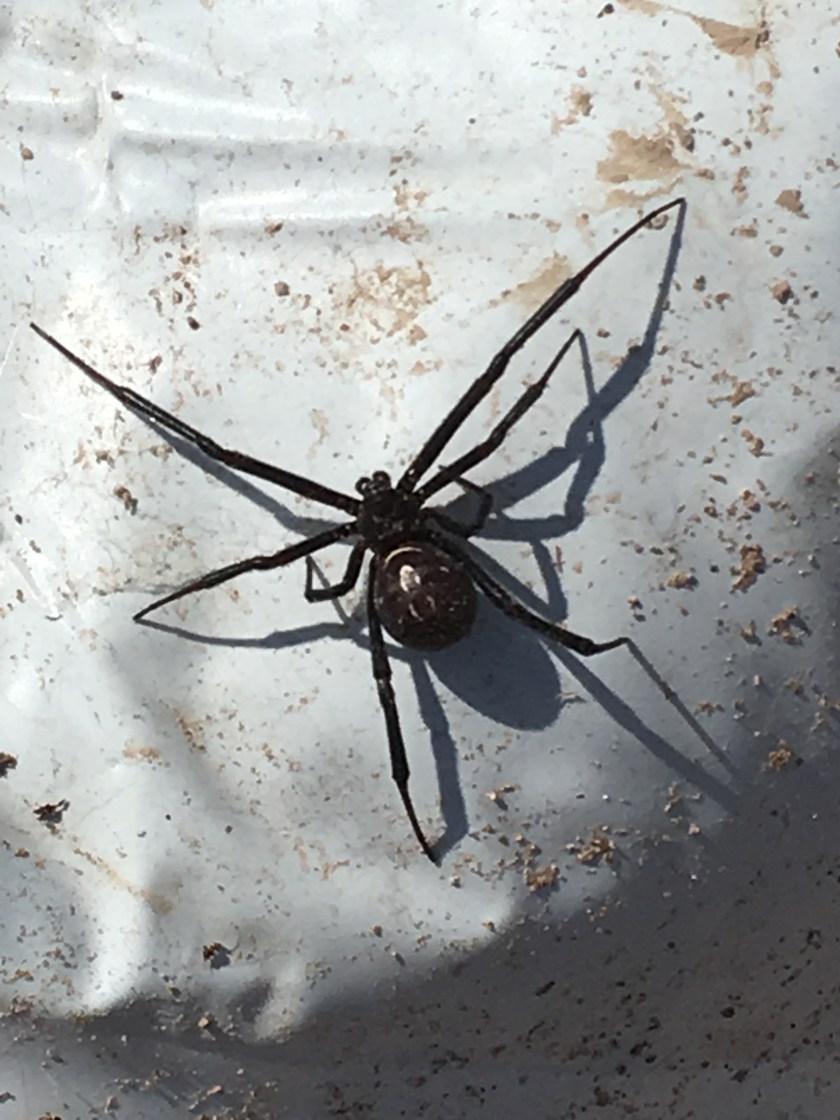
This is a black widow spider that I got lucky when I crossed paths with early one morning. It was under a bag of peat moss that I thoughtlessly reached under to pick up without gloves one morning. Needless to say I dropped the bag rather quickly when I saw it on the bag. It didn’t live very long after this photo was taken…
We seem to have an infestation of kissing bugs in the 5th wheel. Kissing bugs are blood sucking bugs and like most blood sucking bugs, their bites itch and they can transmit disease. Like most blood sucking bugs we’ve dealt with over the years, they seem to be more attracted to me than Cheryl. Lucky her. Indoor pesticide is on the shopping list. If worse comes to worse, we will have to bug bomb the trailer. Really hoping it doesn’t come to that. Although I’ve found a number of scorpions in the rocks outside, I’m always wearing gloves when working in the rocks and dirt so it is not a concern. Additionally, scorpion stings are not generally life threatening unless you have an allergic reaction to them. I keep trying to get pictures of them when I see them. Because they don’t like the light, when I uncover one it has usually disappeared by the time I get the phone around to snap a photo. I’m thankful that we haven’t noted any scorpions in the trailers yet. I did learn one thing the other night. If my eyes are not adjusted to the dark, I should have a light on when using the throne. I felt something on my leg one evening and brushed it off. Couldn’t see what it was or where it went when I brushed it off. I then proceeded to head to bed for the night. As I’m laying in bed, I felt something uncomfortable on my butt so I shifted a round a bit to get more comfortable. Then it bit/pinched me in the ass. YIKES! I hopped up, turned on the light and stripped. After searching my garments, I found a beetle. It’s life ended rather abruptly that night. I am thankful it was a beetle and not something worse. There are other aspects of that event that I am thankful for but will leave them unsaid. You can use your imagination.
I did kill a baby rattle snake by the road side gate one evening coming back from Douglas. That was the second time we’ve seen that (a) baby rattle snake by the gate. While I had committed to myself that I would leave and let live rattlers not in our immediate living area, I made an exception for this one. I am always concerned about getting out of the vehicle at night in (too) close proximity to a rattle snake. There are a couple of concerns specific to baby rattle snakes that I have. 1: They are harder to see because they are smaller. 2: They can’t rattle yet to let you know they are there. As this one seemed to be content hanging out where we get in and out of vehicles to open and close the gate, I decided he needed to go to avoid a future unfortunate encounter.
As mice attract snakes, while we don’t have any mice in the trailer, I’ve seen a few scamper away from burrows as I dig out mesquite bushes, so I know they are around. I’ve bought a “walk the plank” mouse trap and plan to set it up this weekend in hopes of clearing out a number of mice with minimal effort.
Sasha came back to the trailer one evening carrying dead jack rabbit which she proceeded to enjoy over that evening and next day. Because she didn’t bury it, by day three what was left of the remains were really starting to stink so I picked it up with the shovel and slung it over the north east corner of the fence. A week or so later, I saw her walking back to the trailer with another (presumed) kill. This one she buried in the trench that I had once again started working on filling with dirt. The next day I returned to work in the trench and she decided she should retrieve it before I found it or otherwise buried it deeper where she wouldn’t be able to get to it. I was surprised when I saw what she uncovered. It was not a rabbit but the head of a baby dear. I seriously doubt she killed it herself. More likely she came across what was left of a coyote or maybe mountain lion kill. As it was already putrid smelling, I relocated that one back outside the fence line as well. When I returned from the task of relocating it poor Sasha was looking around the trench rather lost and confused – where did dinner go?
Speaking of Sasha. That dog is something else, I tell ya. The week after Rachel and I were fully recover from our summer colds, we all went over to Tom and Alicia’s to visit leaving Sasha behind to guard the property. As their property is directly to the south of ours and they have a drive with gate that exits at the south west corner of our property, we usually use that back drive to go to their place as it is only about a mile that route as opposed to 5 miles by going 2 miles back down to the state highway to get to their street a mile down the road, then 2 miles back to their property. Tom’s property is fenced as he too has cattle and unlike the other ranchers around here, he keeps his cattle fenced within his property. Anyway, when we got there Tom and Alicia had just started their horse feeding chores so Rachel and I jumped in and helped Tom while Alicia took Cheryl around on their quad ATV telling Cheryl about the various horses they have. As we were finishing up, Tom looked up and said: Hey, there’s Sasha. I thought he was joking. Then, I spotted her. She must have followed the road or the scent of the diesel exhaust from the truck all the way to Tom and Alicia’s. She was on the far side of the horse pen where she was trying to figure out how to get through to get to us. He shimmied her way through the horizontal bars on the back gate to the horse pen to get into the horse pen then was trying to figure out if the mini horses which are only slightly larger than her were a threat or not. Luckily they were mostly focused on eating so they generally didn’t care about her being in their pen. Tom and I then walked over to the inside gate to let her through into the interior yard of Tom and Alicia’s. As we still wanted to go inside and visit, we decided to put Sasha in the outdoor dog kennel for the B&B’s guest’s dogs making sure she had water in there with her. We then went inside for a visit. What seemed like a mere 15 minutes later, I happen to look out the window and saw Sasha walk by the window. Typical Sasha – Mrs Houdini. As they have great danes that don’t take kindly to other dogs in their space and can jump their fenced dog yard should they choose to do so, we decided we should bring her inside with us as it was clear we weren’t going to keep her in that kennel. Sasha then shared with Tom and Alicia the joys of a dog that slobbers, a lot, especially after getting a nice drink of water. More than once Sasha thought it would be nice to spray the living room with slobber by shaking her head vigorously as each of us reached for our drinks to cover them with one hand as we shielded our faces with the other hand. Very thankfully, Tom and Alicia are animal lovers and were very forgiving of Sasha being Sasha. I think I was more tense about Sasha’s activities in their home than they were. To top the evening off, when it came time to leave, Sasha decided she liked the air conditioning of Tom and Alicia’s more than going home with us. After I made room in the back of the truck bed for her, I took her by the collar to lead her to the truck but she planted her butt on the ground to tell me, “No, I don’t want to go. I like it here”. My response: “too bad, you coming with us.” As I was leading/pulling her into the bed of the truck by her collar (she was standing on a tote I happen to still have in the truck using it as a step), Tom picked up her hind end to help her in the rest of the way. Needless to say, the next time we went to visit Tom and Alicia in the evening, we locked Sasha in the trailer with the windows open, the ceiling fan on, and a full bowl of food and a full bowl of water. Thankfully, when we are home, she generally stays around the property. A couple of evenings ago, I noted that I hadn’t seen her around since late morning which was very unusual. I woke up around 2AM local and started worrying as I hadn’t heard her yet (she barks a lot at night to let all the wild life around know that she there). About and hour later I woke up to her barking so I got up and let her in to eat. As chance would have it, about 15 minutes later coyotes started howling in the area so she started barking again – inside the trailer. Not ok. So I got up and let her back outside to do her job. I went back to sleep easily knowing she was back home safe. One of these days I will get around to Sasha proofing the fence line. Or at least attempting too….
We had problems with the refrigerator in the 5th wheel keeping things cold when the temps were in the hundreds. We fired up the fridge in Rachel’s trailer which is keeping things much colder. We moved all the food to her trailer. I haven’t decided yet what we are going to do about the fridge in the 5th wheel. There is no one around here that does house calls for RV frig service and I’m not inclined to hook up our home and drop it off for service for who knows how many days any time soon. I may have to figure out how to pull it out and haul the fridge itself in for service. I may also evaluate replacing it altogether with a standard refrigerator. For now, we have a working albeit very inconvenient solution.
As far as projects go, I’ve been a bit ADD (aka indecisive) over the last few weeks. Once I recovered from my cold, I chose to defer filling in the remaining trench/hole and having the phone line connected to the 5th wheel in it’s current location. Instead, I started focusing on clearing the land behind Rachel’s trailer as we will be moving her trailer back about 30′ and eventually putting the 5th wheel in the area her trailer currently occupies. I got the land cleared and started relocating gravel from the area by Rachel’s trailer I plan to trench to bury water line and electrical and communications line conduits.
Photo of the land cleared behind Rachel’s trailer with some of the gravel moved to it. The structure roofs visible in the distance are Boyd’s place. Boyd is our nearest neighbor.Area on the north side of Rachel’s Trailer looking west toward the canyon where I cleared the gravel from in preparation to trench for utilities to the long term placement of both RV’s.
This is as far as I got before I reluctantly switched gears out of necessity. Not sure if I mentioned it but I dropped my phone on the way home from Michigan. The screen broke (more like shattered) in addition to the glass screen protector that I had on it. I used it like that for a while not realizing the screen itself was broken. It was only when I went to replace the glass screen protector that I realized the screen itself was also shattered so I just pushed the glass screen protector back down. It was too late though. It didn’t stick right and the screen was more problematic using. So, I called work to request a replacement phone. I’m not due for a refresh until next year so I settled for a downgrade to a iphone 6S from a iPhone 7. Sadly, after using the iPhone 6S for a few days, it was clear that WiFi calling did not work as well in my environment as did the iPhone 7 and I was frequently dropping work calls. Completely unacceptable. There was one afternoon I had to exercise great restraint to resist throwing the replacement phone across the trailer. Clearly time to restart the stress management technique which served me so well last year – finding things to be thankful for when things go wrong. While I could have called work back and asked for an iPhone 7 or better, I felt this was not works problem to solve, it was mine. So new (old) high priority project: Get a land phone line installed in the 5th wheel ASAP. In the trench that hadn’t fully been filled yet, I hand dug a narrow trench from the outside phone line box previously installed by the phone company which is by the solar panels to the shed. I then laid conduit and pulled a data cable through it and connected it in the telco’s phone line box. Once I was done with that it was time to finish filling the trench. I first filled in the hand dug trench so it didn’t fill with rain water. I then continued adding dirt/rock mix that was readily available in piles around the property. Once the dirt was to the desired level, I transitioned to finish filling the hole with rock and gravel (2-6″ rock on bottom with gravel on top for easy walking on). Sadly, I ran out of readily screened rocks before the hole was filled. As the space under the solar panels was observed to be collecting water and needed to be filled in with dirt and rock, I decided to kill two birds with one stone. I started screening dirt under the panels, letting the dirt fall onto the ground and scraping the rocks from the screen into the wheel barrel. I did that for much of the day this past Saturday and a few hours on Sunday. Rachel jumped in and helped on Sunday. Between the heat, being out of shape, and having screened dirt for hours on Saturday, I was exhausted after screening for around 4 hours on Sunday. By that time, we had made substantial progress at filling the space under the panels with dirt and the trench with gravel. I still wanted to get the conduit run from the shed to the 5th wheel over the top of the ground for the data cable. I knew if we continued to screen dirt until the hole was completely filled with gravel to my satisfaction, it would be the end of the work day and I would be too exhausted to get the conduit and cable installed. I decided it was close enough to done and switched to running the conduit. After about 15-30 minutes of running conduit between the shed and 5th wheel I realized that I had planned to buy conduit for the project but had not as I had previously decided that the land line could wait until we moved the 5th wheel to it’s long term location. I was about 50′ short of having enough conduit. Oops. Given the phone company was scheduled to come Tuesday morning, I’m glad I didn’t wait until Monday night to install the conduit. I put together a shopping list for Cheryl and Rachel and they made a Douglas run Monday during the day while I worked. I finished installing the conduit and pulling the data cable through it Monday evening. I also unpackaged the set of cordless phones I had bought in June and got batteries installed and on their chargers charging. Tuesday the Shawn from the phone company came to connect the line for me. There was a bit of troubleshooting as the exterior phone jack appeared to have problems, he had to bypass it. Then for what ever reason, the line had been cut and not respliced inside the trailer. Shawn had some handy phone line splices so he easily reconnected the wires and wa-la. Phone service.
While Shawn was working on the phone line we were chatting a bit. He asked if I was aware of the 20 hour power outage throughout the valley last week. Nope. That was the first I heard of it. I am so glad I opted to pay for the solar system rather than for the phone company to extend power lines 2 miles down the road to get me power. That is not the first power outage that I was completely oblivious of. There was a multi-day outage this spring that I heard about from Tom.
Today was the most cloudy to-date since the solar panels have gone live. I was monitoring the battery status pretty closely throughout the day to make sure they got enough charge to get us through the night. We got to around 46.5V before the sun set. That is about .5 a volt short of the normal full charge for this summer. We normally have about 41- 42V left in the batteries after running fans all evening and all night. Low battery cut off is set at 40V. We haven’t been running fans this evening and won’t tonight is it is rather cool thanks to the nearly day long cloud cover. All these factors combined, I think we will have enough juice in the batteries until sun up tomorrow and have opted to not run the generator to top them off that last little bit. Will find out tomorrow if that was a good decision or not. I might have to wait a while to make coffee in the morning.
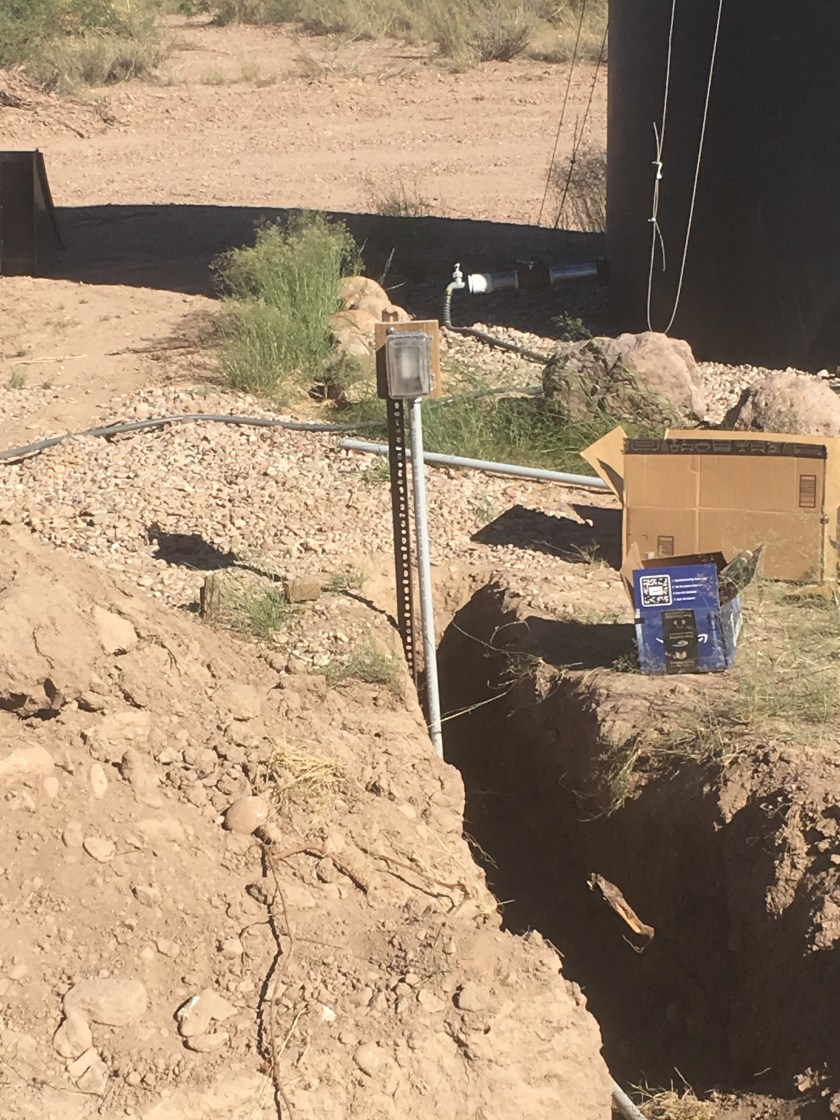
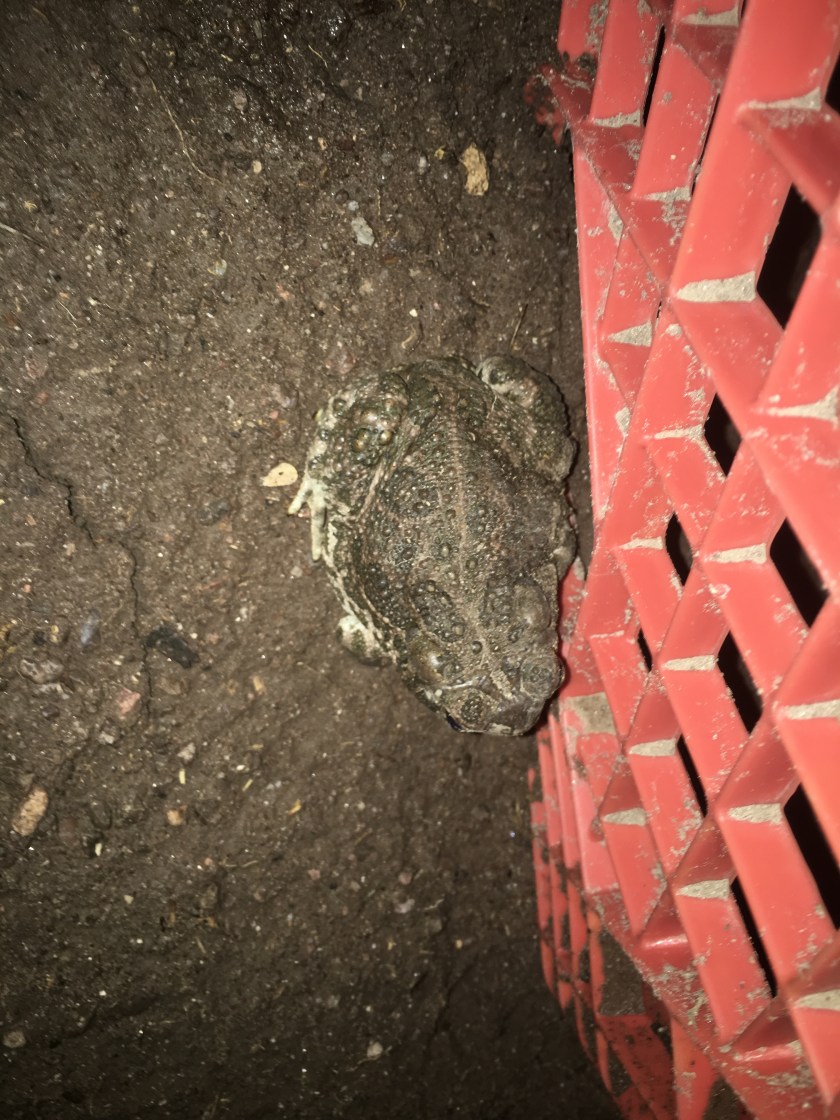
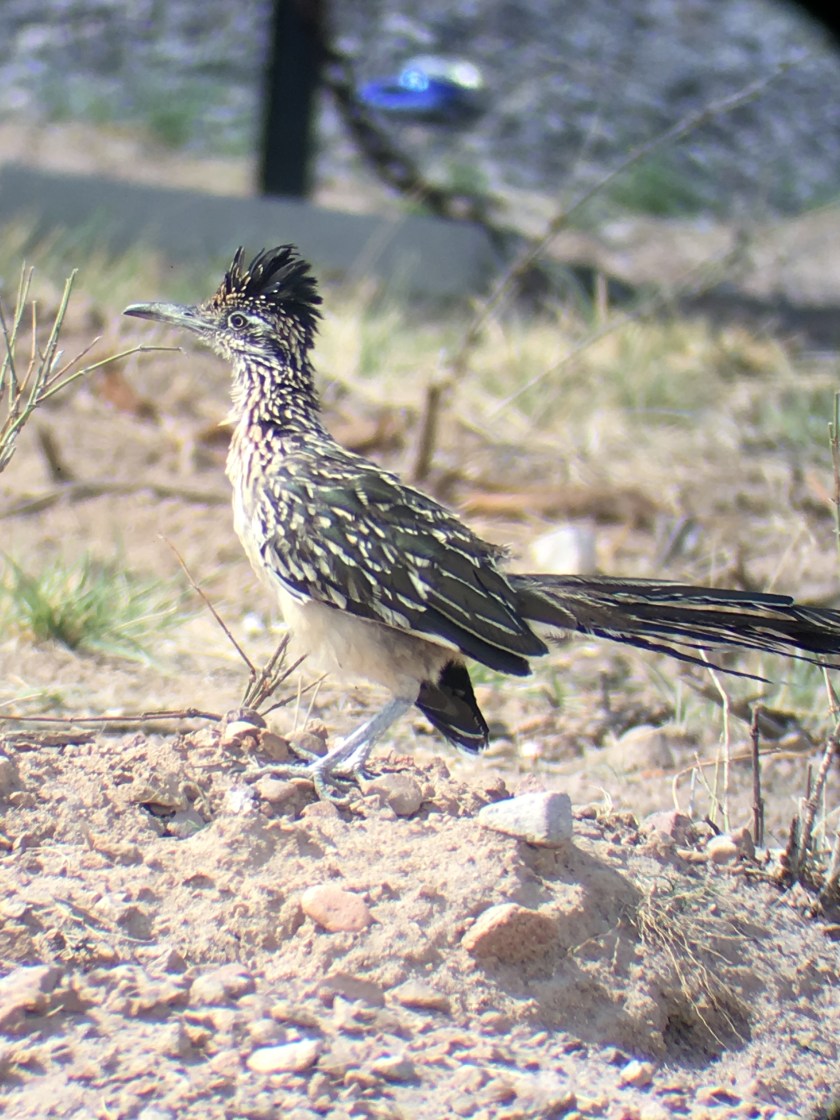
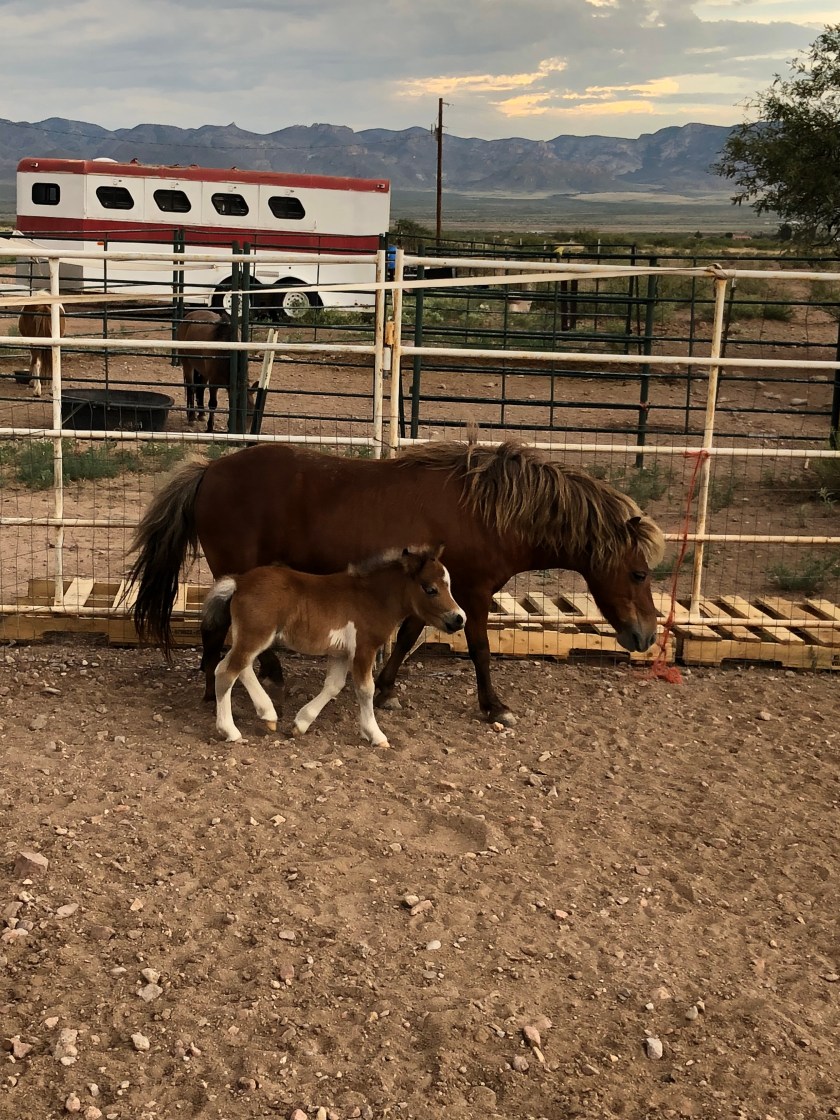
Trench/hole between shed and panels nearly filled with conduit for phone line running over the top of it.Temporary conduit running from shed, under panels with freshly screened fill dirt over to the 5th wheel for phone line. Among many other things, also visible is the phone company box.Conduit and line into the trailer. Looking at this picture has reminded me that I need to fix the data jack covers. They are old and brittle from UV exposure. Best to replace them but need to get them covered in the short term.Pile of gravel for the RV carport just patiently waiting for me to get to it.First toad I’ve seen since I’ve been out here. Boy is he a big one. Dirt looks wet, must have been raining that evening.Our good friend Pete gifted us a spotting scope, tripod, and phone attachment setup all which enabled me to get this great photo of a road runner. He was probably about 100′ away when I snapped this pic with my cell phone though the scope.Momma mini horse Salsa and her 1 week old foal Picante at Tom and Alicia’s.Cheryl and Rachel petting Picante
I worked on and finished the seat I had been working on Monday and Tuesday.
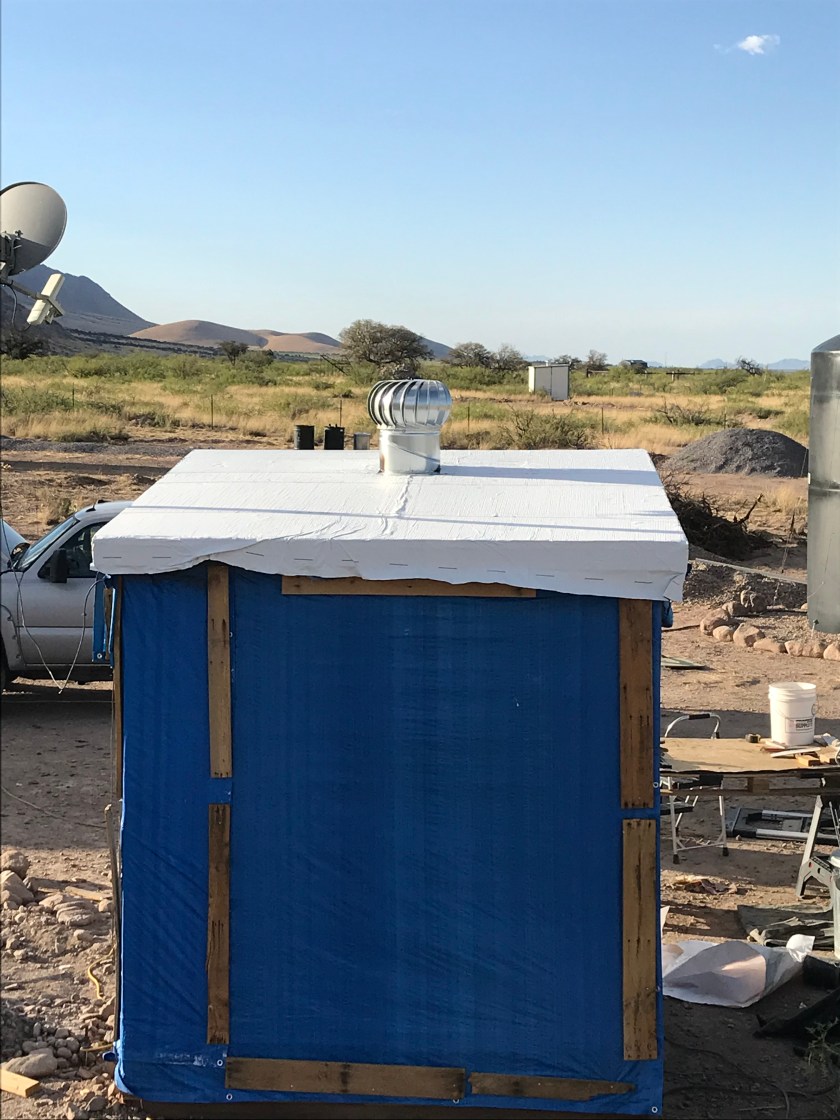
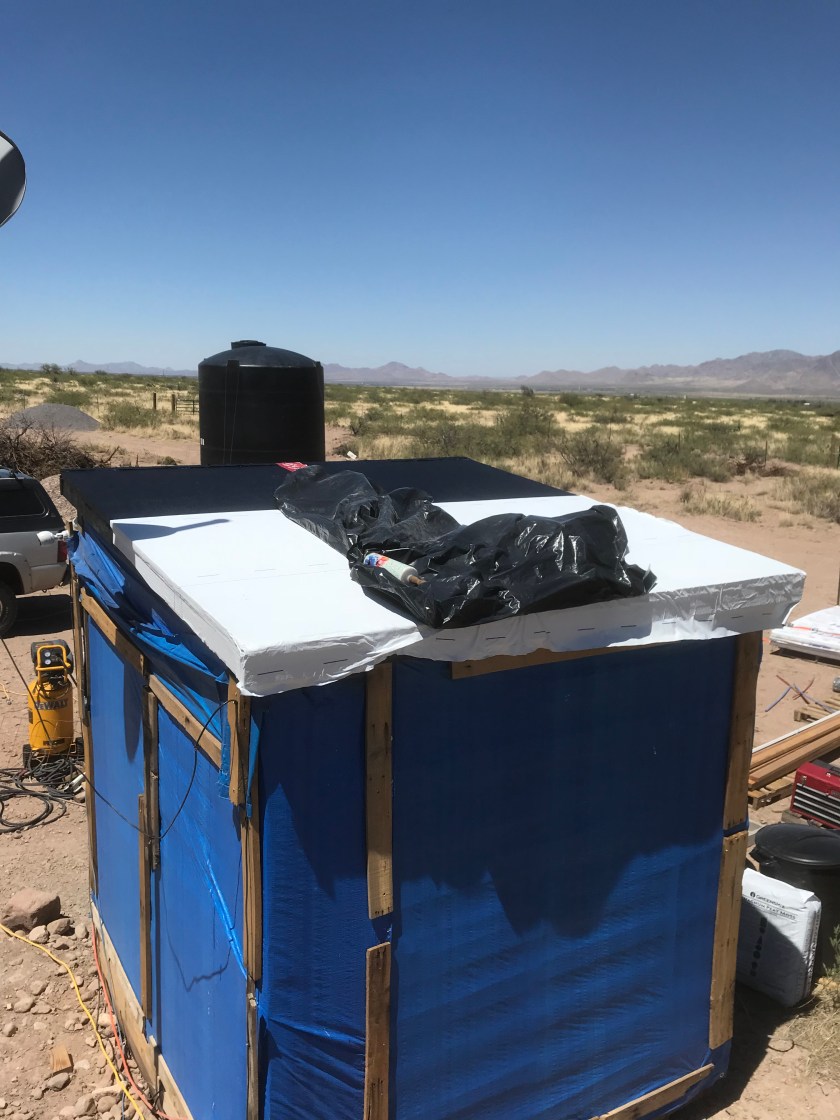
The roofing material arrived Wednesday afternoon after work as expected so I was able to finish the roof up Wednesday evening.
Roof complete with turbine vent and wrinkles in the application of the roofing material. Also visible is my microwave dish for internet to the left and my water tank to the right.
As most of you now know I traveled to Michigan departing June 29, so Thursday was spent completing my efforts to prepare for departure.
I must say this was the most enjoyable vacation I have had in a long time. An uneventful drive the whole way was most appreciated. I stopped in South Bend to visit with my sister and cousin (two different people for those of you wondering) for the better part of the day. As I had not seen “What the Health” yet and I thought they might appreciate seeing it, I fired up Netflix on my laptop and we watched it together. I then headed to Michigan where I spent the week visiting with friends and family. I planned one on one visits with each family member and all save one went splendidly well. I spent a fantastic evening with friends hosted by our good friends Pete and Judy. Friday was spent packing up Cheryl and Rachel’s apartment before heading out to the wedding rehearsal and rehearsal dinner for Jacob and Theresa’s wedding. Saturday was a beautiful day for a beautiful wedding and reception.
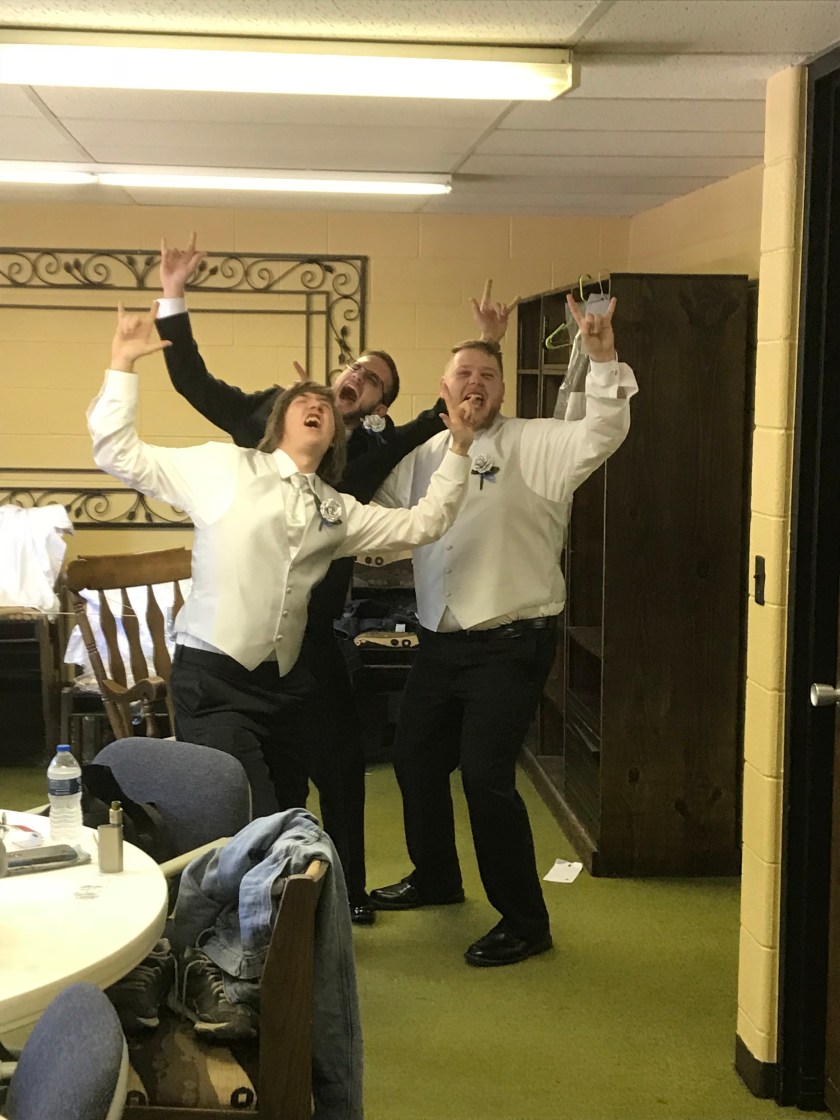
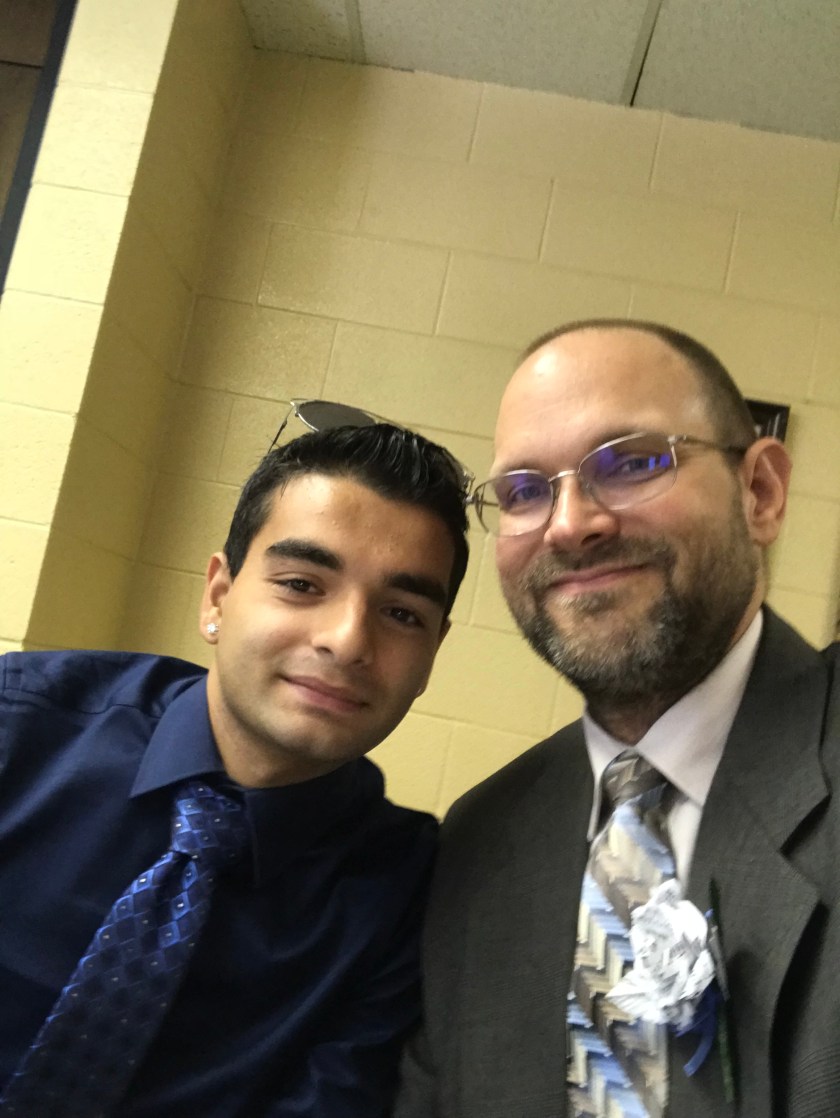
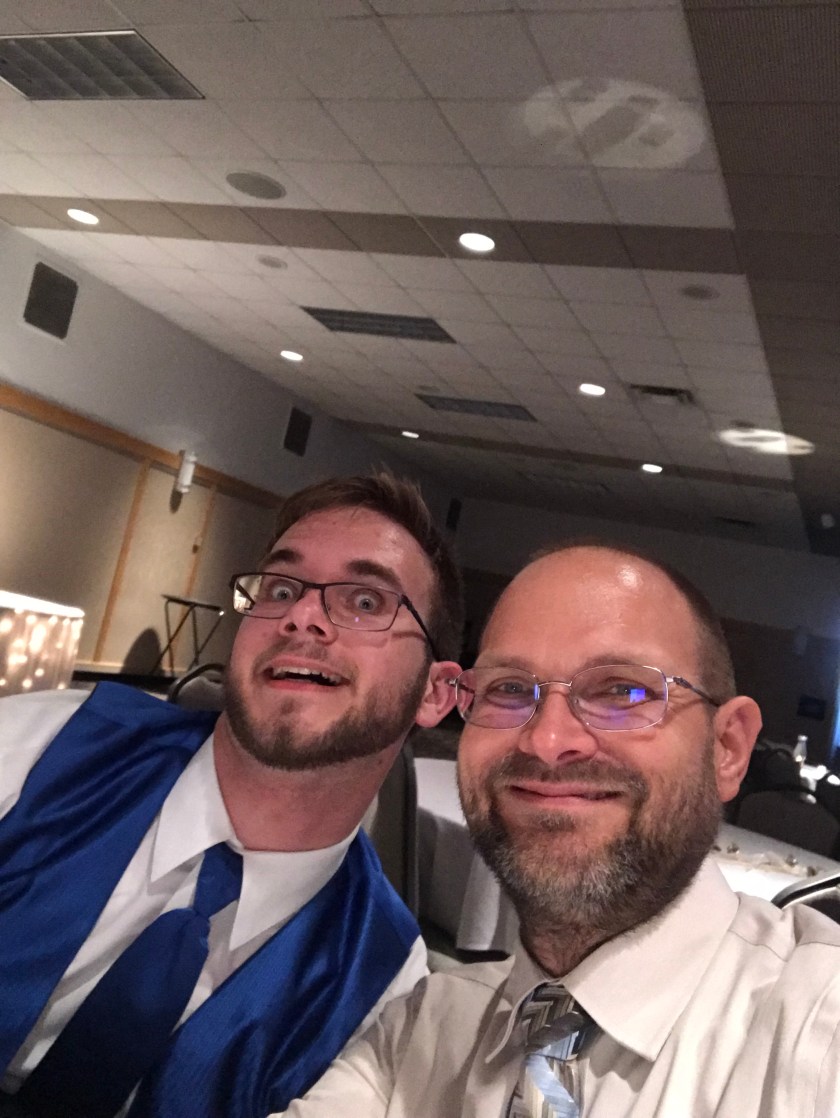
Jacob and 2 of the 3 groomsmen hamming it up before the wedding.My son Sergei and myself before the wedding.My son Jacob (AKA: The Groom) and myself at the reception.
We spent Sunday morning having breakfast with Jacob and Theresa and the new in-laws. Then back to the apartment to finish packing, loading vehicles, and cleaning the apartment. We finally finished around 3:30 PM and hit the road for a few hours of driving so that we could be on the far side of Chicago before Monday. While the drive back to Arizona was generally uneventful, both Rachel and I started showing cold symptoms Friday before the wedding. Between the wedding, and being on the road, I was not able to drink the volume of water I would normally drink when I feel the onset of a cold. As such, the health of both Rachel and I deteriorated over the course of the drive to Arizona. We finally made it home Wednesday afternoon. We unloaded the food we brought from Michigan, various other essentials and left the rest to be unloaded later. We unloaded a bit more Thursday, but generally rested. Thursday evening my ear started to hurt. I figured it was an ear infection from the cold. As we were already planning to spend much of the day in Douglas, I added medical visit to get my ear checked out to the list of running to be done. We got on the road to Douglas later than planned due to the time spent finishing unloading the truck and putting stuff into the storage shed (I was generally moving at a snails pace). We got a late lunch, then decided to take care of the department of transportation before the medical visit as the DOT closed earlier than the QuickCare facility. Rachel, my daughter, decided she also wanted to be seen due to the breathing problems that had developed with her cold. I had a confirmed diagnosis of ear infection. My ear was starting to ring as I was sitting there waiting to be seen. Not good. I had lost hearing Thursday evening, but I know based on the experience of others I am now at risk of permanent hearing loss in that ear. Rachel’s diagnosis was bronchitis. We both got prescriptions for antibiotics and cough syrup with codine. We stopped at the pharmacy to get them filled before heading to a dinner murder mystery show that I had bought tickets for before leaving for Michigan. We all enjoyed the show. Given my lack of sleep for the last 5 days due to coughing much of the night, I had Cheryl drive us home after the show. Saturday and Sunday were spent working on putting stuff away here and there but mostly resting. As of this writing, my ear no longer hurts but I still can’t hear out of it and I continue to have issues with my balance and mild vertigo from time to time. Hoping it rights itself in time.
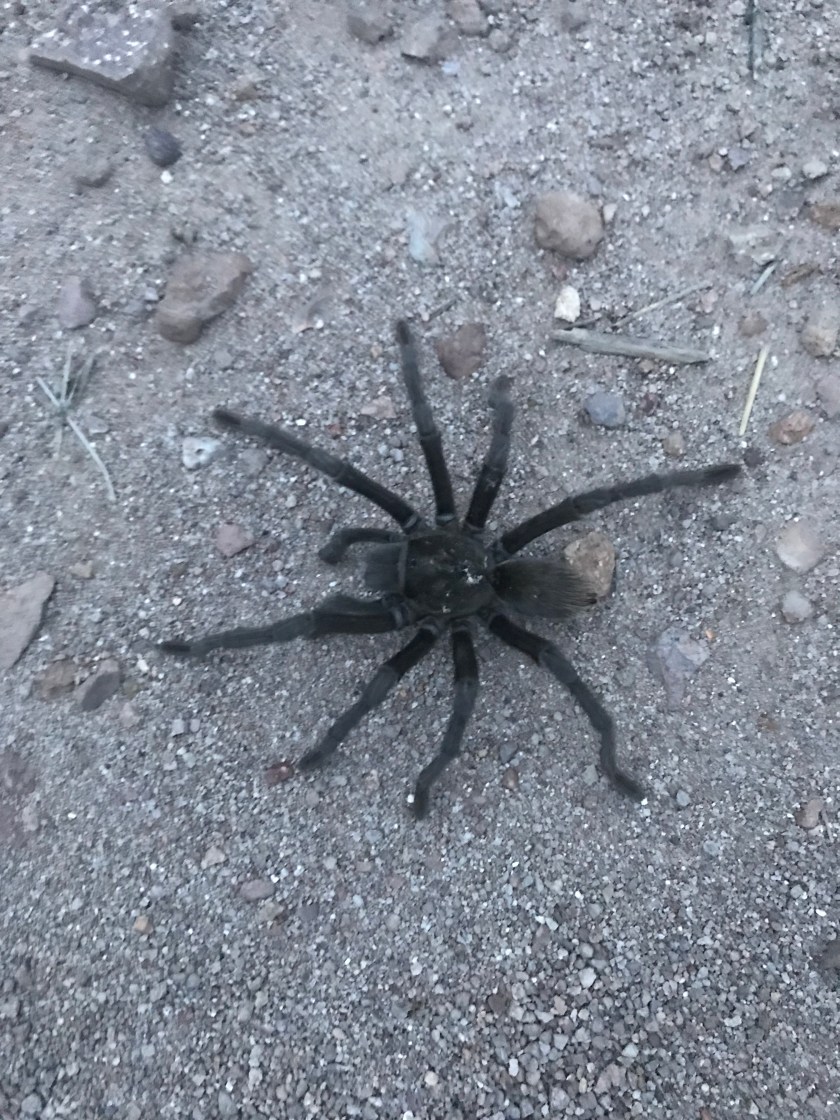
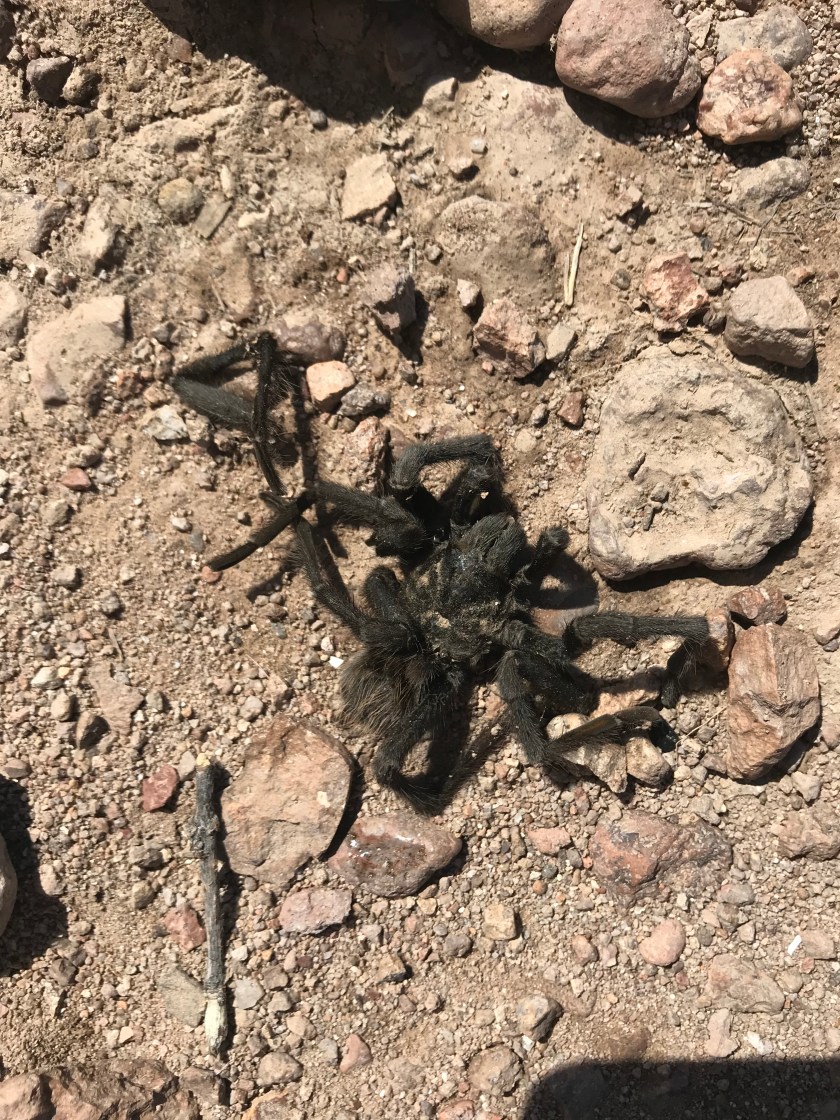
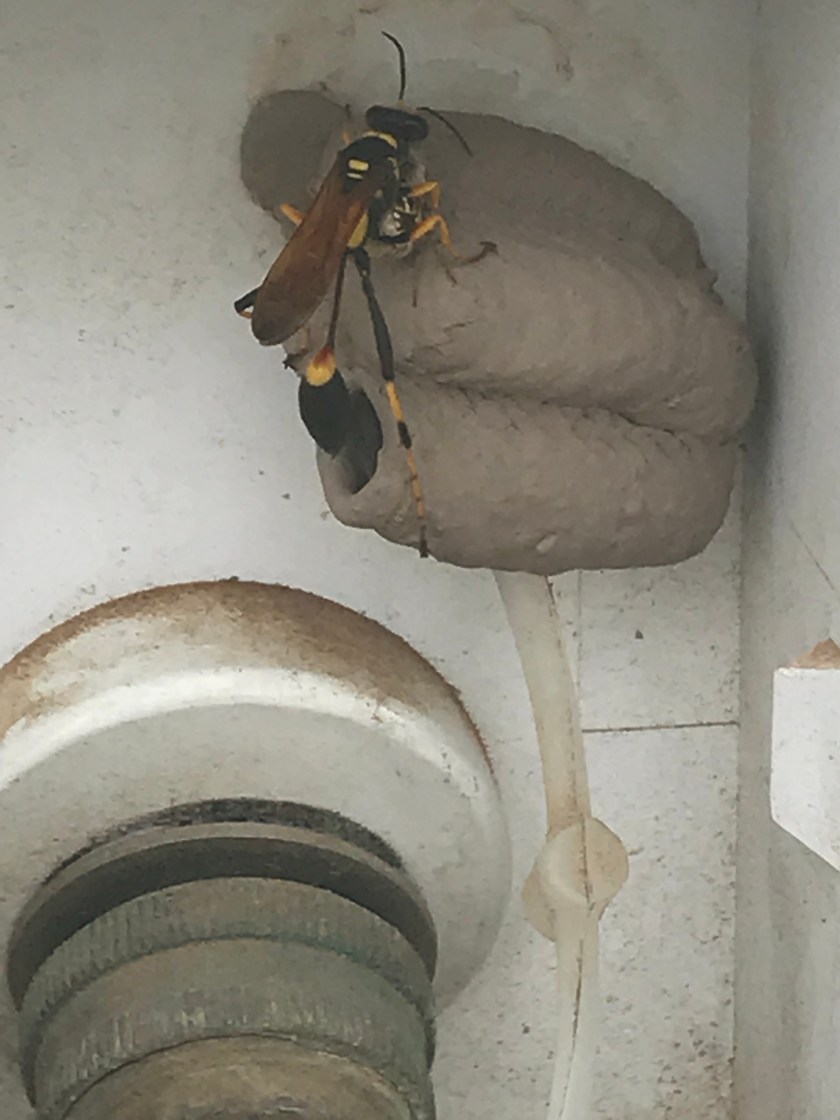
Must be Tarantula season. We have seen a number of tarantulas since we have gotten back from Michigan.This is what happens with a 160 LB dog isn’t looking where she steps and steps on a tarantula.Found this nest in the water supply access panel of the 5th wheel. Mama wasp came along shortly after. Cheryl did some research and identified this as a mud dauber wasp. Thankfully they are not aggressive toward humans as she was clearly not happy when she returned to find I had knocked down her nest. They kill spiders to feed to their young so Cheryl is more than happy to have them around as am I – just not in our fresh water supply access panel.
Hi every one! Hope every one’s summer is going great. Mine is generally going well albeit with seemingly little progress on the various projects.
A word of warning. This is a rather lengthy post. On the bright side, your reading efforts will be rewarded with both laughs (albeit at my expense) and some pics.
Hurricane Bud which ran up the west coast of Mexico was forecast to take the same path as a couple of other hurricanes that hit a few years back that caused major flooding and damage to roads in the area. Precipitation from Bud was forecast to hit our area the afternoon of June 15 and last through June 17. With that in mind, I spent the afternoon of Thursday June 14 cleaning and organizing the electronics shed. Yep. I prioritized cleaning and organizing over other project work. You might say that cleaning and organizing the shed was a monumental project in and of itself. The shed had gotten to be such a mess that I couldn’t find anything in it and there was barely a path to walk from the door to the back wall for access to the control panels and breakers. I moved nearly everything not nailed down out of the shed, setup a shelving unit I bought from Walmart in Douglas the night before, then put every thing back in the shed in an orderly manner. Wow! I can actually find stuff now and I have room to put the table saw in the shed. The morning of June 15 I moved some dirt around with the tractor to create a berm on the west side of the build site near the fence line to minimize any rain runoff from coming directly through that area. I also took care of a few other house keeping matters in preparation for a weekend of rain. The rain hit Friday within an hour of me calling my prep work “good enough (I hope!!)”. It was the first rain we have had here since February. Nothing too exciting. I spent the evening first cleaning the trailer a bit then relaxing and watching some movies.
Saturday morning, the rain had paused and I thought it was a good time to take the trash and recycling to the weekly trash and recycling pickup location. While collecting trash and recycling stored in the electronics shed, I spotted evidence of water leak in shed roof. I followed signs where the water ran and found that it had pooled on top of one of the batteries. YIKES! That is a fire waiting to happen! I carefully mopped up the pooled water. I then climbed up on the shed roof to assess condition of “temporary” tarp that has been there since January. There were no obvious holes but obvious signs of weathering/deterioration of the tarp from the sun so I’m guessing there were many small holes that the water was penetrating through. We still had rain forecast throughout the day, so I needed to take corrective action ASAP before the next round of rain hit. Hmmm… Think. What are my options? Just needs to last for the day as next few days are forecast to be clear and I have all the material I need to put on a long term roof with turbine vent for cooling (roofing material was delivered Friday). Tape down garbage bags? That is certainly not ideal. Have a couple pieces of heavy duty pond liner but one is too small to completely cover right to left across the slope so no go there. Hey, what about the metal roofing I bought from Boyd months ago to use on the shed for long term but decided against it due to perceived challenges with flashing around the vent. Yea, can make that work for a day. I laid three 2×4’s across the slope to support the various metal roofing scraps. I then laid the various pieces of metal roofing across the support 2×4’s. Now, how do I want to secure them? As this is only temporary, I don’t want to nail/screw them down. Think. What do I have available to me? I have 2x4x12, rope, and ratchet tie downs. Solution determined. Lay three 2x4x12’s across the top of the metal roofing pieces and tie them down to exposed pallet slats near the bottom of the shed. Crap! Here comes the wind. I’ve got to get these tied down quickly. I would say I got them secured just in time, but I was finishing securing the last 2×4 in the wind and rain. None the less, I got them secured before the wind caught and sent them sailing through the air.
So much for a trash run. Next weekend.
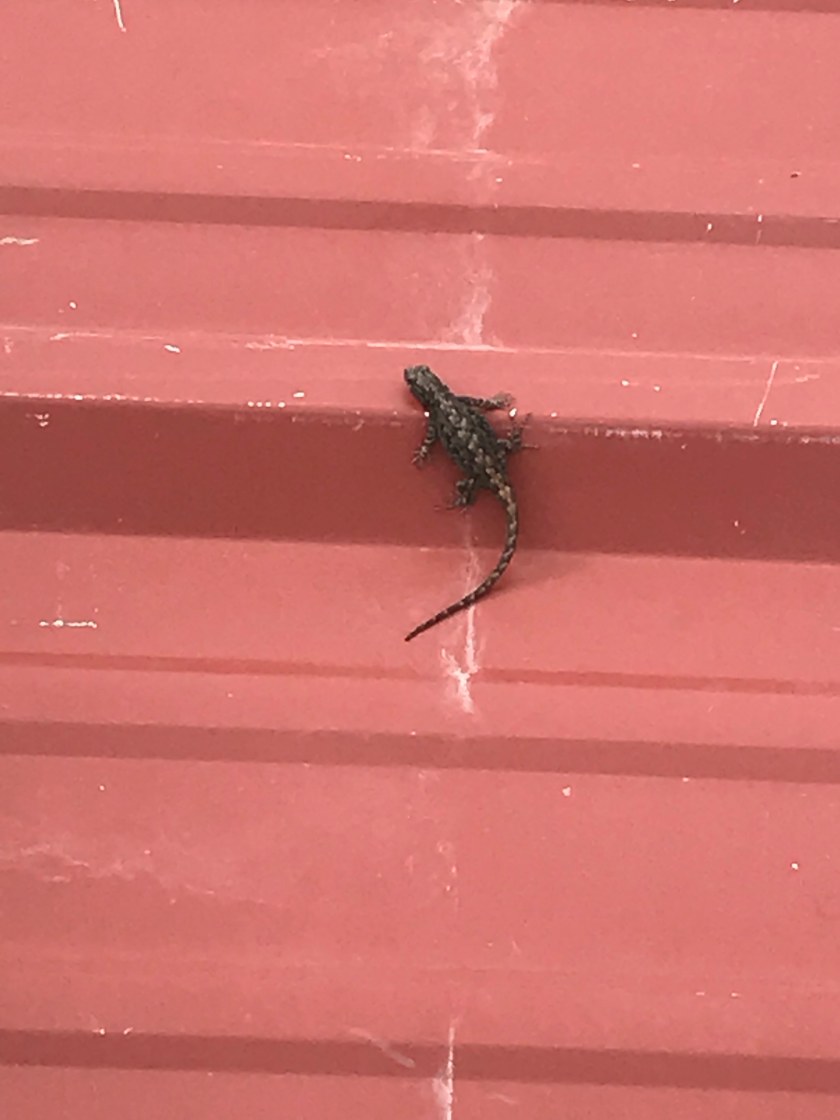
Cute little lizard I found on the roofing material as I was collecting it to put on the shed roof.
Temporary metal roof put on the day prior to keep rain water out of the interior of the shed.
We got a fair bit more wind and rain Saturday afternoon and night than what we had gotten Friday afternoon and night. A check of the interior of the shed Sunday showed that everything was perfectly dry. Whew!
Thankfully Sunday was sunny and there was no additional rain in the forecast for days. With that in mind, I removed the metal and 2×4’s I had put on the day prior and proceeded to remove the tarp so I could put on the rolled roofing. Sadly, the decking was wet and needed a day or so to dry out. Hmmm… what to do with my time now? I sat in my lawn chairs, enjoyed the unseasonably cool temperatures, looked at the shed, and let thoughts flow through my mind. You know… It would probably keep the inside of the shed much cooler if I were to insulate the roof. I can envision securing foam board insulation to the roof. I could then apply the rolled roofing over top of that. Seems like a sound and worth while idea. I don’t want to incur any unnecessary delays in getting the roof on though. I have a project completion deadline of June 28 because monsoon season starts around July 1 and I really don’t want to cut it that close. It is only 3:30, Lowes is only 90 minutes away and they are open until 8PM. I decided to make a hastily conceived road trip. I tried to work through in my mind how everything would go together and updated my shopping list accordingly and off I went.
Lowe’s didn’t have the additional asphalt primer I decided I wanted to ensure I had enough for the project but they did have foam board insulation that would work and liquid nail I would use to secure it to the decking. As I was walking from the store to the truck it occurred to me that I had forgotten the rope I had intended to bring with me to wrap around the foam board to keep it all together for the drive home. That was over and above the tie down ratchet straps I had with me to secure the load once loaded. That need for the rope became very apparent as I was preparing to load the board from the cart to the truck. As I removed the top sheet from the stack and was doing my best to control it, the breeze started to pick up the next sheet in the stack. I quickly put the one I had in my hands down to try to hold the stack of sheets down. Unfortunately I was positioned down wind from the sheets so I had very little control as the wind decided I wasn’t unloading the cart fast enough and it started to help unload the sheets of foam board from the cart for me. I have no recollection of the volume and extent of the profanity and altogether obscene language that came out of my mouth as I gave up holding down the stack and just started to load what boards I could get my hands on while the next two in the stack started to explore the parking lot with the aid of the wind. Thankfully, two shoppers who must have heard me came to my aid (one at a full run). With their help, we corralled the wayward sheets of foam board and got them all safely (albeit slightly damaged) loaded into the truck where I securely strapped them down for the ride home. A quick trip to Home Depot for the asphalt primer, then a break for a Father’s day dinner in Sierra Vista. A stop at Walmart to pick up a rolling pin to use to roll down the roofing material as none of the hardware stores had a purpose made roller for that job in stock. Before finally heading home a quick stop at the gas station to top off as is always the ritual when I am in town (when I have my wallet with me).
It was windy Monday and Tuesday and after my experience in the Lowes parking lot, I had no intention of dealing with that foam board in the wind. Tuesday I walked around two lengths of fence line that had the 6th strand of barbed wire added half way between the previous bottom strand and the ground to deter Sasha from walking under the fencing to explore beyond the fence line. I moved large rocks into the low sections of the fence line where she could still easily crawl under. Luckily it was the last rock I needed to move when my dumb ass once again crossed my legs while walking in my work boots and managed to once again hook the two boots together while in motion moving a 40-50 lb rock. That could have gone wrong in so many ways but thankfully an off balanced hop ramming my thigh and the rock together also managed to unhook the boots from each other allowing me to regain my balance. Whew! That was close! I must really do something differently with these boots.
Before calling it quits outside for the day, I also noted that the foam boards were sagging as one end of the stack was being supported by the tailgate that was up. I decided to put the tailgate down so they could lay flat. After that, I relaxed and used the time to try to get caught up on some of the youtube channels I subscribe to.
Wednesday, I was on a call doing some training with a colleague when I heard some strange and unnatural noises coming from outside. Any guesses? I looked up and saw sheets of foam board flying by the window and bouncing along the ground. I immediately excused myself from the call followed by yet another string of profanity as I searched for my shoes. Thankfully it was not a steady stream of wind but just a brief albeit very inconvenient wind gust that unloaded every sheet of foam board from the bed of the truck. I retrieved the sheets of foam board and securely strapped them into the back of the truck laying flat. My mistake had been dropping the tailgate and not reorienting and securing the tie down strap. Instead I had previously left it laying lose over the top of the foam board. Then back to work I went. After work, I picked a couple of minimally damaged boards and glued them to the roof decking with liquid nail. While I did not get the panels lined up exactly on the decking like I wanted, they were now glued down and they were good enough. Thankfully that was over all a relatively uneventful task as the wind decided to take a day off and not surprise me any more than it had earlier in the day.
Shed roof with foam board glued down. You also get a peek inside the newly organized shed and a look at my WiFi access point and two video cameras.
I took a vacation day Friday and it was the day to put the rolled roofing on. Or not. The more I looked at the roof, the more I wanted to install fascia boards. I had originally planned on metal roofing and thought I could get by without the fascia boards but the more I looked at it and thought about it, I thought omitting them was a bad idea. So, I spend some time Friday morning pondering how I wanted to add fascia boards given the decking and foam board was flush with the roof rafters on the up and down slope sides of the shed. I also didn’t want to make a special trip to town again this week for fascia boards, so the plan was to use 2×4’s which I had readily available. I could cut the rafters back to make room for the 2×4 fascia boards under the decking but that would not give much room for adding foam board and siding to the walls (I bought foam board for the walls as well). I could simply add the fascia boards to the end of the rafters and somehow extend the decking/insulation that couple of inches on both ends of the shed. In the end, that is what I decided to do.
Before I got to work on that though, Francisco came over to help me put the cap back on the truck and work a bit on the fence. As I was walking into position to help pick up the truck cap, I stepped carelessly on uneven ground and rolled my ankle. I went down in a flash. There was no “slow motion” fall there, more like: BAM! I’m suddenly laying on the ground. No time to react, try to catch myself, or otherwise control the direction of my fall. Francisco asked in Spanish if I was okay, and I responded in Spanish that I didn’t know. I slowly accessed locations of pain – ankle (shocking I know) and same knee. I slowly got to my feet and tested my ankle. It held with only discomfort, no severe pain. My arm felt a bit strange so I took a look at it.
Hey look! I’m a human pin cushion. Zoom in to the pic to get a better look of the cactus spines.This cactus had way too many spines so I decided to remove some of them with my arm.
It seems that I fell into a cactus on my way down. Given the spines weren’t causing me any discomfort to speak of and Francisco was there to help me put the cap on the truck, after I walked a few seconds to confirm proper operation of my ankle and knee, we muscled the cap up onto the bed of the truck.
I took my shirt off to get the spines off me. That mostly worked…
No, that is not all hair. There were a dozen or so spines that had penetrated my shirt and had hooked into my skin. I sat on the tailgate of the truck with a pair of tweezers removing cactus spines for about 3 minutes. Thanks for the tweezers Pete!!
After securing the truck cap to the truck bed, putting myself back together, and changing into my work boots for extra ankle support, I spent the day installing the fascia boards, and extending the insulation and decking. By the way, I finally got smart with my work boots. I wore tall socks and put my pant legs on the outside of the boots covering the lace hooks. Anyway, back to the shed. I had a scrap strip of ply wood matching the thickness of the decking so on the front of the shed I just attached that to the top of the fascia then cut a couple strips of foam board to glue to it. It worked out okay. I figured that was all okay as it is not a load bearing part of the structure. I took a slightly different approach in the back. I had spray foam for doors and windows that I never used for some long forgotten project. I used that to fill the gap I had between the two sheets of insulation (I did mention that I did not get them exactly where I wanted them, right?). I set a tape covered 2×4 over that seam so prevent the foam from over expanding above the level of the foam board. I then nailed up taped covered section of ply wood to the outside face of the fascia board with the top edge slightly higher than the level of the foam board. I then filled the resulting gap with what was left of the spray foam. I ran out so I didn’t quite get as much in the gap as I had planned but hoped it would expand sufficiently to fill the gap completely. I also laid a tape covered 2×4 over this gap to prevent the foam from expanding above the level of the foam board. The temp got to 105 and I was a bit lame from the fall, but I worked at a slow and steady pace the rest of the day drinking ample water and got a fair bit done. Surprisingly, the heat really didn’t bother me. I did notice that the temperature in the shed was noticeably cooler than it has been in the past on days around this temperature.
Pic after fascia boards were added before extending the level of the decking and adding a couple inches of foam board.
Big plans Saturday. Finish that roof! Battled 10-15 MPH winds most of the day while putting on roof.
Started by removing the form for the spray foam to see how it did. It didn’t expand and fill in the gap along the back edge as I had hoped, but I think (hope) it will be good enough. The board that was laid on the seam between the foam boards was not exactly flat so the foam expanded above the foam boar to some extent in many locations. At this point, I don’t care, I have to soldier on. The seam runs up and down slope so there is no real harm in having a high spot along that seam (it won’t cause water to pool). Next came the asphalt primer. I am SOOO glad I was wearing gloves, dust mask, eye protection, and long sleeves. I could only find the primer in spray cans. With the wind, even positioning myself upwind and with using a board as a wind block, probably only 80% of the spray was going where I wanted it. When I was done, the mask and safety glasses were specked black as were my shirt and wrists where the I had failed to make sure the gloves and shirt sleeves securely overlapped while I worked.
I started with priming a foot or so of the down slope edge. I let the primer dry then I used peel and stick door/window flashing to cover the downslope spray foam and folded it over onto the fascia board. Being my first time doing something like this, that effort did not go well at all. Note, if you let the sticky side touch itself – game over, you are not getting it apart. Forget it. After cursing a fair amount, I told myself: We still need to cover it with rolled roofing and we will be installing a gutter so no one will see, so get over it and move on. I then cleaned the rest of the foam board with a damp cloth and primed it when it was once again dry. I paused a few minutes to let the primer dry, then I covered the seam between the two sheets of foam board with the door/window peel and stick flashing. I had learned a few things from my previous attempt so this went marginally better. I was working from top of the roof down to the bottom. The wind was not helping as it was blowing the disposable peeling material pretty much unpeeling the roll of material on it’s own. While I was working to press down the flashing I had just unpeeled, the flashing wanted to roll down and apply itself whether I was ready and in the necessary position on the roof or not. Needless to say, there was a fair bit more cursing and a few undesired wrinkles in that application of the flashing as well.
Next came the first course of peel and stick rubber roofing material. Yep, you guessed it. Continued wind and substantially more cursing. I got about half way across the shed roof and took a grown up timeout. I stopped working, and simply sat on the shed roof for a few minutes calming and clearing my mind. With a calm a clear mind, I finished that course of the roofing. The wrinkles in the roofing material where there. Nothing I was going to do about it. Make the best of it and move onto the next course of material which should be easier as there was not a long flap of material to overlap over the down slope of the roof onto the fascia board for the wind to blow and make it stick to itself.
And it was easier and went well. Until…. I got to the end and realized I had cut it about 5 inches shorter than I should have. I had just enough to make it over the edge of the roof but not enough to extend down onto the fascia board as I had desired. More cursing. Stop and think. Okay. Apply a strip of window and door flashing along the fascia which will give the roofing material something more solid to stick too as opposed to only foam board. Done and good enough. Moving on. Next course. I made sure that I cut it long enough. By this time, I pretty much have my application methodology figured out for this stuff.
Picture of the first two courses of roofing applied. The two garbage bags have boards in them that I use to distribute my weight on while working on the foam board. I put the boards in the garbage bags to minimize the amount of dirt transfer from the boards to the primed and roofing material ready surface. Like my pretty rolling pin? Like my wrinkles in the roofing material on the back fascia? Gutter will mostly hide that!
After the third course of rolled roofing material, it was time to pause and install the 12 inch turbine roof vent. Generally speaking, that went as planned. Identify where in the roof I want it to go. Mark the center from inside the shed and drill a hole there. Stick a long screw up threw the hole so it is easy to find from on top of the roof and I can use that screw as the center of a compass to draw a circle. I’ve used string and pencil as a compass before but that usually doesn’t come out as nice as I like. Think… What alternatives are there. Look around. What is available to me. Ahh.. got it. I spot a rectangular piece of ridged card board. Perfect. Put two holes twelve inches apart and I am golden. One hole for the screw through the roof and one hole for the pencil. Done. Ready to go. Climb up on the roof. Put the cardboard compass on the screw and…. WAIT… OMG.. You dumb ass… That would have been an epic mistake. Anyone figure it out yet?? Geometry lesson. Objective: 12 inch diameter hole Method: use a compass to mark the hole so I know where to cut. When using a compass to mark a circle, you set the compass for the radius which is half the diameter. I had set the compass up for 12 inches which would mark a 24 inch hole, not a 12 inch hole. Of course I didn’t have my tape measure with me on the roof so back down to the ground to punch a new hole in the cardboard at 6 inches to create the desired 12 inch circle. Back to the roof, mark a nice circle, drill a hole with a spade bit so I get my jig saw in there to cut out the marked circle. Cut the circle. Silicone the hell out of the bottom of the vent base. Nail the vent base into place putting a dab of silicone under each nail head before I drive it down into place. Add the vent riser adjusting it so it was level then secure it into place with the screws that came with it.
My corrected “compass” and the circle it helped to scribe. Can’t tell where that up/down slope seam is can you? Geeze! Makes me wonder if I would have been better off leaving the air gap.
Hey! Someone cut a hole in my roof!
Get my protective gear all back on and spray more asphalt primer onto the base so it is ready to receive the final course of rolled roofing material.
At this point, it was getting late in the afternoon. I knew I had enough time to push through and complete the project before dark, however, I decided that was not a good idea. Having to unroll around the vent is not going to be easy. I needed a well rested mind and spirit before I tackle that.
Got cleaned up, was tired and hungry. I had no leftovers to eat so I decided to go out to eat to the Portal Cafe. Christina, Dennis, and Gary were also performing at the Valley Lodge so stopped there for an hour and a half to enjoy their musical performance.
It was 105 again Saturday but with the wind and low humidity, the heat didn’t bother me directly. Indirectly, although I took numerous breaks and drank water at each break, I had failed to drink sufficient water through the course of the day. I did not get dehydrated to the point of feeling heat exhaustion or anything of the like but my kidneys let me know that I screwed up. Nothing a gallon of water and a bit of time couldn’t correct.
Besides enjoying the night out to unwind a bit in a social environment, I’m also glad I took the time to write my journal entry this morning because a methodology for laying that last course of rolled roofing material came to mind. I think I have thought it through enough that it will go smoothly. Get dressed and head out confident. I take some measurements needed for my plan. I unbox the roofing and unroll it so I can cut it to length. I unroll all of it. It is about three feet short of what I need. UUUGGGGHHHH!!!! <insert more profanity here> Are you kidding me? Take a deep breath. I can do this. Project deadline is Thursday night. Go inside and check website from where I bought the last roll. Free ground shipping. Great, but that doesn’t do me any good. No options presented to change shipping method to get it here faster. UGH! Think. Wonder if I can find that product on Amazon. Yes! More expensive, but I think the two day shipping is worth the extra $20 in this case. So I order it. ETA: Wednesday. Talk about cutting things tight!
With that, I switched gears to work on building that seat that I believe I mentioned previously. I sanded it and got the first coat of stain on it. Sadly, it is not the work of art or have the level of craftsmen ship I would have liked. Like everything else in this phase of building, it doesn’t have to be pretty, just functional.
I spent the rest of the day working in the trailer splitting time between the computer, cooking, and cleaning.
Battery charging observations.
I was getting the batteries to charge to 48 volts during the winter/spring but this summer they have only been charging to 47 volts and that last volt at the top end is a big deal. 1 volt at the top end of the batteries capacity is actually a lot more energy stored than 1 volt at the lower range. That means if I chose to drain the batteries down to 39 V instead of 40V, there is a fair bit less power consumption needed to use that 1V capacity than there is from 48 down to 47. The fact that the system was stopping it’s charging cycle at around 47V even though it was configured to go to 48V was really bugging me. I had pondered if it had to do with the heat (upper 90s and low 100’s for the last few weeks). I got my answer June 16 and 17. With the temps in the low 70’s, the batteries charged to 48 volts both days.
I also observed while it was raining with complete cloud cover, I was still getting between 1k and 1.5k watts from the panels. That was around the same power I was drawing from the generator when I was using the generator to charge the batteries. My batteries are usually fully charged before the sun is at it’s peak on a sunny summer day. The peak I see the system absorbing from the panels is around 3.8 – 4K watts. All the panels together are rated just below 6K watts. I have no doubt I could get the full 6k from the panels mid summer’s day should the system have that level of demand. Bottom line, I have more than enough power available from my solar panels even on cloudy days for the foreseeable future.
Okay. It is way past my bedtime. Tomorrow will definitely be a coffee day.
One year ago today I started a grand adventure leaving my home state of Michigan, driving across country with my dog, cat, and trailer in tow to Arizona. It has been quite a year! While I vastly over estimated the amount of progress I would be able to make in a year toward building infrastructure and the home we plan to retire in, I made progress none the less.
I built a shed to house electronics for the solar system and the computer network with a ton of help from my new and good friend Rick.
I got internet and a WiFi network operational at the property enabling me to live and work there.
I got the solar system completely installed and operational.
I got a 5000 gallon water tank delivered and filled with water so I would have water available at the property.
I acquired a second RV to provide space and privacy for my wife, daughter, and I who will all be living on the property starting this summer.
I acquired a tractor with back hoe to move earth and assist with various projects in the years to come.
I started a war with the mesquite shrubs. I expect it to be a multi year war but I have confidence that my trusty tractor and I will be victorious in the end.
I got (paid to have installed) a fence to keep the cattle out around the area I plan to develop over the next 5 years
I forced myself out of my shell / comfort zone and made a conscious effort to make new friends and socialize. The end result is I have a number of friends out here now. More friends that I am keeping in touch with than I’ve ever had at any one time in my adult life.
I spent about a month or so back home in Michigan.
I went on two business trips out east.
Had friends from Michigan come to visit.
Had one of my sons come to visit.
Cured the tumor in my dog’s eye by switching her from commercial dog food to home cooked food.
Put my cat down as I didn’t catch his tumor in time and it got the better of him. For what it is worth, I will never feed my pets commercially made food again. Home made food is both cheaper and healthier for them.
Shot at a rabid fox with my rifle and missed. My heart just wasn’t in it even though I knew it was the right thing to do. In hindsight, I wished I had seen it through and put him down.
Shot at a rattle snake with my neighbors shotgun – hit but did not immediately kill it (I blame the miss on the failing light of day as it was nearly dark). Saw him a couple days later in the drive. Left him alone as he wasn’t in our immediate living space. Haven’t seen him since.
Sold one of two houses in Michigan.
Learned many lessons including to remember my wallet when I go to town for shopping.
While I can’t find a record or notes of my weight when I left home, I do have notes back to Dec 2016 that I was 248 lbs. Given that I am now 204, I’m going to say I have lost 30+ pounds in the past 12 months. Not bad considering all the potlucks at Rusty’s where I found it very difficult to resist temptation (and failed to do so on many occasions) and meals I’ve eaten out where I’m eating high fat due to the corn chips, guacamole, and either corn tamales or bean burritos where I’m certain they have added fat for flavor. My target weight is 170 – 180 and I fully expect to get there in the next 12 months.
All the above and more while working full time.
I have a little over three years left to complete the construction of our house and various other structures planned for the property. Guess I better pick up the pace a bit.
I’m looking forward to a very productive year 2. With Cheryl and Rachel moving out here, I will have help with both the projects themselves and house keeping matters that currently take away time from working on projects.
Here are my objectives for the next year:
Move my wife and daughter from Michigan to Arizona to finally join me in this grand adventure.
Finish the outside roof and walls on the electronics shed.
Add 2 more batteries to the solar system to provide sufficient battery power to run two RV’s and lighting over night (currently just shy of the required battery capacity for that requirement).
Build a storage barn for compost pile, tractor, and other things that I wish to protect from sun, rain, and wild fire.
Build a small practice earth bag structure. I will likely use it to house water supply stuff such as water pumps, pressure tank, point of water distribution, and maybe some storage.
Build a carport for the RV’s. This will provide much needed shade to the RV’s in the summer months as well as a rainwater collection surface.
Plumb the RV parking area for water and wire it for electrical.
Chip the piles of brush that I have collected as while they are providing habitat for wildlife (road runners and quail have nested in them), they also add to the fire hazards around the property. Besides, I want the wood chips in place for the future garden and tree plantings.
Continue to collect brush and chips from residents in the valley who don’t want them for use in the future garden and tree plantings.
Do some earthwork to direct the flow of water runoff to where I want it.
Continue my war with the mesquite.
Plant some trees.
Train for and pass my pack test to be a wild land firefighter and join the local fire department as a volunteer.
Take some additional training to add value to the local volunteer fire department.
Continue my weight loss and reach my target weight in a healthy and methodical manner.
Take time for friends and family because they are what make time on earth enjoyable.
Take time for some volunteer work as that is what our community here runs on.
This is a sizable list of projects for a year, but I need to get as many of them done as I can providing I have the funds needed so I can focus 100% on building the house in year three with some experience and lessons learned behind me.
Special thanks to all of you who encourage me to document and share this adventure with you.
Surprise! I’m a week early for my two week post cadence. Or is that 3 weeks early for my monthly post cadence? 🙂
Let me start by sharing that I’ve worked today a bit on the blog’s web page. Given it was incredibly painful to scroll to the bottom of the blogs to read from the beginning or find something in the middle, I’ve added a “Table of Contents” menu item on the front page which you can navigate to various web pages that have links to the related blog entries. For those of you reading this via email, here is the link if you are so inclined to take a gander: https://seekingsimplicity.blog/table-of-contents
I know there are tons of improvements that could be made to the site, but there are only so many hours in the day and making the blog “pretty” isn’t on the to-do list. Maybe in 3 years.
Still making progress on wrapping up the solar system project. The last bit to do before I consider it complete (enough) is finish filling the holes. The ground rods are now all buried. I just have to finish filling in the monster hole I made when connecting the trenches for the power conduit between the solar panels and the shed and 2 of the 4 ground rods I buried for the project. I’ve got it about half filled in and should have it done this week. I estimate another 2 – 4 hours of work left to do on it.
As with most things I do, I’m filling in the holes the hard way – by hand with my operational tractor sitting idly by laughing at me. Why??? you ask. See the first sentence of this paragraph – I have a tendency to do things the hard way. Okay, seriously, there is a reason for my madness other than a new exercise routine. Here is my thinking. The ground is very dry out here, even at 4-5 feet down. I would think ground rods would operate more effectively with moist ground, so I devised a way to help with that. First, cover the rods with 2.5 – 5 cubic feet of peat moss. Wet the peat moss down for immediate improvement in conduction. Second, separate the dirt from the rock. This is where all the manual labor comes in. Not because I don’t want them mixed, but rather because I want to have nothing but a layer of rock on the top 6-12″ The space between the rocks in the rock layer will give water a place to collect when it rains and it will sink mostly straight down through the dirt to the peat moss which will hold moisture and share some with the surrounding dirt for the duration of the monsoon season and beyond. That is the intent anyway. During the monsoon season this year, I’ll make sure some of the water running down the landscape is directed to these trenches and that one over flows to the next and to the next.
I’ll do a blog post dedicated to the solar system later sometime after I get it all done.
I might have had the hole completely filled this week but I lost a day due to a nearby wild fire.
Yep. You read it right. Wild fire near by. VERY near by. I had cleaned up and walked out of the trailer to head to Douglas for some shopping and dinner given the forecast called for a chance of rain (it had been sprinkling on and off in the afternoon). For what ever reason I looked up and to the right at the mountains and said: “OH SHIT. FIRE!” I called it in but seems that I was late to the party as others had already called it in as well.
It was started by a lightning strike on the mountainside to the south west of me. No I didn’t evacuate. It was on a mountainside that had very little fuel to burn and was toward the top of the mountain. Fire will burn up a mountainside very quickly, but burning down a mountainside is a slower process. Initially the winds were out of the south driving the fire along the top third of the mountain in my direction (north), but thankfully the wind shifted direction and started blowing from the north which slowed the fire’s progression northward. Did I mention that winds change direction around here in the summer and you never know which way it will be blowing from. I suppose you could check the weather forecast and memorize the wind speed and direction in relation to time of day for each day. I digress. Back to the fire. The fire where it was didn’t worry me too much but I knew there was a risk that the winds could shift and blow embers toward the base of the mountain or a burning branch or cactus could roll down the mountainside igniting a fire at the base of the mountain which would be far more worrisome.
The Arizona Forestry wild fire fighters showed up about 15 minutes after I called it in (presuming they were already in route from the earlier calls). They spent a while assessing the situation. I went and provided them my contact information and offered them water from my tank should the need arise. Shortly there after a plane showed up and started circling the area. Probably 30 minutes after that a smaller twin engine plane arrived and also started circling the area at a much lower altitude than the original. Some time later a taker arrived. The twin engine got in front of it, they circled a couple of time. With the twin engine plane showing the tanker the path and location of where to dump, the tanker finally dumped its load. Then another tanker. And another and another. I lost count around 7 because I got a call from work to help with a problem, but I think there had to be more than 10. At one point I think there were 4 planes circling the area – the one higher elevation, the twin engine, and two tankers (might have been three tankers at once). I took video of a the first few. There was one I wish I had video of though. The tanker was diving to dump it’s load and it’s path after the dump was right over my trailer as it was powering up to climb after the dive and dump. Sadly that was while I was pounding away at the keyboard troubleshooting the issue at work while sitting in my lawn chair outside monitoring the fire fighting activity.
As they were dumping it was clear to me that the fire was also on the far (south) side of the mountain (might have even started over there) and that fire was far worse than the fire I was looking at on the north east side of the mountain. They dumped a lot of fire retardant over there compared to the side of the mountain facing me.
Regardless, by the time they wrapped up aerial operations, from what I could see the fire appeared to be down to just smoldering with small pockets of flame here and there. The firefighting crews that had showed up while the aerial assault was progressing ended up leaving for the night to return and begin their work the next morning. They posted a lookout at the end of my road and I imagine there were also overnight lookouts posted at other locations that had good visibility of the other side of the mountain which faces Tom and Alicia’s place.
The ground crew worked on the fire for two days to make sure it was completely out.
And now for the pictures.
Fire shortly after I spotted it and had called it in.My first phone camera through monocular photo.One of many tankers painting the mountain side red with retardantTanker after dropping his load. Note that the camera is generally level and he is still in a dive that he has to pull out of.A beautiful smokey sunset.After the aerial operations were over. Just a few smoldering hot spots that could be seen more easily at dusk.
I also have a fair bit of video that I took of them dumping retardant. Sometime I’ll sit down and piece the videos together into one video and upload it to youtube.